マニピュレータ型ロボットのURDF作成
Updated on: 2018-02-27
本セクションはマニピュレータのURDF作成及びGazebo上でのシミュレーションを説明します。
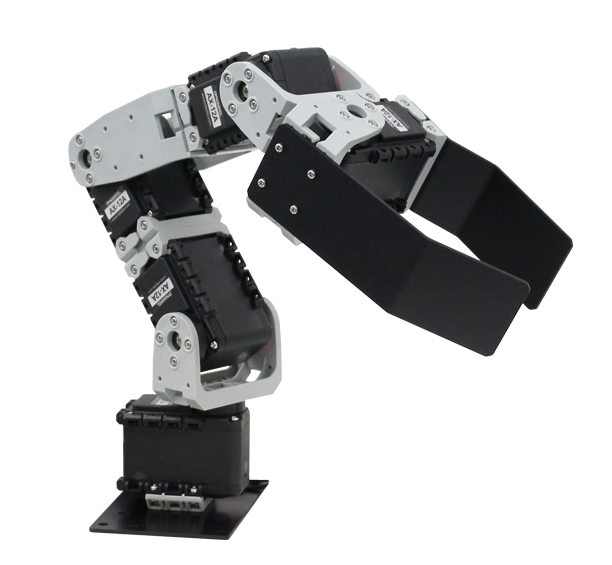
作成するマニピュレータ型ロボットは下記のRT製「CRANE+」です。
下記に作成するリンクを表示します。
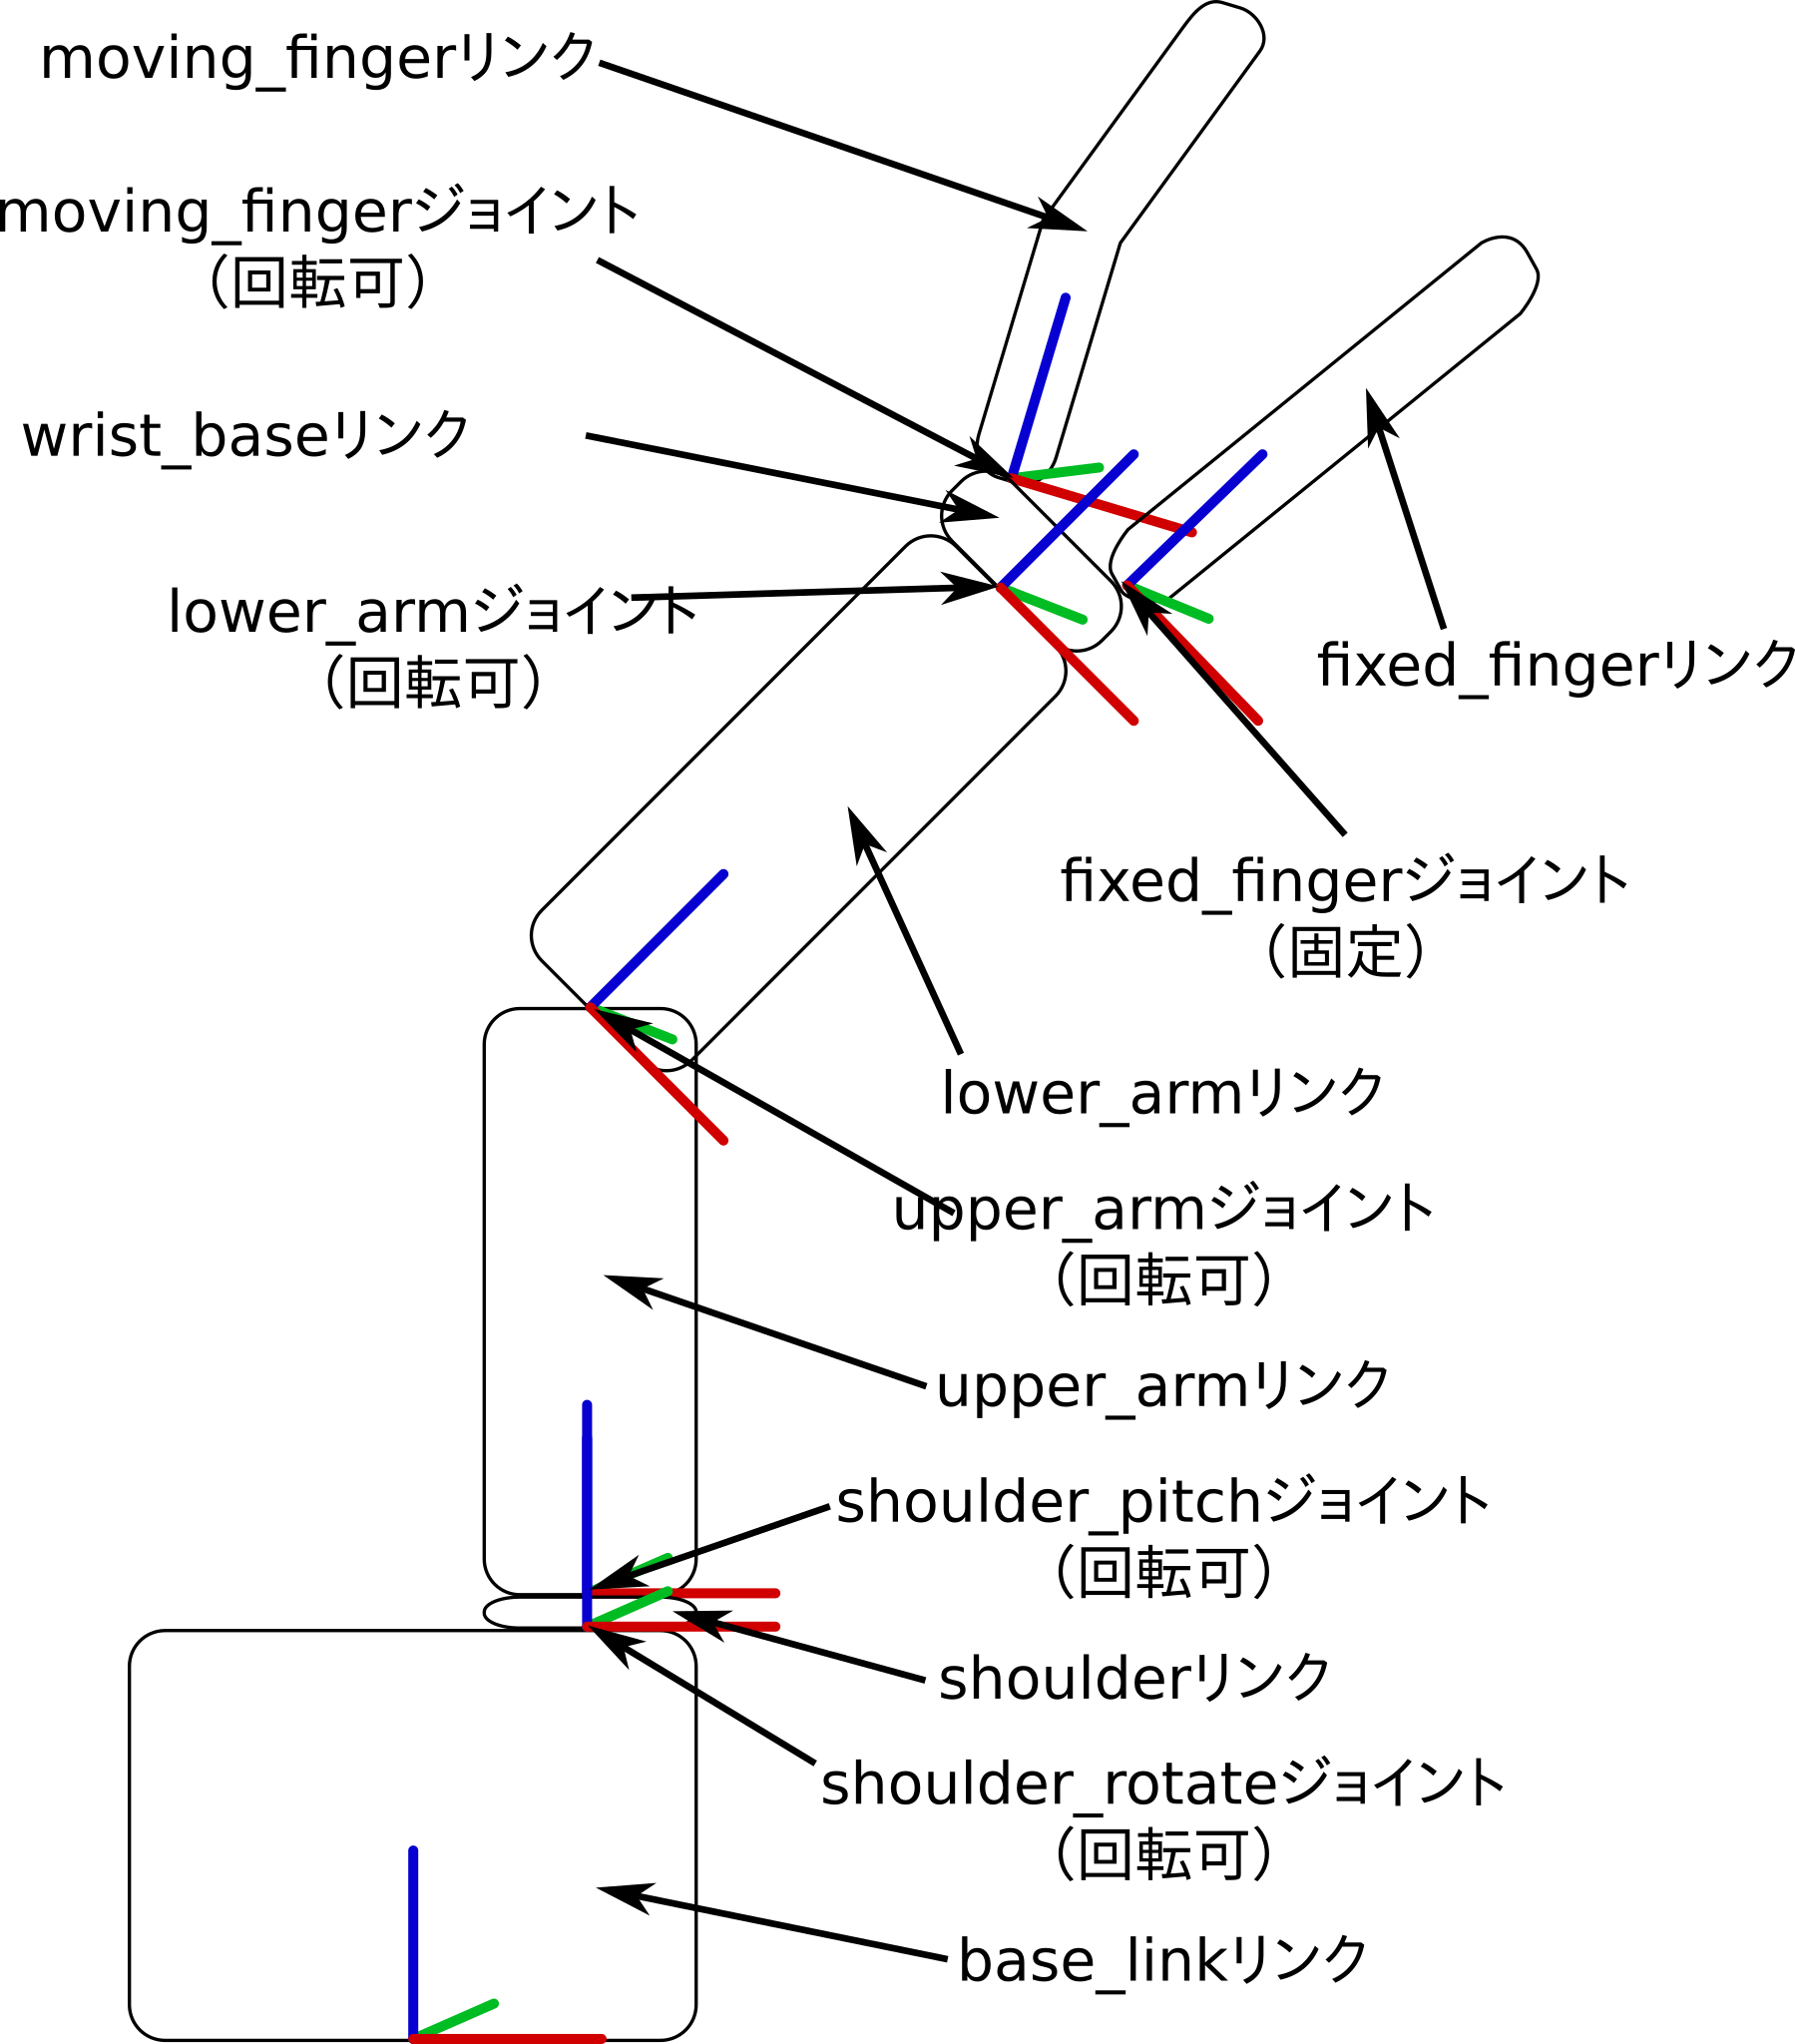
今回のURDFは、「xacro」というツールの利用でより簡潔かつ柔軟なURDFを作成します。
xacro
「xacro」というツールは、XMLようのマクロ言語です。 xacroには主に6つの機能があります。
-
マクロによってXMLテンプレートからURDFを自動生成すること
-
コンスタントの定義と利用によってURDFを読みやすくてメンテナンスしやすくすること
-
数学機能の利用でURDFを変更しやすくすること
-
別ファイルのインクルードによって複雑なロボットのURDFを複数のファイルに分散すること
-
if文によってURDFを自動的に現状のロボット等に合わせること
-
launch時に自動生成を行うことによっていつもURDFの最新版が利用されていることの保証すること
下記で上記の機能を一つづつ説明します。 そして上記の機能を利用してマニピュレータのURDFを作成します。
xacroファイルはXMLファイルです。 内容は主にURDFと同じですが、URDFの要素とxacroの要素が同じファイルに利用されます。 そしてファイルをURDFとして利用する前にxacroのプリプロセッサを通して、純粋なURDFファイルを生成します。
下記はxacroファイルの例です。
1
2
3
4
5
6
7
8
9
10
11
12
13
14
15
16
17
18
19
20
21
22
23
24
25
26
27
28
29
30
<?xml version="1.0"?>
<robot name="crane_x7" xmlns:xacro="http://ros.org/wiki/xacro">
  <!-- Include the Crane X7 generator macro -->
  <xacro:include filename="$(find crane_x7_description)/urdf/crane_x7.xacro"/>

  <!-- Link to provide the location reference for the arm -->
  <link name="base_link"/>

  <!-- Use the crane_x7 macro to configure a Crane X7 arm with desired joint
       velocities limit and lower/upper limits for the first joint. This
       allows accessing different operational areas, e.g. left-handed vs.
       right-handed robots. -->
  <crane_x7 parent="base_link"
              base_color="red"
              shoulder_color="white"
              shoulder_joint_cover_color="red"
              upper_arm_upper_color="white"
              upper_arm_lower_color="white"
              elbow_joint_cover_color="red"
              lower_arm_upper_color="white"
              lower_arm_lower_color="white"
              wrist_color="white"
              hand_color="red"
              joints_vlimit="4.81710873"
              shoulder_llimit="-2.97132"
              shoulder_ulimit="2.97132"
              logos_definition="crane_x7_rt_logos.xacro">
    <origin xyz="0 0 0"/>
  </crane_x7>
</robot>
短いファイルですが、このファイルは別のファイルをインクルードして、そしてマクロの利用でロボットモデルのインスタンスを作成します。 純粋なURDFファイルとなるxacroのプリプロセッサを通した結果は空行なしで513行です。 xacroの利用のおかげでURDFはパワーアップします。
URDFファイルでxacroを利用するためにxacroのXMLネームスペースを定義することが必要です。
URDFファイルのトップにあるrobot要素を下記のように変更することでxacroは利用可能になります。
1
<robot xmlns:xacro="http://ros.org/wiki/xacro">
その後、普通のURDFと同様に書けますが、自由にxacroの要素も利用できます。
マクロ
xacroの第一機能はマクロです。 マクロということは、XMLを出力するテンプレートです。 テンプレートを定義して、そしてURDFファイルの別の所でそのテンプレートを参照することによって一行が自動生成後何行でもなれます。 そしてテンプレートを参照するときに引数の渡すことで生成されたXMLのカストマイズができます。
下記は簡単なマクロの定義です。
1
2
3
4
5
6
7
<xacro:macro name="simple_link">
  <link name="a_link">
    <visual>
      ...
    </visual>
  </link>
</xacro:macro>
上記のマクロの利用は下記のようにします。
1
<xacro:simple_link>
そして上記の利用で下記のようなURDFが生成されます。
1
2
3
4
5
<link name="a_link">
  <visual>
    ...
  </visual>
</link>
マクロは単なるXMLソースの入り変えだけならあんまり力はありません。 なので、マクロは引数をもらうこともできます。
1
2
3
4
5
<xacro:macro name="joint_macro" params="name *origin">
  <joint name="${name}_joint" type="fixed">
    <xacro:insert_block name="origin"/>
  </joint>
</xacro:macro>
上記のマクロは2つの引数をもらいます。
nameは単なる引数です。
originは頭にアスタリスクがついているからブロック引数と呼びます。
- 引数
- プログラミング言語の関数と同じような引数です。
マクロを利用するときに引数の値となる文字列を渡します。
その文字列はマクロ内に指定された所で利用されます。
マクロ内にシェルスクリプトと類似な文法で利用する所を定義します。
${name}があれば、その引数の値に入れ替えられます。 複数回に利用することは可能です。 - ブロック引数
- マクロを利用するときに、マクロを呼ぶ要素内にある要素(ブロック)を生成されたXMLに利用します。
そのブロックの置く場所は
xacro:insert_blockで示します。 同ブロックは複数回に入れることは可能です。
上記のマクロは下記のように利用します。
1
2
3
<xacro:joint_macro name="wrist">
  <origin xyz="1 2 3" rpy="0 0 0"/>
</xacro:joint_macro>
下記のXMLが生成されます。
1
2
3
<joint name="wrist_joint" type="fixed">
  <origin xyz="1 2 3" rpy="0 0 0"/>
</joint>
マクロ定義に引数のディフォルトは定義できます。
下記はmy_paramにmy_valueというディフォルト値を指定します。
1
<xacro:macro name="a_macro" params="my_param:=my_value">
コンスタント
xacroファイルにコンスタントの利用によって、プログラミング言語と同様に数の変わりに変数名のようなことが利用可能です。 主に2つの理由でコンスタントの利用がおすすめです。
-
意味が分からない数字より意味が明確である名を読む方が分かりやすいURDFファイルになります。
-
同じ値を複数の所に利用すると、コンスタントとして記述すると変更が必要であれば一つだけの所で変更すれば済みます。
すなわち、コンスタントをよく利用すると、メンテナンス性が高いURDFが書けます。
マクロと同様、コンスタントは定義と利用が別々です。
定義は下記のように、xacro:propertyでします。
1
<xacro:property name="PI" value="3.14159"/>
上記はPIというコンスタントを定義します。
下記で利用します。
1
2
3
<joint name="my_joint" type="fixed">
  <origin xyz="0 0 0" rpy="${PI} 0 0"/>
</joint>
上記は下記のXMLに生成されます。
1
2
3
<joint name="my_joint" type="fixed">
  <origin xyz="0 0 0" rpy="3.14159 0 0"/>
</joint>
コンスタントはもちろんマクロの中にも利用できます。
xacroファイルでコンスタントはどこでも定義できます。
ただ、ROS Jade以上を利用するとxacroにネームスペースというコンセプトがあります。
マクロ内に定義するコンスタントはそのマクロの外に利用できません。
マクロの外にも利用したいコンスタントがあれば、マクロの外で定義することがおすすめです。
しかし、コンスタントの値はマクロの引数によって変わることはたまにあります。
この場合、コンスタントはマクロ内に定義することが必須です。
それでも外に利用可能にするために、定義内にscope="parent"またはscope="global"の指定が必要です。
数学の利用
URDF作成によく何かを計算してその結果を値として指定します。 例えばリンクの位置を複数の値の組み合わせで計算ことです。 変更があるとこのような計算した値はとても変更しにくいです。 もう一度計算することにエラーが起こる可能性があるし、計算方法すらもう忘れた可能性があります。
このような問題がないように、xacroに数学の機能があります。 計算方法をそのままxacroファイルに記述すると自動的に正しい値が計算され、生成されたURDFに書かれます。
数学の文法はコンスタントの利用と同じです。 下記は数学でジョイントの原点を指定します。
1
2
3
4
5
6
7
<xacro:property name="PI" value="3.14159"/>
<xacro:property name="link_1_height" value="2.5"/>
<xacro:property name="link_1_width" value="0.3"/>

<joint name="a_joint" type="fixed">
  <origin xyz="${link_1_height} ${link_1_width}/2 0" rpy="2*${PI} 0 -${PI}"/>
</joint>
下記のXMLが生成されます。
1
2
3
<joint name="a_joint" type="fixed">
  <origin xyz="2.5 0.15 0" rpy="6.28318 0 -3.14159"/>
</joint>
ROS Jade以後を利用すると、数学はPythonによって計算されるようになりました。
Pythonで可能な計算はxacroにも可能になったので、sin等のような複雑な数学でも利用可能になりました。
ファイルのインクルード
xacroファイルは純粋なURDFファイルと同様に大きくなることがあります。
メンテナンス性を考えるとファイルを分けることが便利です。
xacroのxacro:include要素を利用する、C言語の#includeと同様に、別のファイルに定義されたことが現在のファイルに利用できます。
すなわちインクルードされたファイルにあるxacroのマクロ等の利用は可能になります。
1
2
3
4
5
6
7
<xacro:macro name="link" params="link_name">
  <link name="${link_name}">
    <visual>
      ...
    </visual>
  </link>
</xacro:macro>
上記はlinks.xacroとすれば、下記のxacroファイルが書けます。
1
2
3
4
5
6
7
8
9
<xacro:include filename="links.xacro"/>

<xacro:link name="link_1"/>
<xacro:link name="link_2"/>

<joint name="joint_1" type="fixed">
  <parent link="link_1"/>
  <child link="link_2"/>
</joint>
下記は生成後の結果です。
1
2
3
4
5
6
7
8
9
10
11
12
13
14
15
16
<link name="link_1">
  <visual>
    ...
  </visual>
</link>

<link name="link_2>
  <visual>
    ...
  </visual>
</link>

<joint name="joint_1" type="fixed">
  <parent link="link_1"/>
  <child link="link_2"/>
</joint>
if文
構成可能なロボットのような状況であれば、URDFファイルを利用先によって変更したいことはあります。
xacroではif文でこんなことは可能です。2つの種類があります。
<xacro:if value="expression">valueがexpressionと同じであれば、要素の中身が生成されたURDFに残ります。<xacro:unless value="expression">valueがexpressionであれば、要素の中身は生成されたURDFにありません。
ROS Jade以後を利用すると、if文の判断はPythonで行います。
より複雑なif文が可能です。
launch時の自動生成
xacroのプリプロセッサとなるプログラムは生成されたURDFをstdoutに出力します。
おかげで、launchファイルにrobot_descriptionパラメータの定義でxacroの呼ぶことでxacroファイルを直接利用することが可能です。
URDFファイルを事前に生成することや保存することは必要ではありません。
launchファイルにrobot_descriptionの定義を下記のようにすれば、roslaunchを実行するときにxacroファイルからURDFが生成されてパラメータサーバに登録されます。
1
2
  <param name="robot_description"
    command="$(find xacro)/xacro --inorder '$(find my_package)/urdf/my_robot.urdf.xacro'"/>
可視化モデルの作成
これからマニピュレータのURDFを作成します。
少し無理矢理ですが、作成するURDFにboxとして定義するリンクは多いので、xacroを利用してより簡単なXMLを書きます。
下記の順番でURDFを作成します。
-
マニピュレータの固定されるリンクを定義します。
-
マニピュレータの腕を構造するリンクのマクロを定義します。
-
マクロを利用してマニピュレータの腕を定義するマクロを定義します。
-
マニピュレータのグリッパーをマクロとして定義します。
-
定義したマクロを利用してマニピュレータを定義します。
なお、下記のファイルに分散します。
manipulator_parts.xacro- マニピュレータの腕に構造するリンクやジョイントの定義するマクロを提供するファイルです。
one_finger_gripper.xacro- グリッパーの定義するマクロを提供するファイルです。
manipulator.urdf.xacro- マニピュレータのURDFを生成するためのトップファイルです。
他のファイルをインクルードして、そこにあるマクロを利用して
robotを定義します。
すべてのファイルはマニピュレータURDFようのパッケージに入れます。 下記でパッケージと空のファイルを作成します。
1
2
3
4
5
6
7
8
9
10
$ cd ~/urdf_ws/src
$ catkin_create_pkg --rosdistro kinetic manipulator_description
Created file manipulator_description/package.xml
Created file manipulator_description/CMakeLists.txt
Successfully created files in /home/username/urdf_ws/src/manipulator_description. Please adjust the values in package.xml.
$ cd manipulator_description
$ mkdir urdf
$ touch urdf/manipulator_parts.xacro
$ touch urdf/one_finger_gripper.xacro
$ touch manipulator.urdf.xacro
なぜこのように分散するかというと、再利用製のためです。 とくにマニピュレータはエンドエフェクタの変更することはよくあります。 アプリケーションによって違うグリッパーを付けたいことが多くて、さらにタスクによって自動的にエンドエフェクタを変更するマニピュレータもよくあります。 グリッパーを別のファイルでマクロとして定義すると、URDFを利用中のエンドエフェクタに合わせることは簡単になります。
そして、マニピュレータの腕に利用するリンクをマクロとして定義して別のファイルに置くと、そのリンクの違う組み合わせで新しいマニピュレータのURDFが作成しやすいです。 多くのマニピュレータはリンクの変更は不可能ですが、CRANE+のようにリンクの変更がしやすいマニピュレータもあるのでここでそれを支援するURDFの作成方法を示します。
マクロ等の定義はトップダウンの順にするので、最初はmanipulator.urdf.xacroにトップレベルのマクロの利用を書きます。
トップレベルファイルの作成
manipulator.urdf.xacroをエディターで開いて、下記の内容を入力します。
1
2
3
4
5
6
7
8
9
10
11
12
13
14
15
16
17
18
19
20
21
22
23
24
<?xml version="1.0"?>
<robot name="modular_manipulator" xmlns:xacro="http://ros.org/wiki/xacro">
  <xacro:include filename="$(find manipulator_description)/urdf/manipulator_parts.xacro"/>
  <xacro:include filename="$(find manipulator_description)/urdf/one_finger_gripper.xacro"/>

  <material name="black">
    <color rgba="0.2 0.2 0.2 1"/>
  </material>
  <material name="grey">
    <color rgba="0.75 0.75 0.75 1"/>
  </material>

  <link name="world"/>

  <xacro:property name="end_effector_base_link" value="wrist_base_link"/>

  <xacro:manipulator parent="world" end_effector_link="${end_effector_base_link}"
      link_colour_1="black" link_colour_2="grey">
    <origin xyz="0 0 0" rpy="0 0 0"/>
  </xacro:manipulator>

  <xacro:one_finger_gripper base_link_name="${end_effector_base_link}"
      base_colour="black" finger_colour="grey"/>
</robot>
下記はこの内容の説明です。
1
<robot name="modular_manipulator" xmlns:xacro="http://ros.org/wiki/xacro">
ロボットの定義を開始します。
xacroのXMLネームスペースを利用します。
1
2
<xacro:include filename="$(find manipulator_description)/urdf/manipulator_parts.xacro"/>
<xacro:include filename="$(find manipulator_description)/urdf/one_finger_gripper.xacro"/>
2つのxacroファイルをインクルードします。 ファイルが提供するマクロやコンスタントを利用します。
1
2
3
4
5
6
<material name="black">
  <color rgba="0.2 0.2 0.2 1"/>
</material>
<material name="grey">
  <color rgba="0.75 0.75 0.75 1"/>
</material>
利用する色を定義すます。
1
<link name="world"/>
空のリンクを定義します。 ここにマニピュレータを固定します。
1
<xacro:property name="end_effector_base_link" value="wrist_base_link"/>
数回利用する値に名を付けるためにコンスタントを定義します。 この値はエンドエフェクタのリンクの名として利用します。
1
2
3
4
<xacro:manipulator parent="world" end_effector_link="${end_effector_base_link}"
    link_colour_1="black" link_colour_2="grey">
  <origin xyz="0 0 0" rpy="0 0 0"/>
</xacro:manipulator>
マニピュレータの腕を定義するマクロを利用します。 パラメータでインスタンスをカストマイズします。
parent- マニピュレータを固定するリンクの名です。
マニピュレータの
base_linkはここに固定されたジョイントで繋げられます。 end_effector_link- 腕の先端につなげるリンクの名です。 このマニピュレータの先端はジョイントので、そのジョイントがつなげるリンクを渡すことが必要です。 リンク名はエンドエフェクタに利用する名と同じにします。
link_colour_1とlink_colour_2- リンクの
visual要素に利用するmaterialの名です。 <origin xyz="0 0 0" rpy="0 0 0"/>worldリンクの原点に対して具体的にどこにマニピュレータを設置するか指定します。 前舳はゼロので、中央に設置します。
1
2
<xacro:one_finger_gripper base_link_name="${end_effector_base_link}"
    base_colour="black" finger_colour="grey"/>
エンドエフェクタをマニピュレータの先端に付けます。
マクロの仮定義
次に、URDFを生成してrvizで確認できるように、両方の利用したマクロを仮に定義します。
manipulator_parts.xacroをエディターで開いて下記のXMLを入力します。
1
2
3
4
5
6
7
8
<?xml version="1.0"?>
<robot xmlns:xacro="http://ros.org/wiki/xacro">
  <!-- Manipulator macro -->
  <xacro:macro name="manipulator"
      params="parent end_effector_link link_colour_1 link_colour_2 *origin">
    <xacro:property name="PI" value="3.14159"/>
  </xacro:macro>
</robot>
one_finger_gripper.xacroの内容は下記にします。
1
2
3
4
5
6
<?xml version="1.0"?>
<robot xmlns:xacro="http://ros.org/wiki/xacro">
  <xacro:macro name="one_finger_gripper" params="base_link_name base_colour finger_colour">
    <xacro:property name="PI" value="3.14159"/>
  </xacro:macro>
</robot>
そしてrvizでURDFを確認します。
urdf_tutorialパッケージのdisplay.launchは自動的にxacroファイルからURDFファイルが生成できます。
移動型ロボットのURDFと同様にroslaunchでmanipulator.urdf.xacroのテストができます。
ただし、manipulator.urdf.xacroで別のファイルをインクルードしたとき、パッケージ検索の機能を利用したので、 ワークスペースをソースした上で起動しないとxacroはそのインクルード先のファイルが見つけられません。
1
2
3
4
5
$ cd urdf_fs
$ catkin_make
[省略]
$ source devel/setup.bash
$ roslaunch urdf_tutorial display.launch model:=src/manipulator_description/urdf/manipulator.urdf.xacro gui:=false
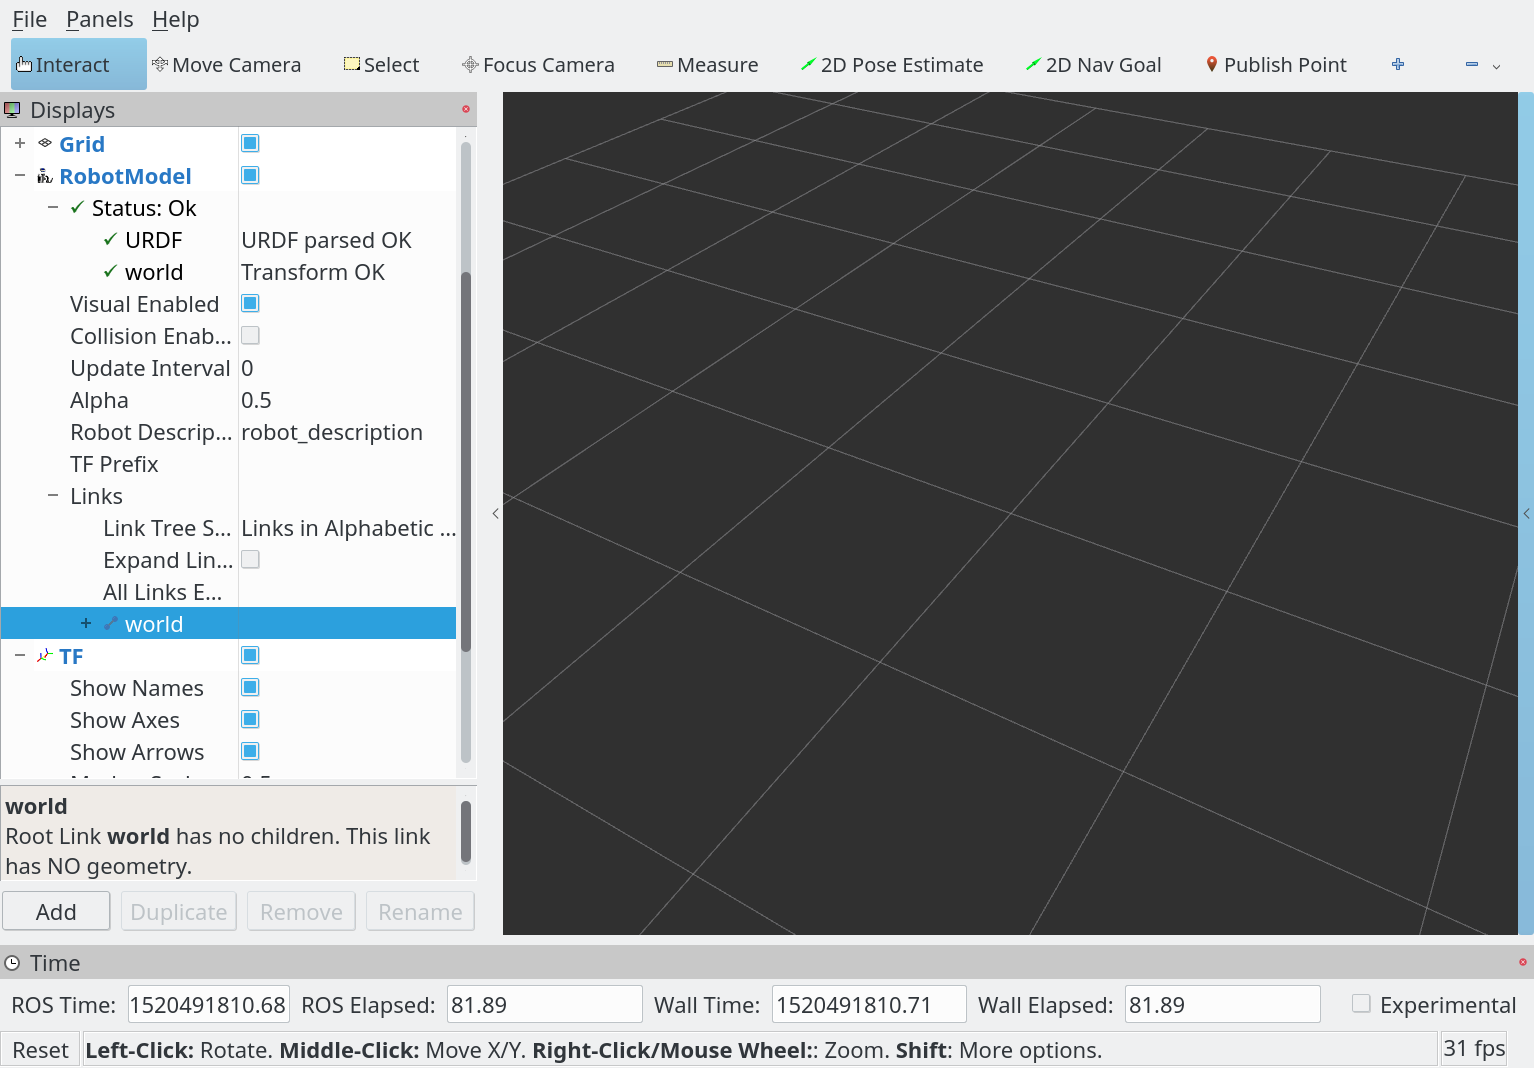
rvizは下記のように表示されます。
worldリンクはありますがそれ以外何もありません。
worldリンクはジオメトリがないので可視化として何も表示されません。
次にマクロの内容を入力し始めます。
ベースの定義
manipulator_parts.xacroのmanipulatorマクロ内に下記のジョイントとリンクを入力します。
base_jointはマニピュレータのbase_linkをworldリンクへ繋げます。
base_linkはマニピュレータのベースです。
1
2
3
4
5
6
7
8
9
10
11
12
13
14
15
16
17
18
19
20
21
22
23
24
25
26
27
28
    <joint name="base_joint" type="fixed">
      <parent link="${parent}"/>
      <child link="base_link"/>
      <xacro:insert_block name="origin"/>
    </joint>

    <xacro:property name="BASE_X" value="0.05"/>
    <xacro:property name="BASE_Y" value="0.032"/>
    <xacro:property name="BASE_Z" value="0.038"/>
    <link name="base_link">
      <visual>
        <geometry>
          <box size="${BASE_X} ${BASE_Y} ${BASE_Z}"/>
        </geometry>
        <origin xyz="0 0 ${BASE_Z/2}" rpy="0 0 0"/>
        <material name="${link_colour_1}"/>
      </visual>
      <collision>
        <geometry>
          <box size="${BASE_X} ${BASE_Y} ${BASE_Z}"/>
        </geometry>
        <origin xyz="0 0 ${BASE_Z/2}" rpy="0 0 0"/>
      </collision>
      <inertial>
        <mass value="0.1"/>
        <inertia ixx="1e-3" ixy="0" ixz="0" iyy="1e-3" iyz="0" izz="1e-3"/>
      </inertial>
    </link>
下記に行を説明します。
<parent link="${parent}"/>(2行目)base_jointの親リンクをパラメータとしてもらったリンクにします。 マクロを利用する所でマニピュレータをどこに固定するか指定できるようにこのようにします。<xacro:property name="BASE_X" value="0.05"/>(7行目と8行目と9行目)- リンク定義に数回利用する寸法をコンスタントとして定義します。 このコンスタントはマクロ外で見えません。
<box size="${BASE_X} ${BASE_Y} ${BASE_Z}"/>(13行目と20行目)- リンクのジオメトリにコンスタントを利用します。
<origin xyz="0 0 ${BASE_Z/2}" rpy="0 0 0"/>(15行目と22行目)- リンクのジオメトリの原点にもコンスタントを利用しますが、数学も利用します。
なお、シミュレータにも利用するつもりので物理的なデータをすでに入力します。 慣性のデータは簡単なデータにしています。 普段は正しいデータを計算するべきです。
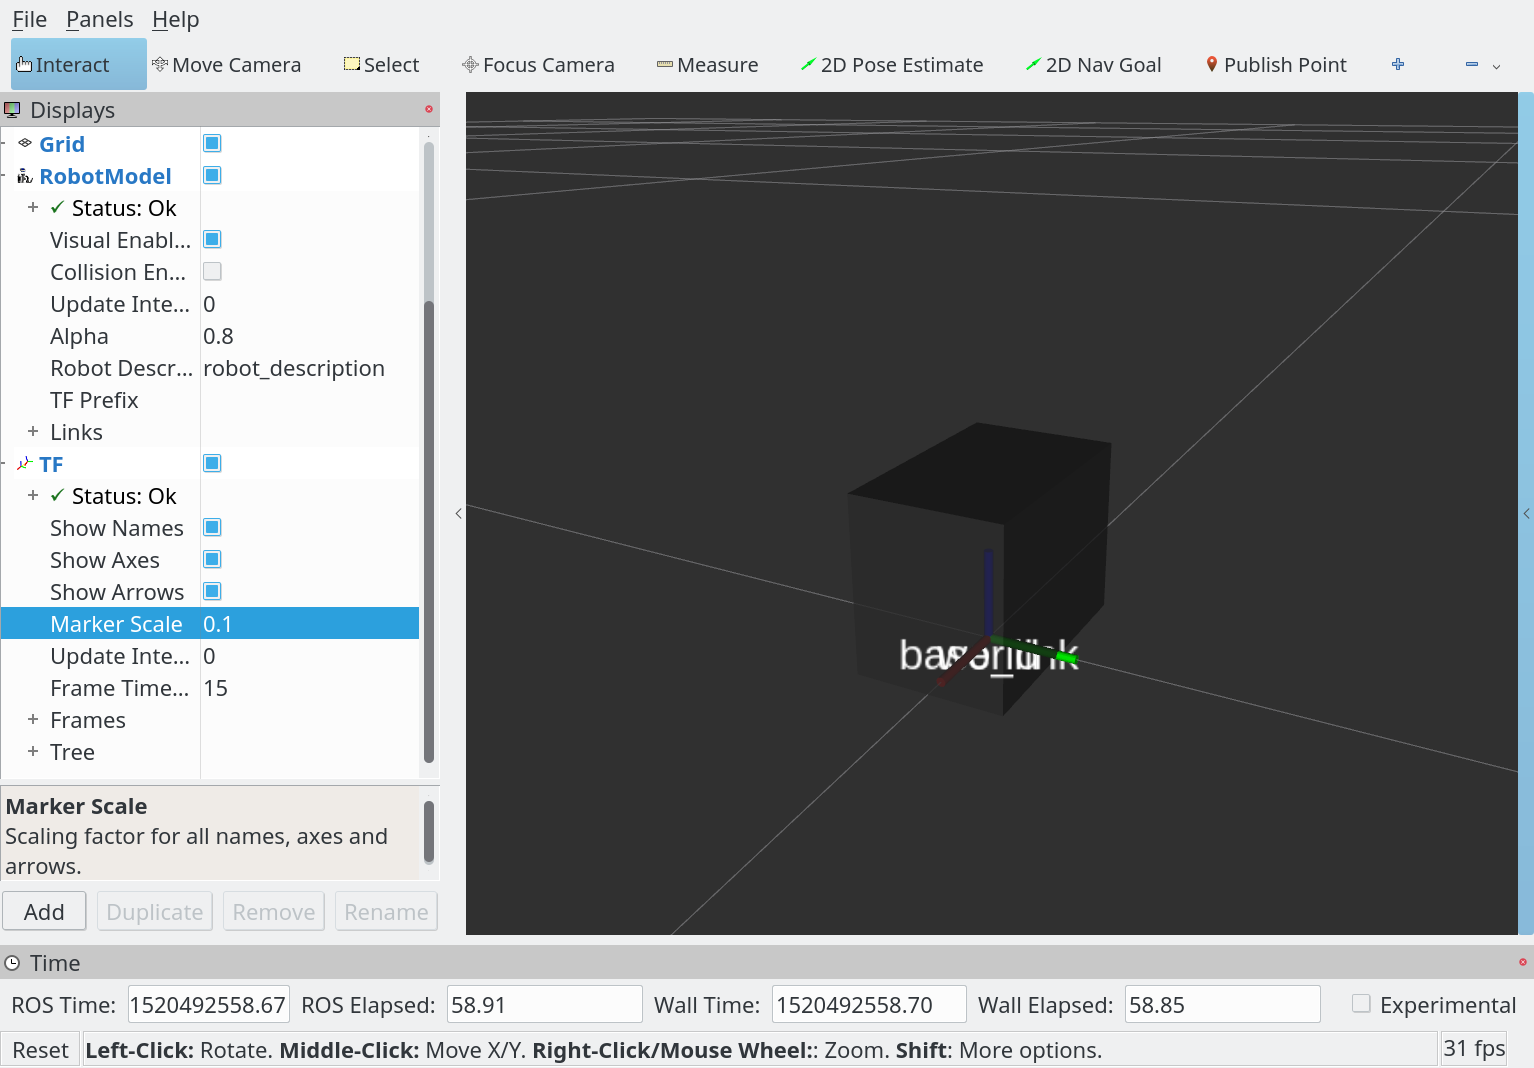
rvizで確認するとbase_linkが見えます。
1
$ roslaunch urdf_tutorial display.launch model:=src/manipulator_description/urdf/manipulator.urdf.xacro gui:=false
肩の定義
ベースと同様に肩を定義します。
manipulator_parts.xacroのmanipulatorマクロ(base_linkの下)に下記を入力します。
1
2
3
4
5
6
7
8
9
10
11
12
13
14
15
16
17
18
19
20
21
22
23
24
25
26
27
28
29
30
31
32
33
34
35
36
37
38
39
40
41
42
43
44
    <joint name="shoulder_rotate_joint" type="revolute">
      <axis xyz="0 0 1"/>
      <parent link="base_link"/>
      <child link="shoulder_link"/>
      <origin xyz="${BASE_X/2-0.01} 0 ${BASE_Z}" rpy="0 0 0"/>
      <limit lower="-${PI}" upper="${PI}" effort="30" velocity="${PI}"/>
    </joint>

    <xacro:property name="SHOULDER_X" value="0.025"/>
    <xacro:property name="SHOULDER_Y" value="0.0485"/>
    <xacro:property name="SHOULDER_Z" value="0.0375"/>
    <link name="shoulder_link">
      <visual>
        <geometry>
          <box size="${SHOULDER_X} ${SHOULDER_Y} 0.01"/>
        </geometry>
        <origin xyz="0 0 0.005" rpy="0 0 0"/>
        <material name="${link_colour_2}"/>
      </visual>
      <visual>
        <geometry>
          <box size="${SHOULDER_X} 0.005 ${SHOULDER_Z-0.01}"/>
        </geometry>
        <origin xyz="0 ${SHOULDER_Y/2-0.0025} ${0.01+(SHOULDER_Z-0.01)/2}" rpy="0 0 0"/>
        <material name="${link_colour_2}"/>
      </visual>
      <visual>
        <geometry>
          <box size="${SHOULDER_X} 0.005 ${SHOULDER_Z-0.01}"/>
        </geometry>
        <origin xyz="0 ${-(SHOULDER_Y/2)+0.0025} ${0.01+(SHOULDER_Z-0.01)/2}" rpy="0 0 0"/>
        <material name="${link_colour_2}"/>
      </visual>
      <collision>
        <geometry>
          <box size="${SHOULDER_X} ${SHOULDER_Y} ${SHOULDER_Z}"/>
        </geometry>
        <origin xyz="0 0 ${SHOULDER_Z/2}" rpy="0 0 0"/>
      </collision>
      <inertial>
        <mass value="0.025"/>
        <inertia ixx="1e-3" ixy="0" ixz="0" iyy="1e-3" iyz="0" izz="1e-3"/>
      </inertial>
    </link>
得に指摘が必要な行は下記です。
<joint name="shoulder_rotate_joint" type="revolute">(1行目)- ベースと肩の間の回転するジョイントの定義です。
移動型ロボットの回転するジョイントと違って、
continuousではなくてrevoluteという種類にします。revoluteジョイントは回転できますが、最初と最大の角度があります。 永遠に回転することはできません。 <limit lower="-${PI}" upper="${PI}" effort="30" velocity="${PI}"/>(6行目)- ジョイントの回転リミットを指定します。
このジョイントは-180度から180度へ回転できます。
limitを利用するとeffortとvelocityも指定することが必要だから、適当に問題にならない値を利用しています。 本物のロボットのURDFを作る場合は正しい値を入力する方がいいです。
rvizで確認します。
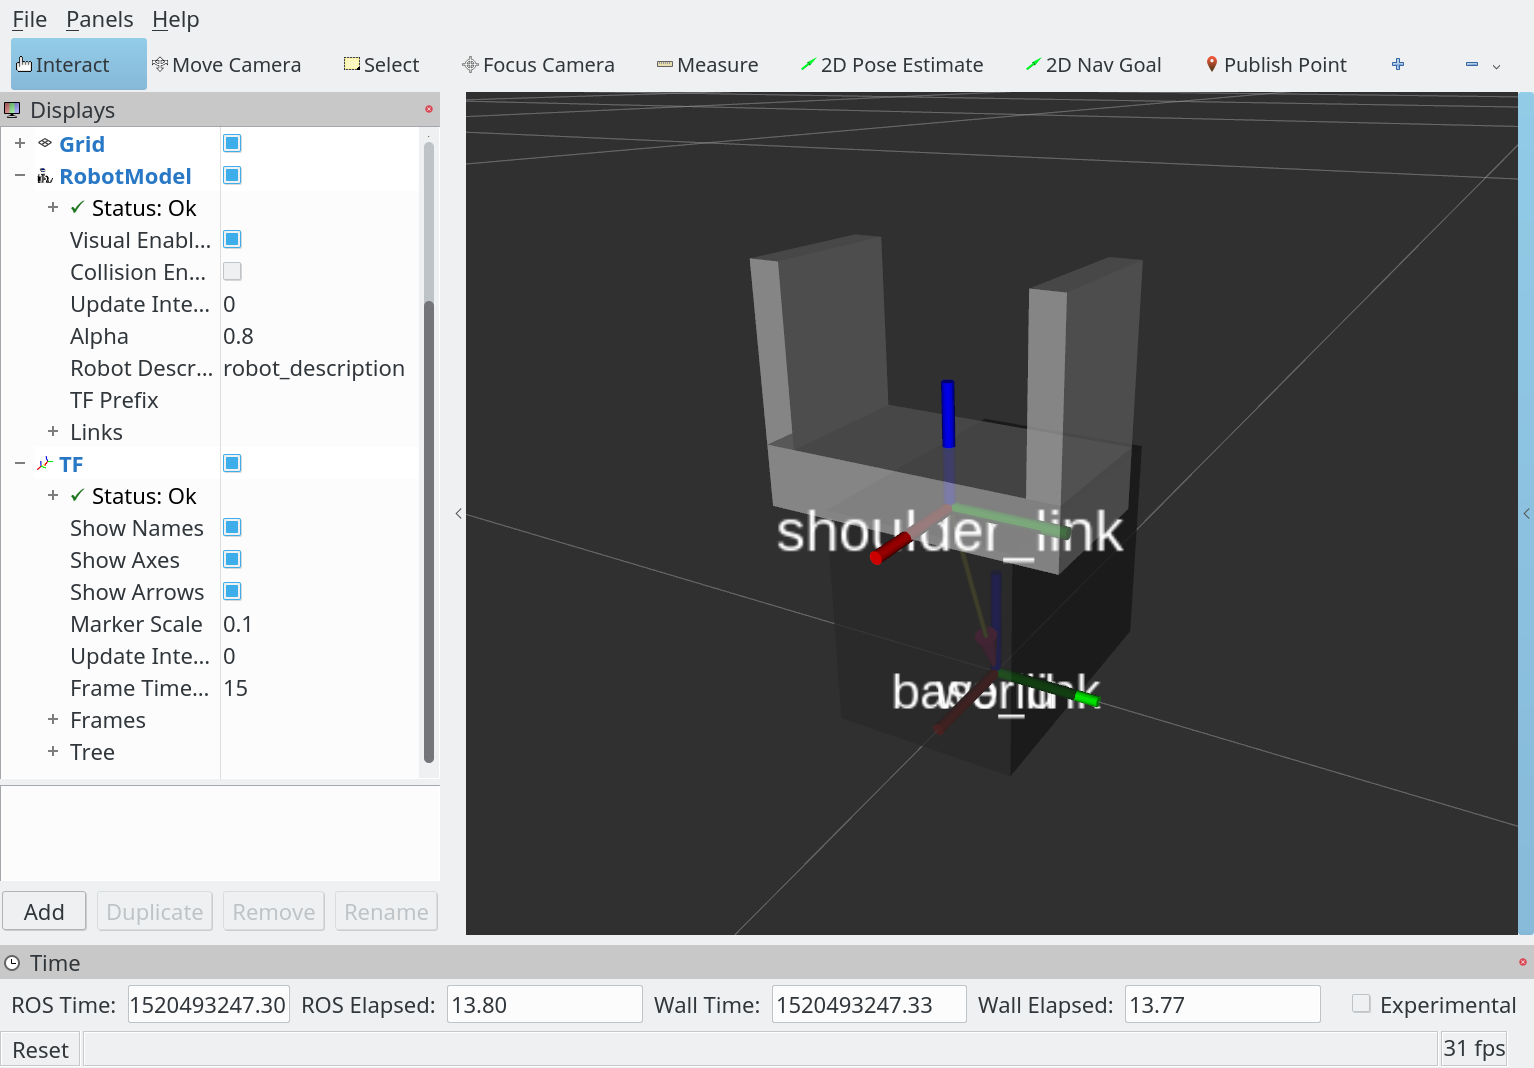
なお、このリンクはvisualジオメトリに3つもboxを利用しますが、collisionジオメトリに一つのboxのみを利用します。
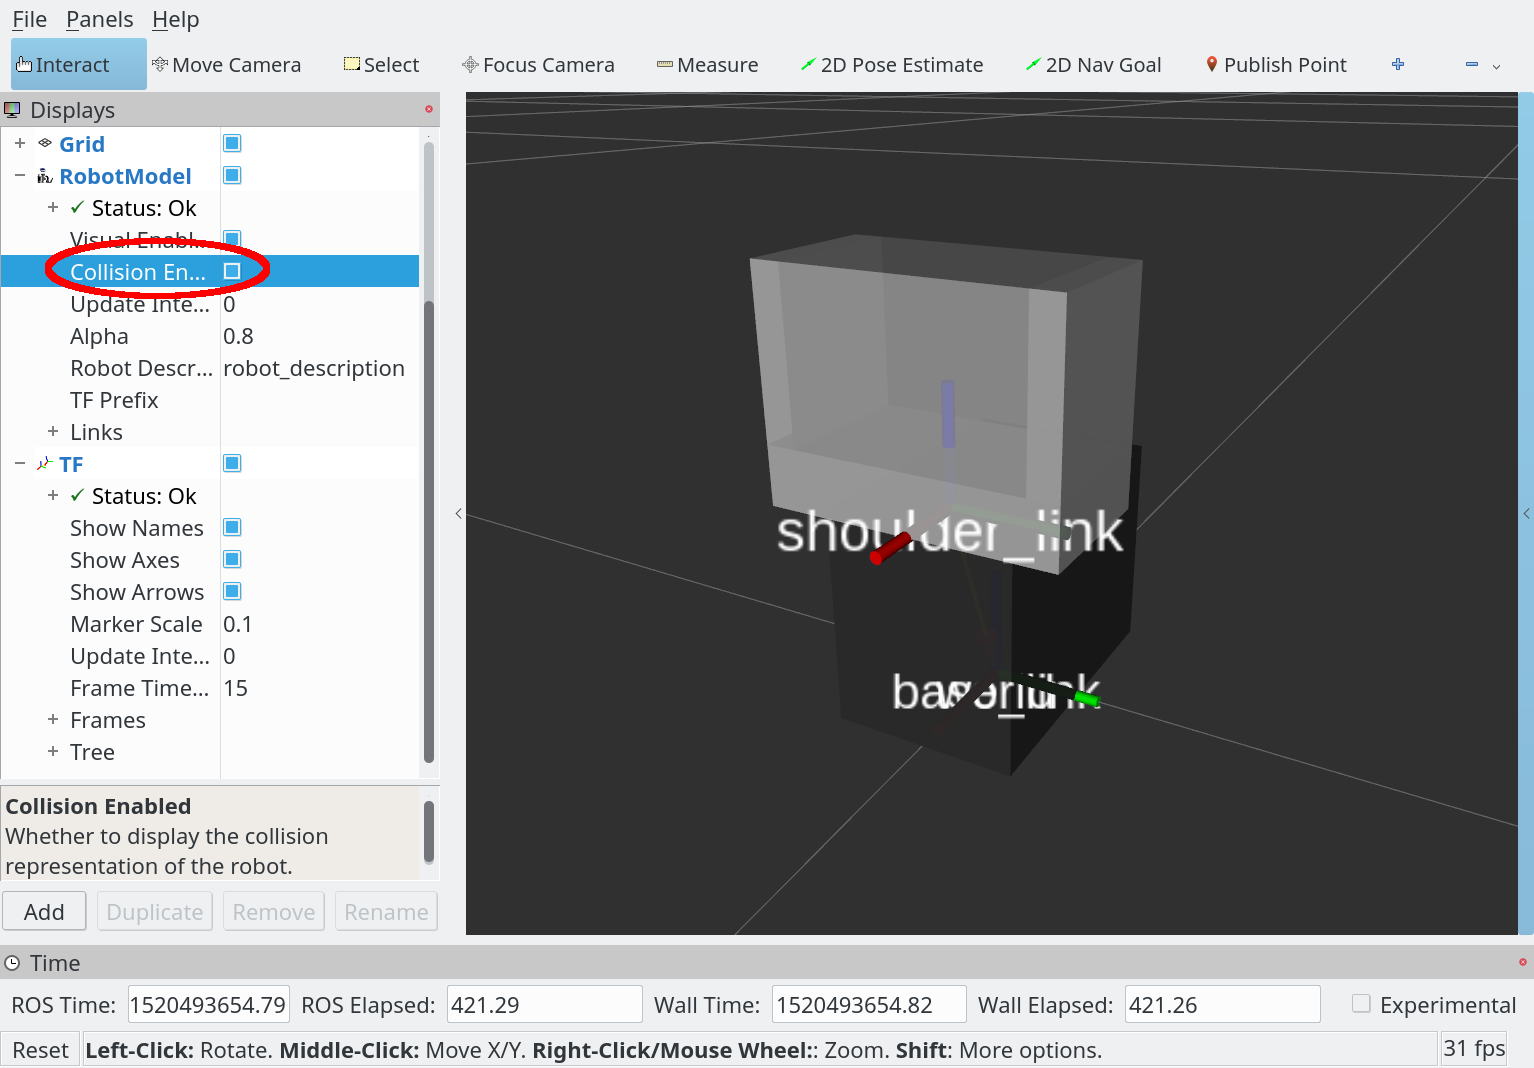
rvizで衝突データの表示を入れるとこのcollisionジオメトリが見えます。
shoulder_linkの全体を囲んでいます。
こうした理由は、基本的MoveIt!等の制御アルゴリズムはジョイントの両側のリンクは衝突できないという仮定を利用します。
Gazeboも同ロボット内のリンクであれば衝突チェックは行いません。
なので、衝突チェックようのジオメトリをできるだけ簡単にするために、ジョイント内の部分を無視して、ただのboxにします。
マクロで腕リンクの定義
上腕と前腕は同じ形ので、定義をマクロで行います。
まずはmanipulator_parts.xacroのmanipulatorマクロ内に肩と上腕をつなげるジョイントを定義します。
1
2
3
4
5
6
7
    <joint name="shoulder_pitch_joint" type="revolute">
      <axis xyz="0 1 0"/>
      <parent link="shoulder_link"/>
      <child link="upper_arm_link"/>
      <origin xyz="0 0 ${SHOULDER_Z-0.01}" rpy="0 0 0"/>
      <limit lower="-${PI}" upper="${PI}" effort="30" velocity="${PI}"/>
    </joint>
上腕のリンク名はupper_arm_linkにしました。
次にマクロの利用を書きます。
1
2
3
4
5
6
7
8
9
10
11
    <xacro:arm_link link_name="upper_arm_link"
        child_link_name="lower_arm_link"
        llimit="-${2 * PI / 3}"
        ulimit="${2 * PI / 3}"
        colour="${link_colour_1}"/>

    <xacro:arm_link link_name="lower_arm_link"
        child_link_name="${end_effector_link}"
        llimit="${-2 * PI / 3}"
        ulimit="${2 * PI / 3}"
        colour="${link_colour_2}"/>
ここで複数のパラメータを渡しています。
link_name- リンクの名に利用する文字列です。
child_link_name- マクロはリンクとそのリンクの先端に繋げられているジョイントを定義します。 ジョイントの両側にリンクが必要ので、このジョイントの無効につなげるつもりのリンクの名を指定します。
llimitとulimit- 先端のジョイントの回転リミットです。
colour- リンクに利用する色です。
マクロはまだ定義していないので、xacroでURDFを生成しようとするとエラーが出ます。
1
2
3
4
5
$ xacro --inorder src/manipulator_description/urdf/manipulator.urdf.xacro
unknown macro name: xacro:arm_link
XacroException(u'unknown macro name: xacro:arm_link',)
when instantiating macro: manipulator (~/urdf_ws/src/manipulator_description/urdf/manipulator_parts.xacro)
in file: src/manipulator_description/urdf/manipulator.urdf.xacro
arm_linkマクロを定義します。
manipulator_parts.xacroの下(robot要素内)に下記のXMLを入力します。
1
2
3
4
5
6
7
8
9
10
11
12
13
14
15
16
17
18
19
20
21
22
23
24
25
26
27
28
29
30
31
32
  <xacro:macro name="arm_link" params="link_name child_link_name llimit ulimit colour">
    <xacro:property name="ARM_LINK_X" value="0.032"/>
    <xacro:property name="ARM_LINK_Y" value="0.038"/>
    <xacro:property name="ARM_LINK_Z" value="0.12"/>
    <link name="${link_name}">
      <visual>
        <geometry>
          <box size="${ARM_LINK_X} ${ARM_LINK_Y} ${ARM_LINK_Z}"/>
        </geometry>
        <origin xyz="0 0 ${ARM_LINK_Z/2}" rpy="0 0 0"/>
        <material name="${colour}"/>
      </visual>
      <collision>
        <geometry>
          <box size="${ARM_LINK_X} ${ARM_LINK_Y} ${ARM_LINK_Z}"/>
        </geometry>
        <origin xyz="0 0 ${ARM_LINK_Z/2}" rpy="0 0 0"/>
      </collision>
      <inertial>
        <mass value="0.2"/>
        <inertia ixx="1e-3" ixy="0" ixz="0" iyy="1e-3" iyz="0" izz="1e-3"/>
      </inertial>
    </link>

    <joint name="${link_name}_joint" type="revolute">
      <axis xyz="0 1 0"/>
      <parent link="${link_name}"/>
      <child link="${child_link_name}"/>
      <limit lower="${llimit}" upper="${ulimit}" effort="30" velocity="${PI}"/>
      <origin xyz="0 0 ${ARM_LINK_Z}" rpy="0 0 0"/>
    </joint>
  </xacro:macro>
<joint name="${link_name}_joint" type="revolute">(25行目)- リンクの先端に置くジョイントです。 ジョイント名は必ずユニークにすることが必要ので、ジョイント名にリンク名を利用します。
<child link="${child_link_name}"/>(28行目)- ジョイントの子供リンクはマクロのパラメータで指定されたリンクにします。
rvizでマクロの利用を確認しようとすると下記のようなエラーが出ます。
1
[ERROR] [1520494923.725128802]: Failed to build tree: child link [wrist_base_link] of joint [lower_arm_link_joint] not found
これはエンドエフェクタがまだ大義されていないからです。
マニピュレータの先端にあるジョイントの子供側のリンクが存在しません。
とりあえず、上腕と前腕の確認ができるように、manipulatorマクロの中に下記の行を追加します。
1
  <link name="${end_effector_link}"/>
一回の定義で2回のインスタンスができました。

注意:次にエンドエフェクタを定義しますが、まずは先に追加した空のリンクを削除します。
エンドエフェクタの定義
これからone_finger_gripper.xacroでエンドエフェクタを定義します。
別のファイルにする理由は、別のマニピュレータで利用しやすいようにです。
エンドエフェクタの定義に特に新しいことはありません。
one_finger_gripper.xacroにあるone_finger_gripperマクロ内に下記のXMLを入力します。
1
2
3
4
5
6
7
8
9
10
11
12
13
14
15
16
17
18
19
20
21
22
23
24
25
26
27
28
29
30
31
32
33
34
35
36
37
38
39
40
41
42
43
44
45
46
47
48
49
50
51
52
53
54
55
56
57
58
59
60
61
62
63
64
65
66
67
68
69
70
71
72
73
74
75
76
77
78
79
80
81
82
83
84
85
86
87
88
89
90
    <xacro:property name="SERVO_X" value="0.032"/>
    <xacro:property name="SERVO_Y" value="0.05"/>
    <xacro:property name="SERVO_Z" value="0.038"/>

    <link name="${base_link_name}">
      <visual>
        <geometry>
          <box size="${SERVO_X} ${SERVO_Y} ${SERVO_Z}"/>
        </geometry>
        <origin xyz="0 0 ${SERVO_Z/2}" rpy="0 0 0"/>
        <material name="${base_colour}"/>
      </visual>
      <collision>
        <geometry>
          <box size="${SERVO_X} ${SERVO_Y} ${SERVO_Z}"/>
        </geometry>
        <origin xyz="0 0 ${SERVO_Z/2}" rpy="0 0 0"/>
      </collision>
      <inertial>
        <mass value="0.1"/>
        <inertia ixx="1e-3" ixy="0" ixz="0" iyy="1e-3" iyz="0" izz="1e-3"/>
      </inertial>
    </link>

    <link name="fixed_finger">
      <visual>
        <geometry>
          <box size="0.03 0.002 0.08"/>
        </geometry>
        <origin xyz="0 0 0.04" rpy="0 0 0"/>
        <material name="${finger_colour}"/>
      </visual>
      <collision>
        <geometry>
          <box size="0.03 0.002 0.08"/>
        </geometry>
        <origin xyz="0 0 0.04" rpy="0 0 0"/>
      </collision>
      <inertial>
        <mass value="0.01"/>
        <inertia ixx="1e-3" ixy="0" ixz="0" iyy="1e-3" iyz="0" izz="1e-3"/>
      </inertial>
    </link>

    <joint name="fixed_finger_joint" type="fixed">
      <parent link="${base_link_name}"/>
      <child link="fixed_finger"/>
      <origin xyz="0 ${SERVO_Y/2} ${SERVO_Z}" rpy="0 0 0"/>
    </joint>

    <link name="moving_finger">
      <visual>
        <geometry>
          <box size="0.03 0.002 0.04"/>
        </geometry>
        <origin xyz="0 -0.01414 0.01414" rpy="${PI/4} 0 0"/>
        <material name="${finger_colour}"/>
      </visual>
      <visual>
        <geometry>
          <box size="0.03 0.002 0.05414"/>
        </geometry>
        <origin xyz="0 -0.02828 ${0.05415/2+0.02828}" rpy="0 0 0"/>
        <material name="${finger_colour}"/>
      </visual>
      <collision>
        <geometry>
          <box size="0.03 0.002 0.04"/>
        </geometry>
        <origin xyz="0 0 0.02" rpy="${PI/4} 0 0"/>
      </collision>
      <collision>
        <geometry>
          <box size="0.04 0.002 0.03"/>
        </geometry>
        <origin xyz="${0.02+0.02828} 0.02828 0.015" rpy="0 0 0"/>
      </collision>
      <inertial>
        <mass value="0.01"/>
        <inertia ixx="1e-3" ixy="0" ixz="0" iyy="1e-3" iyz="0" izz="1e-3"/>
      </inertial>
    </link>

    <joint name="moving_finger_joint" type="revolute">
      <axis xyz="1 0 0"/>
      <parent link="${base_link_name}"/>
      <child link="moving_finger"/>
      <origin xyz="0 -${SERVO_Y/2} ${SERVO_Z}" rpy="0 0 0"/>
      <limit lower="-0.75" upper="0.25" effort="30" velocity="${PI}"/>
    </joint>
グリッパーは3つのリンクと2つのジョイントで構造されます。 ベースはマニピュレータの先端に固定されます。 ベースに固定された指と移動可能な指が付けられています。
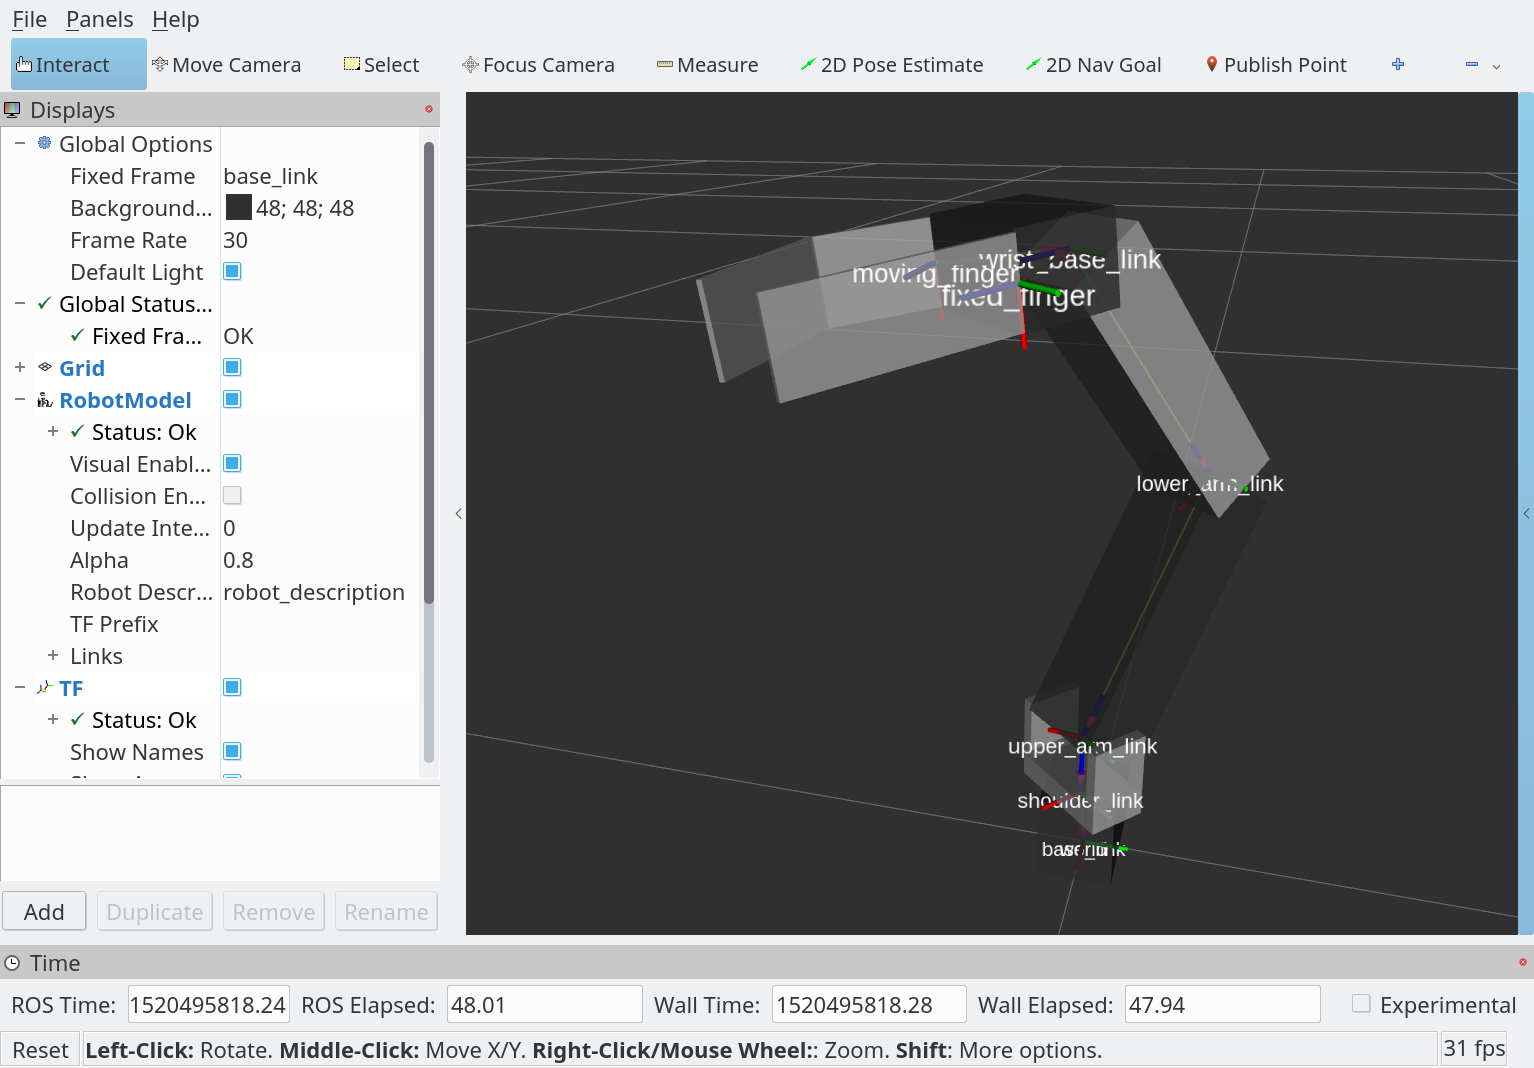
下記でrvizを起動してマニピュレータの全体を確認します。
GUIのスライダーを利用して各ジョイントを動かすとマニピュレータが動きます。
1
$ roslaunch urdf_tutorial display.launch model:=src/manipulator_description/urdf/manipulator.urdf.xacro gui:=true
このソースは以下のURLでダウンロード可能です。
下記のように自分のワークスペースに入れて利用できます。
1
2
3
4
5
6
$ cd ~/urdf_ws/src
$ git clone https://github.com/gbiggs/rosjp_urdf_tutorial_packages
$ cd rosjp_urdf_tutorial_packages
$ git checkout manipulator_visualisation_urdf
$ cd ~/urdf_ws
$ catkin_make
Gazebo上でシミュレーション
マニピュレータの可視化が完成しました。 次にシミュレータにも利用可能にします。
シミュレータが利用する衝突ジオメトリと物理的なデータはすでにURDFに記述したので、マニピュレータモデルはすぐにGazeboで利用可能です。
シミュレータを起動するlaunchファイルを作成します。
1
2
3
4
$ cd ~/urdf_ws/src/manipulator_description
$ mkdir launch
$ cd launch
$ touch manipulator_simulation.launch
manipulator.launchは移動型ロボットのmobile_robot_simulation.launchと似ている内容です。
変更点は、robot_descriptionパラメータはxacroで自動生成します。
1
2
3
4
5
6
7
<launch>
  <param name="robot_description"
    command="$(find xacro)/xacro --inorder '$(find manipulator_description)/urdf/manipulator.urdf.xacro'"/>
  <include file="$(find gazebo_ros)/launch/empty_world.launch"/>
  <node name="spawn_urdf" pkg="gazebo_ros" type="spawn_model"
    args="-param robot_description -urdf -model modular_manipulator"/>
</launch>
ワークスペースに入って起動すると、Gazeboが起動してマニピュレータのシミュレーションを開始します。
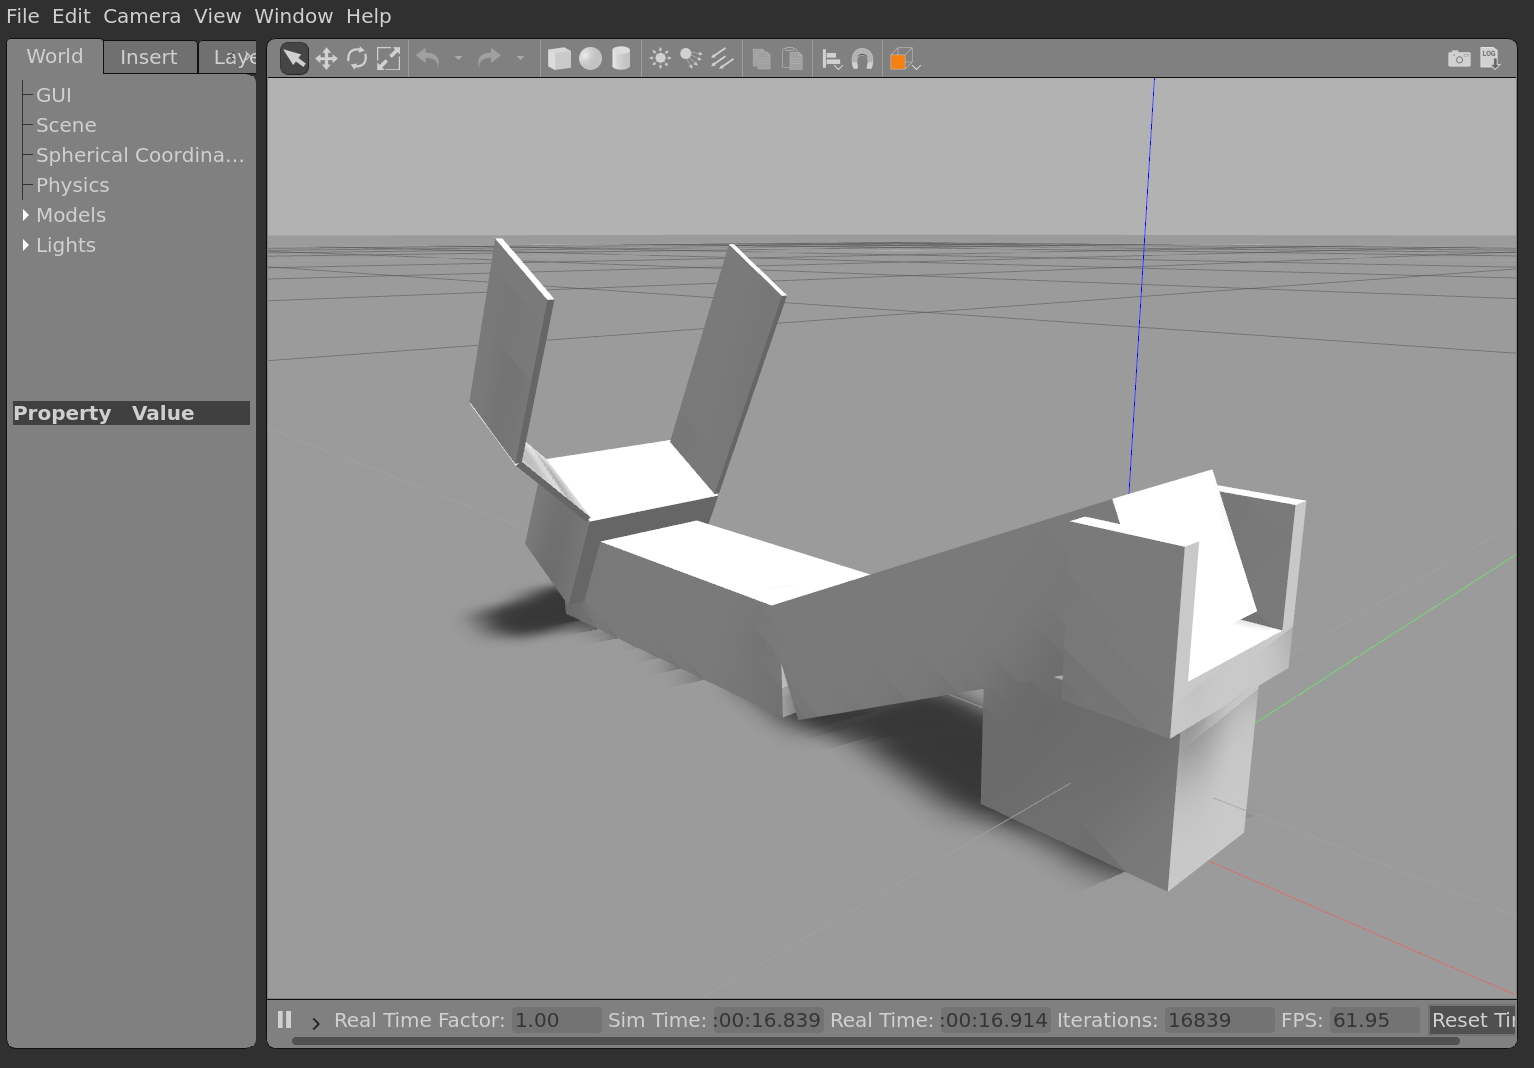
Gazeboが起動したすぐ、ロボットが死んだように落ちました。 これはロボットのリンクに質量があるけど、ジョイントを固定するアクチュエータはありません。 ロボットがたおらないように、そして制御できるように、各ジョイントにアクチュエータを指定することが必要です。
シミュレータ専用データの置き場作成
シミュレータようの情報は同じxacro/URDFファイルに入れることは可能ですが、URDFが大きければ大きいほど処理時間が増えます。
ROSの様々な所に利用されているので、ロボットが複雑であればrobot_descriptionパラメータからURDFが利用されること毎処理時間が増えます。
PR2のような複雑なロボットはxacroとURDFの処理時間は気づくぐらいかかります。
なので、シミュレータを利用していない時にシミュレータの情報がないXMLを作れば、メンテナンスも楽になり、処理時間が短くなります。
どう分けるかは様々な考えがありますが、ここではGazebo用の情報を専用のxacroファイルに置きます。
そしてmanipulator.urdf.xacroにif文を利用して、xacroで処理するときにシミュレータを利用するか決められるようにします。
シミュレータを利用するときのみにシミュレータ専用xacroファイルをインクルードします。
if文を利用するために、そのif文の条件を指定するところが必要です。
今回はlaunchファイル経由で指定します。
manipulator_simulation.launchを下記のように編集してuse_simulationという引数を追加します。
引数はrobot_descriptionパラメータでxacroを利用する所に利用します。
1
2
3
4
5
6
7
8
9
10
11
12
13
14
15
<launch>
<!---- ここから削除 ---->
  <param name="robot_description"
    command="$(find xacro)/xacro --inorder '$(find manipulator_description)/urdf/manipulator.urdf.xacro'"/>
<!---- ここまで削除 ---->

<!---- ここから追加 ---->
  <arg name="use_simulation" default="false"/>
  <param name="robot_description"
    command="$(find xacro)/xacro --inorder '$(find manipulator_description)/urdf/manipulator.urdf.xacro' use_simulation:=$(arg use_simulation)"/>
<!---- ここまで追加 ---->
  <include file="$(find gazebo_ros)/launch/empty_world.launch"/>
  <node name="spawn_urdf" pkg="gazebo_ros" type="spawn_model"
    args="-param robot_description -urdf -model modular_manipulator"/>
</launch>
manipulator.urdf.xacroを下記のように編集します。
1
2
3
4
5
6
7
8
9
10
11
12
13
14
15
16
17
  <xacro:manipulator parent="world"
      end_effector_link="${end_effector_base_link}"
      link_colour_1="black"
      link_colour_2="grey">
    <origin xyz="0 0 0" rpy="0 0 0"/>
  </xacro:manipulator>

  <xacro:one_finger_gripper base_link_name="${end_effector_base_link}"
      base_colour="black"
      finger_colour="grey"/>

<!---- ここから追加 ---->
  <xacro:if value="$(arg use_simulation)">
    <xacro:include filename="$(find manipulator_description)/urdf/manipulator.gazebo.xacro"/>
  </xacro:if>
<!---- ここまで追加 ---->
</robot>
上記の変更はif文でuse_simulation引数はtrueまたは1かどうかをチェックします。
trueまたは1の場合にmanipulator.gazebo.xacroファイルをインクルードします。
引数の値はコマンドラインで指定します。
下記でfalseに指定します。
1
2
3
4
5
6
7
8
9
$ cd ~/urdf_ws
$ xacro --inorder src/manipulator_description/urdf/manipulator.urdf.xacro use_simulation:=false
<?xml version="1.0" ?>
<!-- =================================================================================== -->
<!-- |    This document was autogenerated by xacro from src/manipulator_description/urdf/manipulator.urdf.xacro | -->
<!-- |    EDITING THIS FILE BY HAND IS NOT RECOMMENDED                                 | -->
<!-- =================================================================================== -->
<robot name="modular_manipulator" xmlns:xacro="http://ros.org/wiki/xacro">
[省略]
manipulator.gazebo.xacroはまだ存在しないので、use_simulationをtrueに指定すると下記のようにエラーが出ます。
1
2
3
4
$ xacro --inorder src/manipulator_description/urdf/manipulator.urdf.xacro use_simulation:=true
No such file or directory: ~/urdf_ws/src/manipulator_description/urdf/manipulator.gazebo.xacro
XacroException('No such file or directory: ~/urdf_ws/src/manipulator_description/urdf/manipulator.gazebo.xacro',)
when processing file: src/manipulator_description/urdf/manipulator.urdf.xacro
roslaunchを利用するときに同様に引数を指定します。
trueにするとこれもエラーになります。
1
2
3
4
5
6
7
8
9
10
11
12
13
$ roslaunch manipulator_description manipulator_simulation.launch use_simulation:=true
... logging to ~/.ros/log/f87f0190-22ad-11e8-bec6-d8cb8ae35bff/roslaunch-alnilam-8099.log
Checking log directory for disk usage. This may take awhile.
Press Ctrl-C to interrupt
Done checking log file disk usage. Usage is <1GB.

No such file or directory: ~/urdf_ws/src/manipulator_description/urdf/manipulator.gazebo.xacro
XacroException('No such file or directory: ~/urdf_ws/src/manipulator_description/urdf/manipulator.gazebo.xacro',)
when processing file: ~/urdf_ws/src/manipulator_description/urdf/manipulator.urdf.xacro
Invalid <param> tag: Cannot load command parameter [robot_description]: command [/opt/ros/kinetic/lib/xacro/xacro --inorder '~/urdf_ws/src/manipulator_description/urdf/manipulator.urdf.xacro' use_simulation:=true] returned with code [2].

Param xml is <param command="$(find xacro)/xacro --inorder '$(find manipulator_description)/urdf/manipulator.urdf.xacro' use_simulation:=$(arg use_simulation)" name="robot_description"/>
The traceback for the exception was written to the log file
エラーが出ないようにファイルを作成します。
1
2
$ cd ~/urdf_ws/src/manipulator_description/urdf
$ touch manipulator.gazebo.xacro
アクチュエータの定義
Gazeboでマニピュレータをシミュレートするとき、各ジョイントのアクチュエータのためにros_controlプラグインを利用します。
ros_controlプラグインの利用の一番大きな利点は、本物のマニピュレータとそっくりのインターフェースを提供します。
おかげでシミュレータでも本物のロボットでも、制御するソフトウェアは変わらなくてもいいです。
ROSではマニピュレータは基本的にfollow_joint_trajectory/joint_statesインターフェースを利用します。
ros_controlはこのインターフェースを提供します。
ros_controlの詳細はドキュメンテーションに参照してください。
ros_controlプラグインを利用するためにURDFに各ジョイントのtransmissionを定義することが必要です。
transmissionはモータとギアボックスをシミュレートします。
移動型ロボットで利用したdifferential_drive_controllerと違って、transmissionはより簡単な概念を実装します。
differential_drive_controllerはアクチュエータのシミュレーションと2つのアクチュエータの制御することによってよりハイレベルな概念を実装します。
transmissionは単純のアクチュエータをシミュレートするので、そのアクチュエータをどう制御するかは別のノードで実装することが必要です。
manipulator.gazebo.xacroで下記のXMLのを入力して、マニピュレータの一般的なtransmissionを定義します。
本ファイルは別のファイルにインクルードされるので、マクロとして定義することが必要です。
インクルードするファイルにマクロを利用します。
1
2
3
4
5
6
7
8
9
10
11
12
13
14
<?xml version="1.0"?>
<robot xmlns:xacro="http://ros.org/wiki/xacro">
  <xacro:macro name="basic_transmission" params="joint_name">
    <transmission name="${joint_name}_trans">
      <type>transmission_interface/SimpleTransmission</type>
      <joint name="${joint_name}">
        <hardwareInterface>hardware_interface/PositionJointInterface</hardwareInterface>
      </joint>
      <actuator name="${joint_name}_motor">
        <mechanicalReduction>1</mechanicalReduction>
      </actuator>
    </transmission>
  </xacro:macro>
</robot>
下記にマクロの内容を説明します。
<transmission name="${joint_name}_trans">transmissionの定義を開始します。<type>transmission_interface/SimpleTransmission</type>transmissionの種類を指定します。 自分で新しいtransmissionを作成してここで利用することも可能です。<joint name="${joint_name}">- この
transmissionが制御するジョイントを指定します。 URDFモデルに存在するジョイント名を同じにします。 <hardwareInterface>hardware_interface/PositionJointInterface</hardwareInterface>- 提供する外部インターフェースを指定します。 インターフェースの種類によってROSからこのアクチュエータの制御方法が変わります。 利用可能なインターフェースはここを参照してください。 ポジション制御や速度制御があります。
<actuator name="${joint_name}_motor">- アクチュエータのパラメータを指定します。
<mechanicalReduction>1</mechanicalReduction>- アクチュエータのギアレシオを指定します。
1にするとモータのギアとジョイントのギアは同じだという意味ので現実的ではありませんが、ここでは充分です。 本物のロボットがあれば本物のアクチュエータのギアレシオを利用する方がいいです。
manipulator.urdf.xacroのif文の中に上記のマクロを利用して、全ジョイントのtransmissionを定義します。
ros_controlプラグインも追加します。
1
2
3
4
5
6
7
8
9
10
11
12
13
14
  <xacro:if value="$(arg use_simulation)">
    <xacro:include filename="$(find manipulator_description)/urdf/manipulator.gazebo.xacro"/>
<!---- ここから追加 ---->
    <xacro:basic_transmission joint_name="shoulder_rotate_joint"/>
    <xacro:basic_transmission joint_name="shoulder_pitch_joint"/>
    <xacro:basic_transmission joint_name="upper_arm_link_joint"/>
    <xacro:basic_transmission joint_name="lower_arm_link_joint"/>

    <gazebo>
      <plugin name="control" filename="libgazebo_ros_control.so"/>
    </gazebo>
<!---- ここまで追加 ---->
  </xacro:if>
</robot>
ros_controlを利用するために、本物のロボットと同様に設定ファイルの作成が必要です。
設定ファイルを作成して、下記の内容を入力します。
1
2
3
$ cd ~/urdf_ws/src/manipulator_description/
$ mkdir config
$ touch config/manipulator.yaml
manipulator.yamlの内容:
1
2
3
4
5
6
7
manipulator_controller:
  type: "position_controllers/JointTrajectoryController"
  joints:
    - shoulder_rotate_joint
    - shoulder_pitch_joint
    - upper_arm_link_joint
    - lower_arm_link_joint
上記の設定ファイルはmanipulator_controllerというコントローラを定義します。
コントローラの種類はposition_controllers/JointTrajectoryControllerです。
ジョイント毎に時間に対して位置を制御するコントローラです。
ros_control等のノードが利用できるために、 設定ファイルの内容をパラメータサーバに登録することが必要です。
そしてコントローラを実行することも必要です。
manipulator_simulation.launchに下記の追加でそうします。
1
2
3
4
5
6
7
8
9
10
11
12
13
14
<launch>
  <arg name="use_simulation" default="false"/>
  <param name="robot_description"
    command="$(find xacro)/xacro --inorder '$(find manipulator_description)/urdf/manipulator.urdf.xacro' use_simulation:=$(arg use_simulation)"/>
<!---- ここから追加 ---->
  <rosparam file="$(find manipulator_description)/config/manipulator.yaml" command="load"/>
<!---- ここまで追加 ---->
  <include file="$(find gazebo_ros)/launch/empty_world.launch"/>
  <node name="spawn_urdf" pkg="gazebo_ros" type="spawn_model"
    args="-param robot_description -urdf -model modular_manipulator"/>
<!---- ここから追加 ---->
  <node name="controller_spawner" pkg="controller_manager" type="spawner" args="manipulator_controller"/>
<!---- ここまで追加 ---->
</launch>
最後の準備として、利用するコントローラがインストールされているようにします。
1
2
3
$ sudo apt-get install ros-kinetic-joint-trajectory-controller
$ sudo apt-get install ros-kinetic-effort-controllers
$ sudo apt-get install ros-kinetic-controller-manager
launchファイルを実行すると、シミュレートされたロボットは落ちません。
1
$ roslaunch manipulator_description manipulator_simulation.launch use_simulation:=true
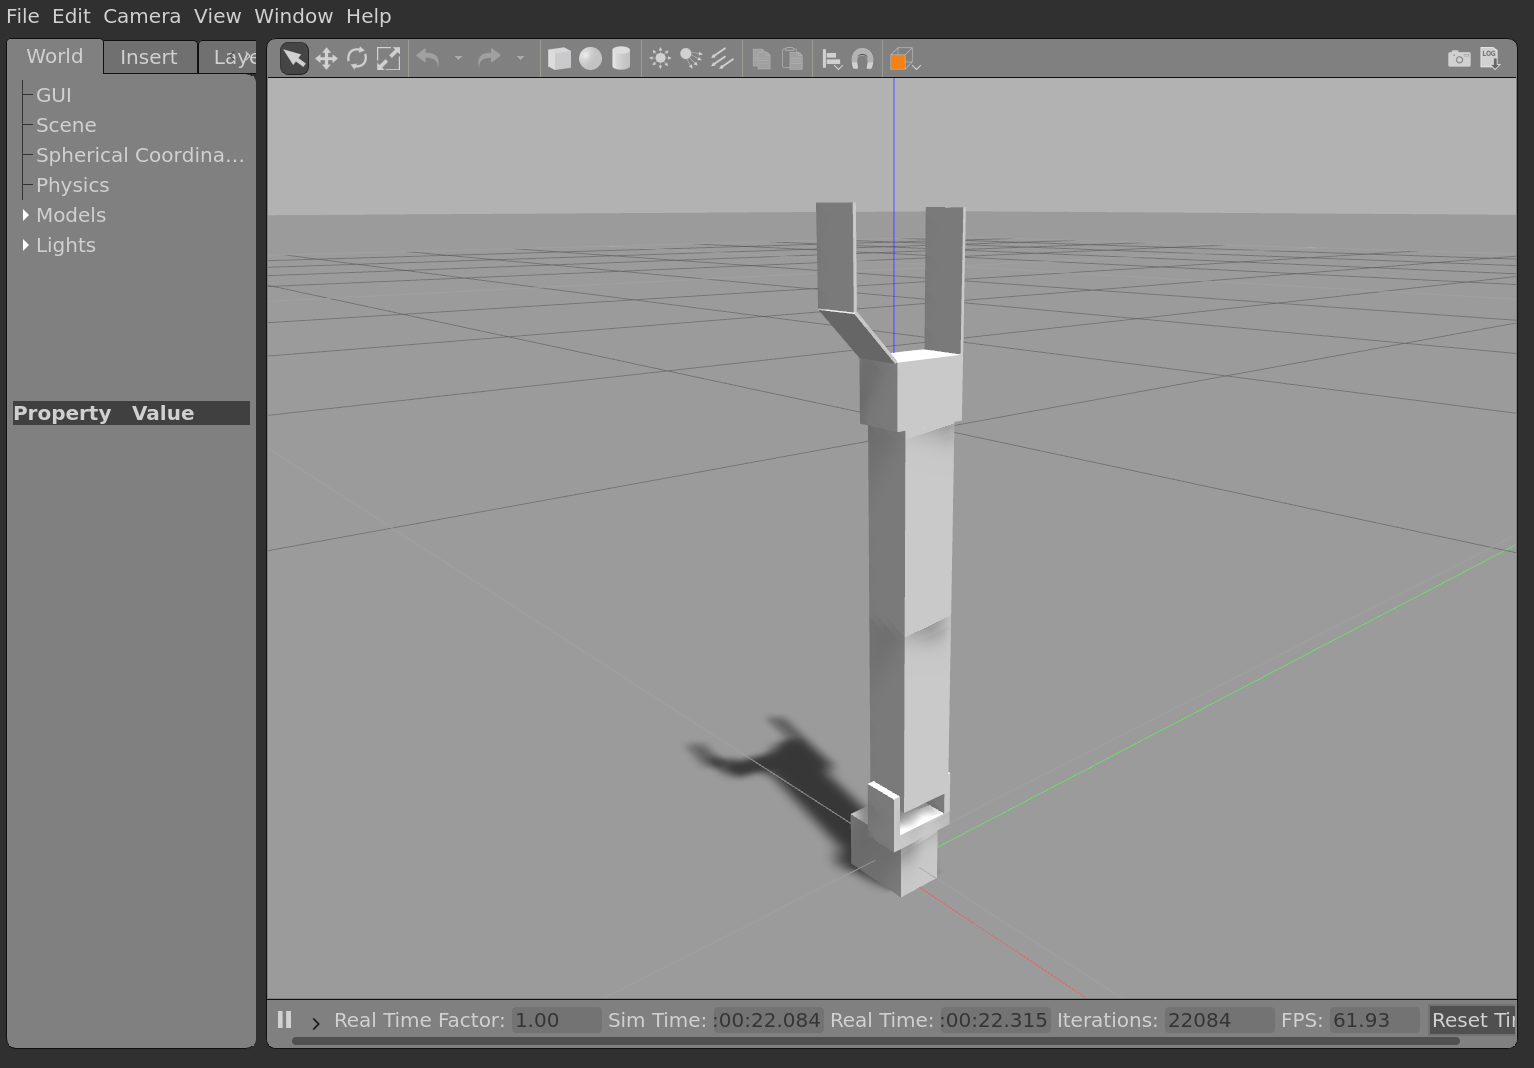
rostopicでコントローラの利用するトピックが見えます。
1
2
3
4
5
6
7
8
9
10
11
12
13
14
15
16
17
18
19
20
$ rostopic list
/clock
/gazebo/link_states
/gazebo/model_states
/gazebo/parameter_descriptions
/gazebo/parameter_updates
/gazebo/set_link_state
/gazebo/set_model_state
/joint_states
/manipulator_controller/command
/manipulator_controller/follow_joint_trajectory/cancel
/manipulator_controller/follow_joint_trajectory/feedback
/manipulator_controller/follow_joint_trajectory/goal
/manipulator_controller/follow_joint_trajectory/result
/manipulator_controller/follow_joint_trajectory/status
/manipulator_controller/state
/rosout
/rosout_agg
/tf
/tf_static
1
2
3
4
5
6
7
$ rostopic info /manipulator_controller/command
Type: trajectory_msgs/JointTrajectory

Publishers: None

Subscribers:
 * /gazebo (http://alnilam:36974/)
trajectory_msgs/JointTrajectoryメッセージの送信でロボットが制御できます。
1
2
3
$ rostopic pub -1 /manipulator_controller/command trajectory_msgs/JointTrajectory \
  '{joint_names: ["shoulder_rotate_joint", "shoulder_pitch_joint", "upper_arm_link_joint", \
  "lower_arm_link_joint"], points: [{positions: [0.5, -0.75, 1.5, 0.75], time_from_start: [1.0, 0.0]}]}'
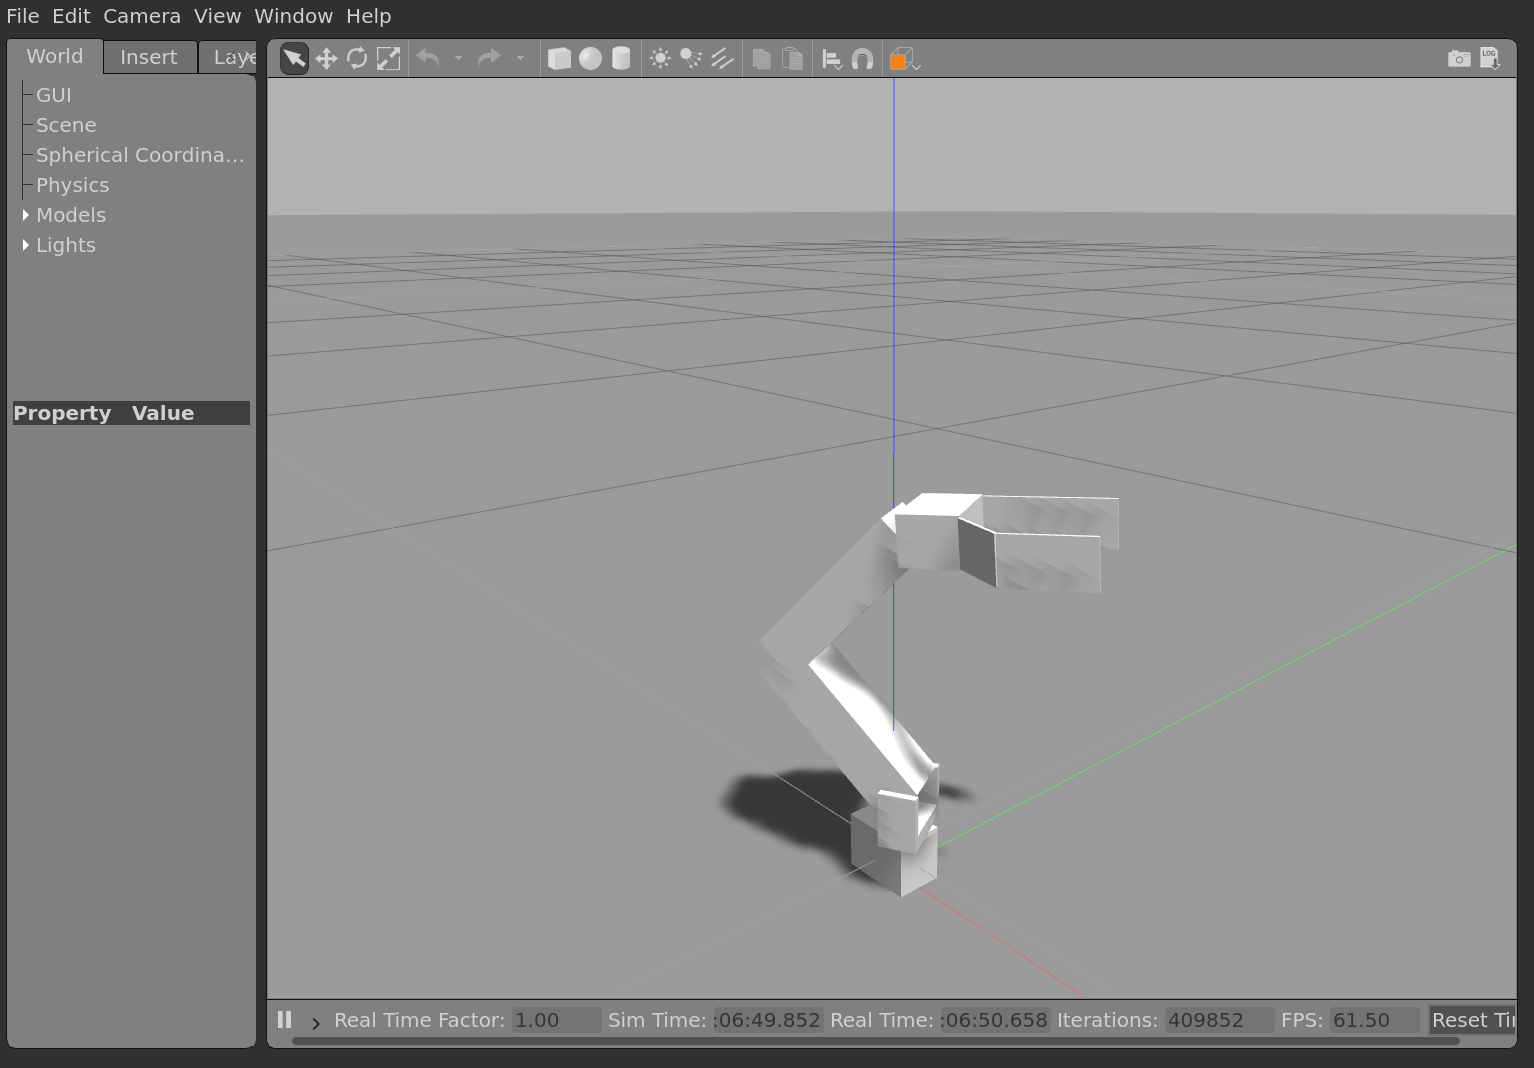
rvizで可視化
移動型ロボットと同様に、rvizで可視化するためにジョイントの位置情報及びTFのデータを送信することが必要です。
ジョイントの位置情報の送信のために、manipulator.urdf.xacroにjoint_state_publisherプラグインを追加します。
1
2
3
4
5
6
7
8
9
10
    <gazebo>
      <plugin name="control" filename="libgazebo_ros_control.so"/>
<!---- ここから追加 ---->
      <plugin name="joint_state_publisher" filename="libgazebo_ros_joint_state_publisher.so">
        <jointName>shoulder_rotate_joint, shoulder_pitch_joint, upper_arm_link_joint, lower_arm_link_joint, moving_finger_joint</jointName>
      </plugin>
<!---- ここまで追加 ---->
    </gazebo>
  </xacro:if>
</robot>
そしてmanipulator_simulation.launchに下記を追加することでrobot_state_publisherを実行します。
1
2
3
4
5
6
7
8
9
10
11
12
13
<launch>
  <arg name="use_simulation" default="false"/>
  <param name="robot_description"
    command="$(find xacro)/xacro --inorder '$(find manipulator_description)/urdf/manipulator.urdf.xacro' use_simulation:=$(arg use_simulation)"/>
  <rosparam file="$(find manipulator_description)/config/manipulator.yaml" command="load"/>
  <include file="$(find gazebo_ros)/launch/empty_world.launch"/>
  <node name="spawn_urdf" pkg="gazebo_ros" type="spawn_model"
    args="-param robot_description -urdf -model modular_manipulator"/>
  <node name="controller_spawner" pkg="controller_manager" type="spawner" args="manipulator_controller"/>
<!---- ここから追加 ---->
  <node name="robot_state_publisher" pkg="robot_state_publisher" type="robot_state_publisher"/>
<!---- ここまで追加 ---->
</launch>
Gazeboを再起動します。
それからrvizを起動して、Fixed Frameをworldに設定して、RobotModelとTFの可視化を追加します。
次の図のようにロボットが表示されます。
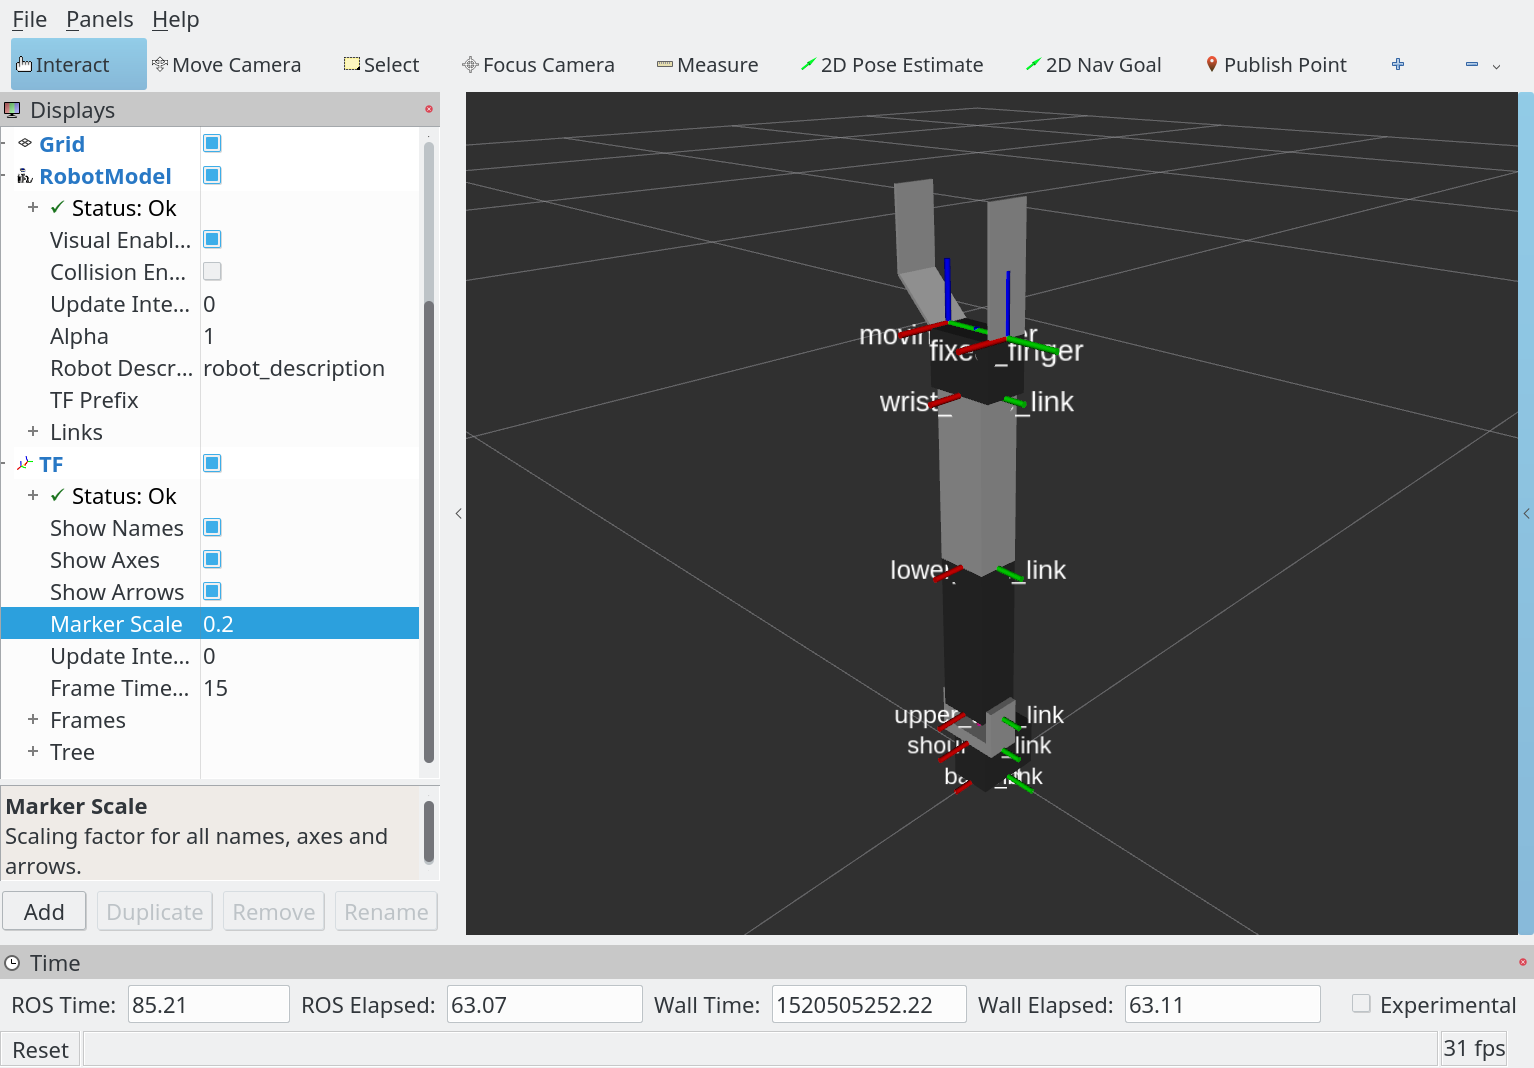
またrostopicでジョイントを制御するとrvizにもロボットの動きが見えます。
Gazeboと同じ動きです。
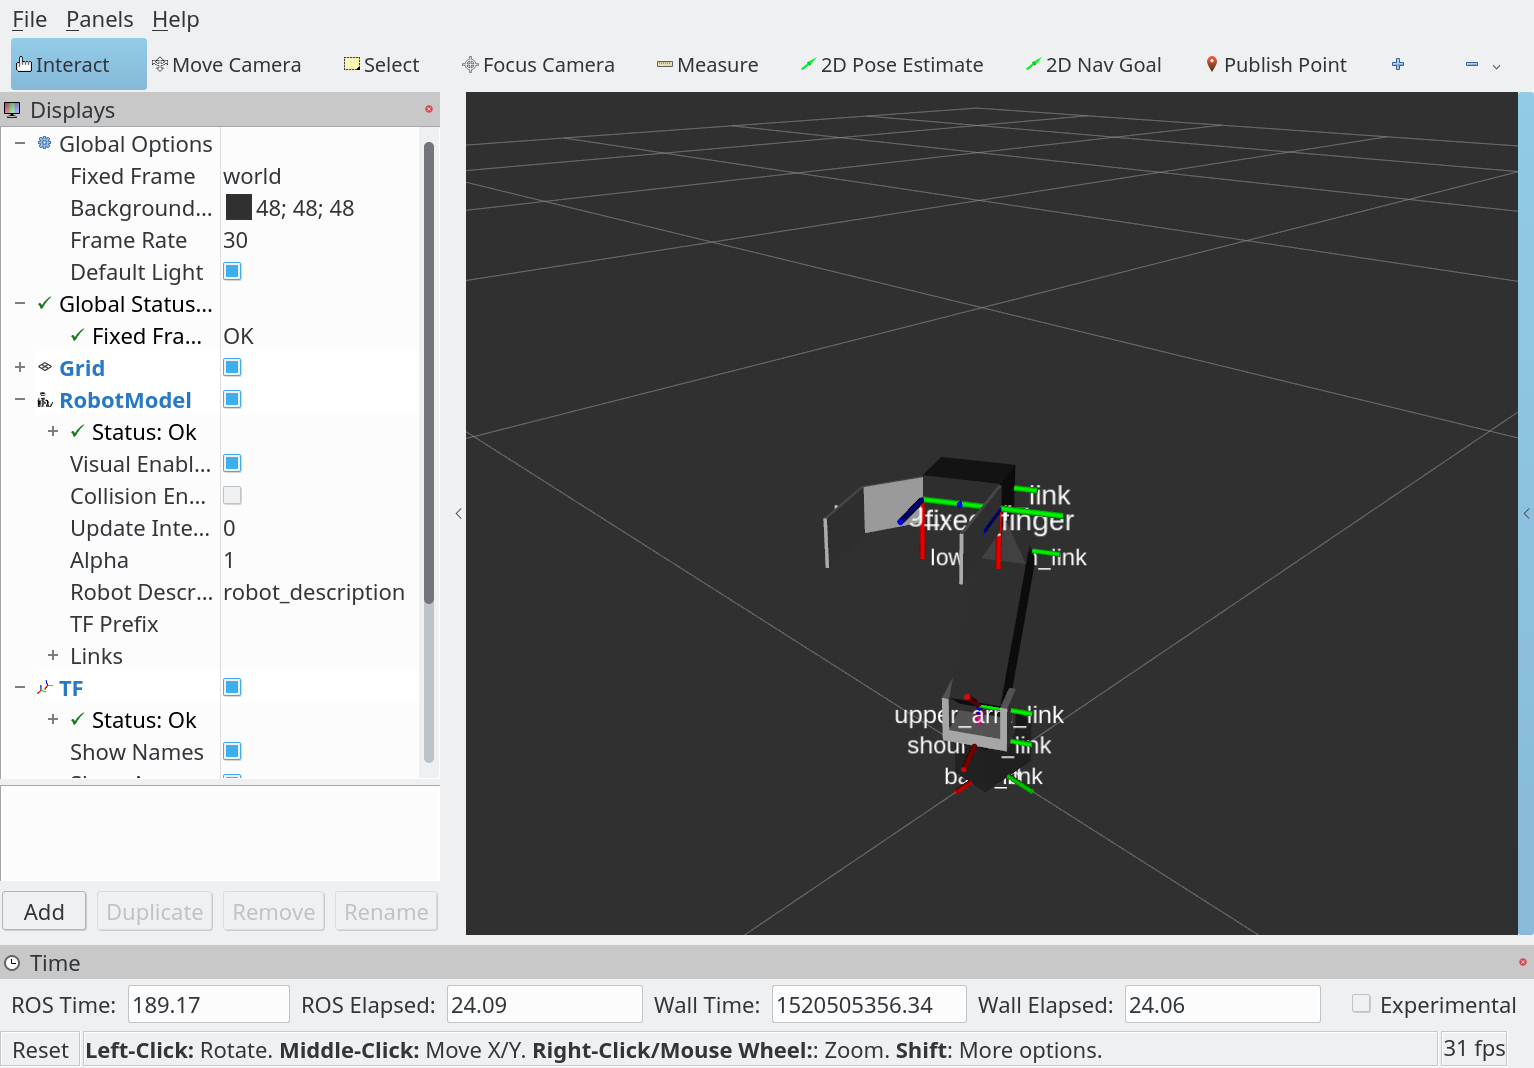
このソースは以下のURLでダウンロード可能です。
下記のように自分のワークスペースに入れて利用できます。
1
2
3
4
5
6
$ cd ~/urdf_ws/src
$ git clone https://github.com/gbiggs/rosjp_urdf_tutorial_packages
$ cd rosjp_urdf_tutorial_packages
$ git checkout manipulator_simulation
$ cd ~/urdf_ws
$ catkin_make
追加課題:グリッパーの変更
manipulator_description/urdfに新しいxacroファイルを作成して、そのファイルに新しい種類のグリッパーを定義してみましょう。
そしてmanipulator.urdf.xacroでone_finger_gripperの代わりに自分の新しいグリッパーを利用してみましょう。
