マニピュレータの制御とMoveIt!の利用
Updated on: 2017-06-26
マニピュレータ制御には、前セクションで行ったようにサーボごと制御することはもちろん可能です。しかし、マニピュレータのグリッパーの位置を制御したり、スムーズなトラジェクトリーに沿って動かしたりしたいでしょう。ならば、サーボごとのようなローレベル制御は足りません。
ROSでは、マニピュレータを一体型なロボットとして制御しタスクを行うために、MoveIt!というライブラリがあります。
本セクションでは、MoveIt!を利用してマニピュレータによりブロックを移動します。
MoveIt!とは
MoveIt!はマニピュレータようのプラニングフレームワーク(「Motion Planning Framework」)です。主なユースケースは、グリッパーを指定された姿勢(位置と角度)への経路を計算し、マニピュレータのサーボの時間に対しての位置を制御し、グリッパーを移動させることです。
プラニングの一部として、周りのオブジェクトの位置やサイズを検討します。グリッパーだけでなくてマニピュレータ全体がオブジェクトに当たらないように経路を計算します。
MoveIt!は様々なロボットやタスクに利用されます。
必要なパッケージのインストール
すでにUbuntu LinuxとROSのインストールのセクションで以下のコマンドによりMoveIt!をインストールしました。
1
sudo apt-get install ros-kinetic-moveit-*
MoveIt!はマニピュレータ一般的ようのソフトウェアです。利用する前にまずはマニピュレータをROSで利用可能化が必要です。そのためにCRANE+のROSパッケージをインストールします。
まずは新しいワークスペースを作成します。
1
2
3
4
5
6
$ cd ~/
$ mkdir -p ~/crane_plus_ws/src/
$ cd ~/crane_plus_ws/src/
$ catkin_init_workspace
Creating symlink "/home/username/crane_plus_ws/src/CMakeLists.txt" pointing to
    "/opt/ros/kinetic/share/catkin/cmake/toplevel.cmake"
次にCRANE+のROSパッケージをダウンロードしコンパイルします。
1
2
3
4
5
6
7
8
9
10
11
12
13
14
15
16
17
18
19
20
21
$ cd ~/crane_plus_ws/src/
$ git clone https://github.com/gbiggs/crane_plus_arm.git
Cloning into 'crane_plus_arm'...
remote: Counting objects: 474, done.
remote: Total 474 (delta 0), reused 0 (delta 0), pack-reused 474
Receiving objects: 100% (474/474), 1.07 MiB | 1.09 MiB/s, done.
Resolving deltas: 100% (235/235), done.
Checking connectivity... done.
$ cd ~/crane_plus_ws/
$ catkin_make
Base path: /home/username/crane_plus_ws
Source space: /home/username/crane_plus_ws/src
Build space: /home/username/crane_plus_ws/build
Devel space: /home/username/crane_plus_ws/devel
Install space: /home/username/crane_plus_ws/install
(省略)
[ 80%] Built target crane_plus_arm_moveit_ikfast_plugin
[100%] Linking CXX executable /home/username/crane_plus_ws/devel/lib/
         crane_plus_camera_calibration/calibrate_camera_checkerboard
[100%] Built target calibrate_camera_checkerboard
$
ワークスペース内のパッケージが利用できるようにワークスペースをソースします。
1
2
$ cd ~/crane_plus_ws/src/
$ source devel/setup.bash
これでCRANE+のパッケージが利用可能になり、ROSでCRANE+の利用が可能になりました。
CRANE+のパッケージ
CRANE+のパッケージは一つだけではありません。複数のパッケージがそれぞれの持つ機能を合わせてマニピュレータを制御します。CRANE+用のパッケージを見てみましょう。
先クローンしたソースのディレクトリの中を見ると、以下のパッケージが見えます。
1
2
3
4
5
6
7
8
$ cd src/
$ ls
CMakeLists.txt  crane_plus_arm
$ cd crane_plus_arm/
$ ls
crane_plus_camera_calibration  crane_plus_hardware               crane_plus_moveit_config  README.md
crane_plus_description         crane_plus_ikfast_arm_plugin      crane_plus_move_to_pose   LICENSE
crane_plus_gripper             crane_plus_joint_state_publisher  crane_plus_simulation
README.mdとLICENSE以外はすべてパッケージです。パッケージづつの機能を説明します。
crane_plus_camera_calibration- CRANE+とカメラの位置関係を計算する
crane_plus_description- ROSでなくてはならないCRANE+のURDF(Unified Robot Description Format、ROSのロボット定義フォーマット)モデルや、シミュレータ用のモデル
crane_plus_gripper- CRANE+のグリッパーを制御するノード
crane_plus_hardware- CRANE+のハードウェアと利用するために様々なノードの起動やパラメータ設定を行うlaunchファイル
crane_plus_ikfast_arm_plugin- MoveIt!と利用するCRANE+のinverse kinematics(グリッパーの位置と角度を果たすためにジョイントのそれぞれの値の計算)プラグイン
crane_plus_joint_state_publisher- Dynamixelサーボのコントローラが出力するサーボ状況メッセージ(
dynamixel_msgs/JointState型) をROSのsensor_msgs/JointState型へ変換するノード crane_plus_moveit_config- CRANE+をMoveIt!で利用するためのパラメータやlaunchファイル等
crane_plus_move_to_pose- MoveIt!を利用してCRANE+のグリッパーの姿勢をコマンドする簡単なツール
crane_plus_simulationcrane_plus_hardwareと類似なパッケージで、ハードウェアではなくてシミュレータ上でマニピュレータを操作するためのパラメータやlaunchファイル
基本的にcrane_plus_hardwareまたはcrane_plus_simulatorのlaunchファイルを利用してハードウェアかシミュレータのロボットを起動して、crane_plus_moveit_configのlaunchファイルでMoveIt!を起動したからロボットを制御します。次のセクションからこの手順を実習します。
ハードウェアのロボットを制御
CRANE+を制御するために、まずはROSとハードウェアのインターフェースになるノードを起動します。
CRANE+の電源を入れたから、以下を実行します。
1
2
3
$ cd ~/crane_plus_ws/src/
$ source devel/setup.bash
$ roslaunch crane_plus_hardware start_arm_standalone.launch
エラー(赤い文字で表示される)がなければ、マニピュレータは起動しました。
次にMoveIt!を起動します。新しい端末で以下を実行します。
1
2
3
4
5
6
7
8
9
10
11
12
13
14
15
$ cd ~/crane_plus_ws/
$ source devel/setup.bash
$ roslaunch crane_plus_moveit_config move_group.launch
... logging to /home/username/.ros/log/7b527712-3aa3-11e7-b868-d8cb8ae35bff/roslaunch-alnilam-3483.log
Checking log directory for disk usage. This may take awhile.
Press Ctrl-C to interrupt
Done checking log file disk usage. Usage is <1GB.

started roslaunch server http://alnilam:33499/

SUMMARY
(省略)
[ INFO] [1494986092.617635076, 141.869000000]: MoveGroup context initialization complete

You can start planning now!
最後に「You can start planning now!」が出力されたら、マニピュレータは利用可能な状態になりました。
MoveIt!は、ROSノードでMoveIt!のAPIを利用することが基本の利用方法です。しかし、試すだけのためにノードを作成することは重い作業です。ノード作成の代わりにROSの基本の可視化ツールRVizも利用できます。
MoveIt!はRViz上でマニピュレータ制御ユーザインターフェースをプラグインとして提供します。MoveIt!と同時にインストールされて、CRANE+のMoveIt!パッケージから起動します。新しい端末で以下を実行してRVizのMoveIt!ユーザインターフェースを起動します。
1
2
3
$ cd ~/crane_plus_ws/
$ source devel/setup.bash
$ roslaunch crane_plus_moveit_config moveit_rviz.launch config:=true
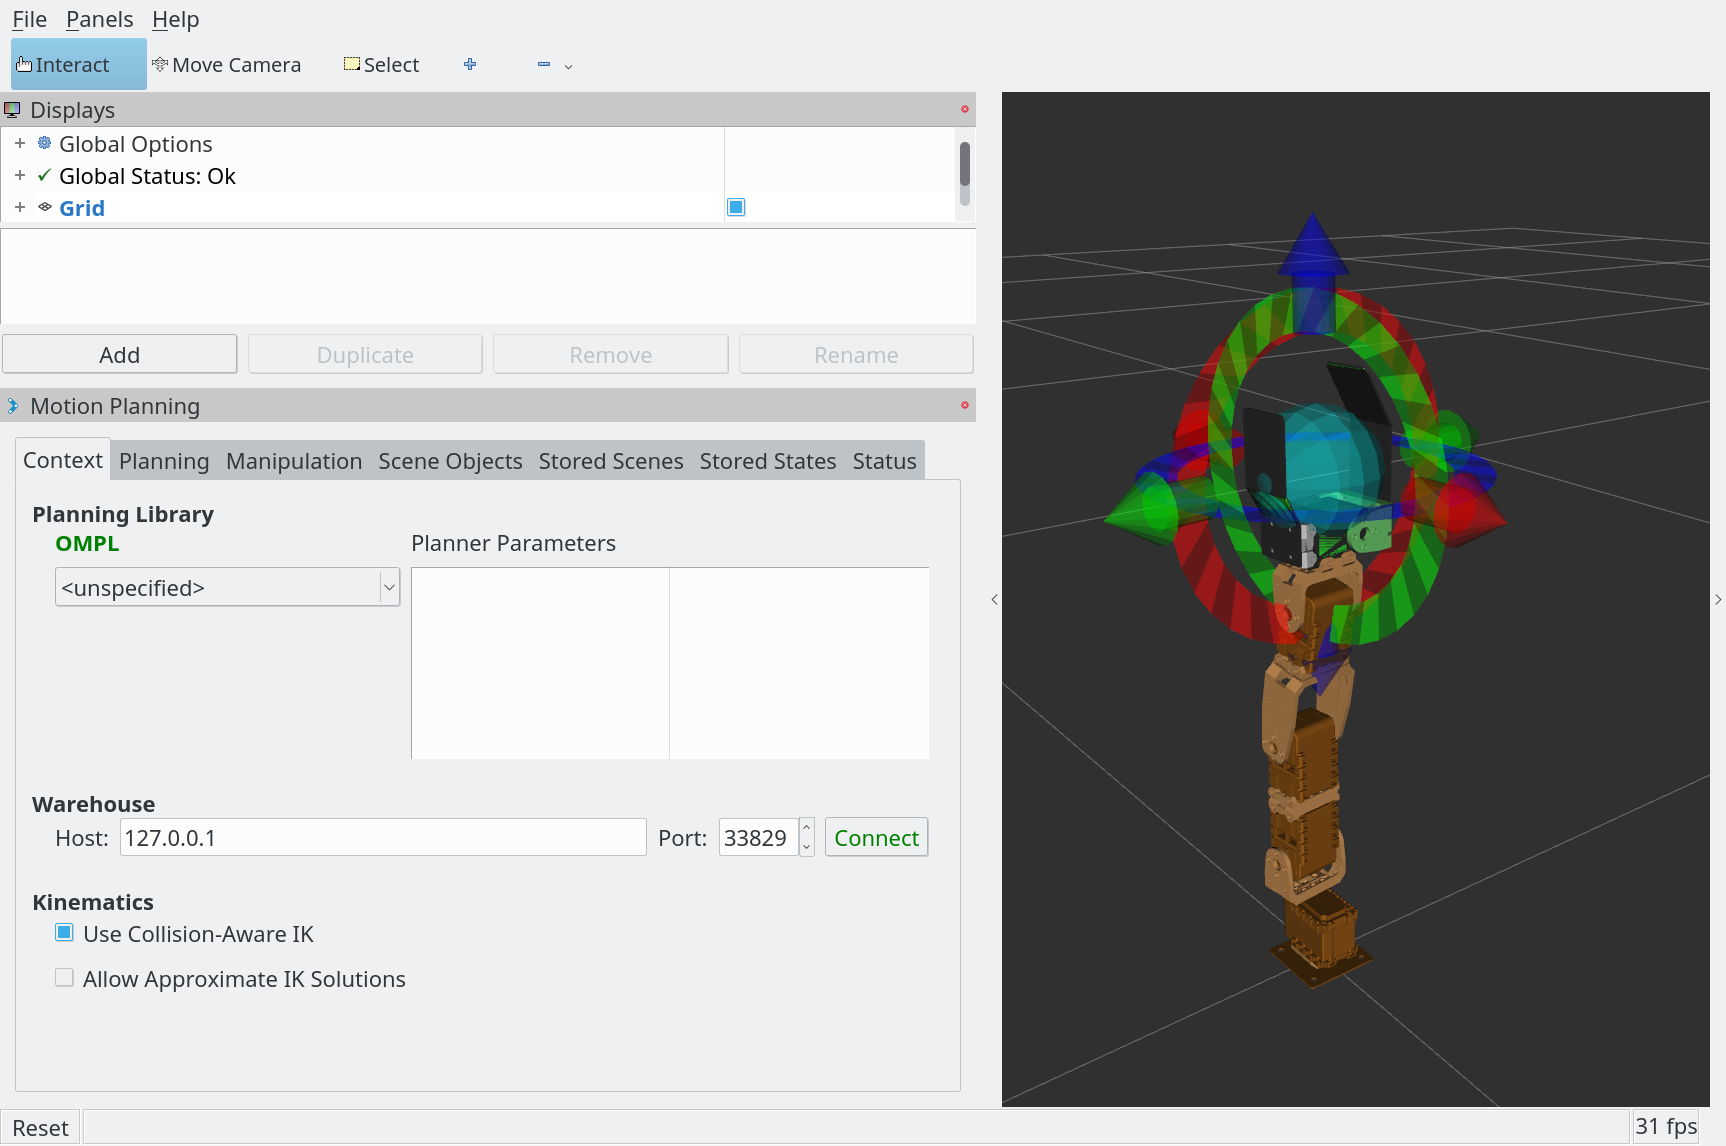
注意:コマンドの最後にconfig:=trueを忘れると、上記画像のようなGUIが表示されません。
RVizでカメラの制御は以下で行います。
- マウスをクリックとドラッグ
- 青い点を中心にしてカメラの回転
- Shift を押しながらマウスをクリックとドラッグ または マウスをミドルクリックとドラッグ
- 青い点を中心にしてカメラをXYで移動する
- マウスウィール または マウス右クリックとドラッグ
- 青い点を中心にしてカメラズーム
RViz内の「Motion Planning」パネルにある「Planning」タブをクリックして、以下のインターフェースを開きます。
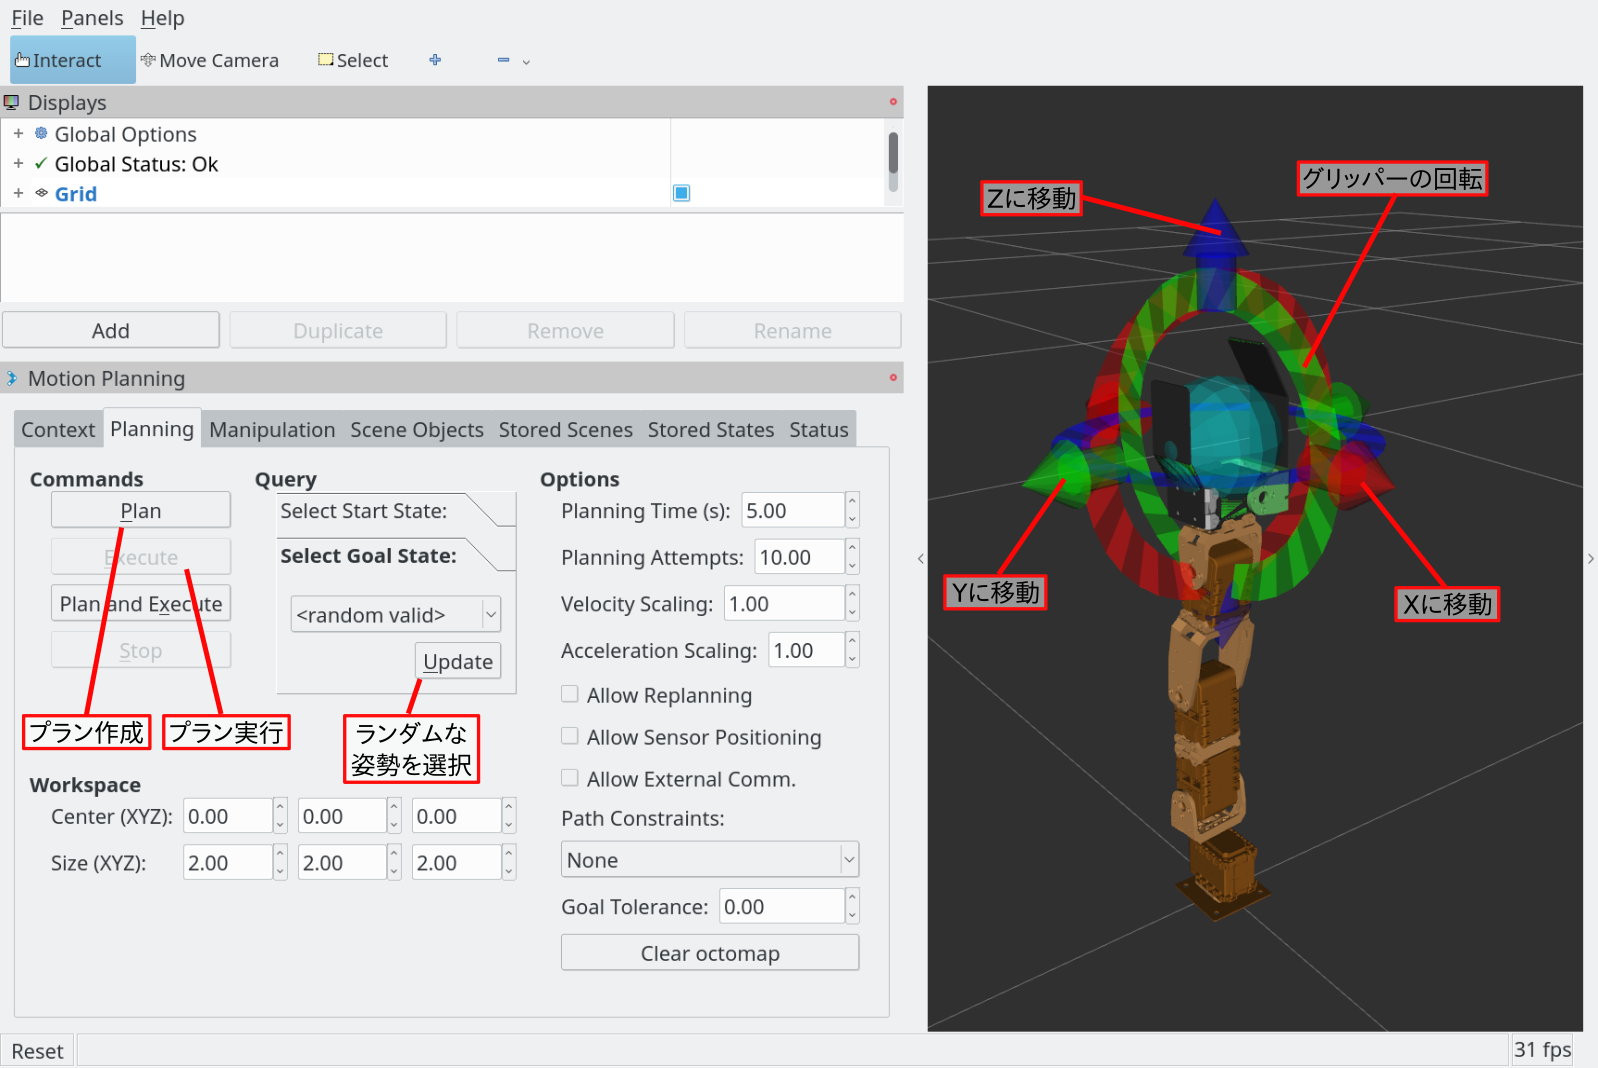
最初のテストとして、マニピュレータをランダムな姿勢に移動しましょう。Planningタブ内の「Select Goal State」で「<random valid>」が選択されているを確認して、「Update」をクリックします。
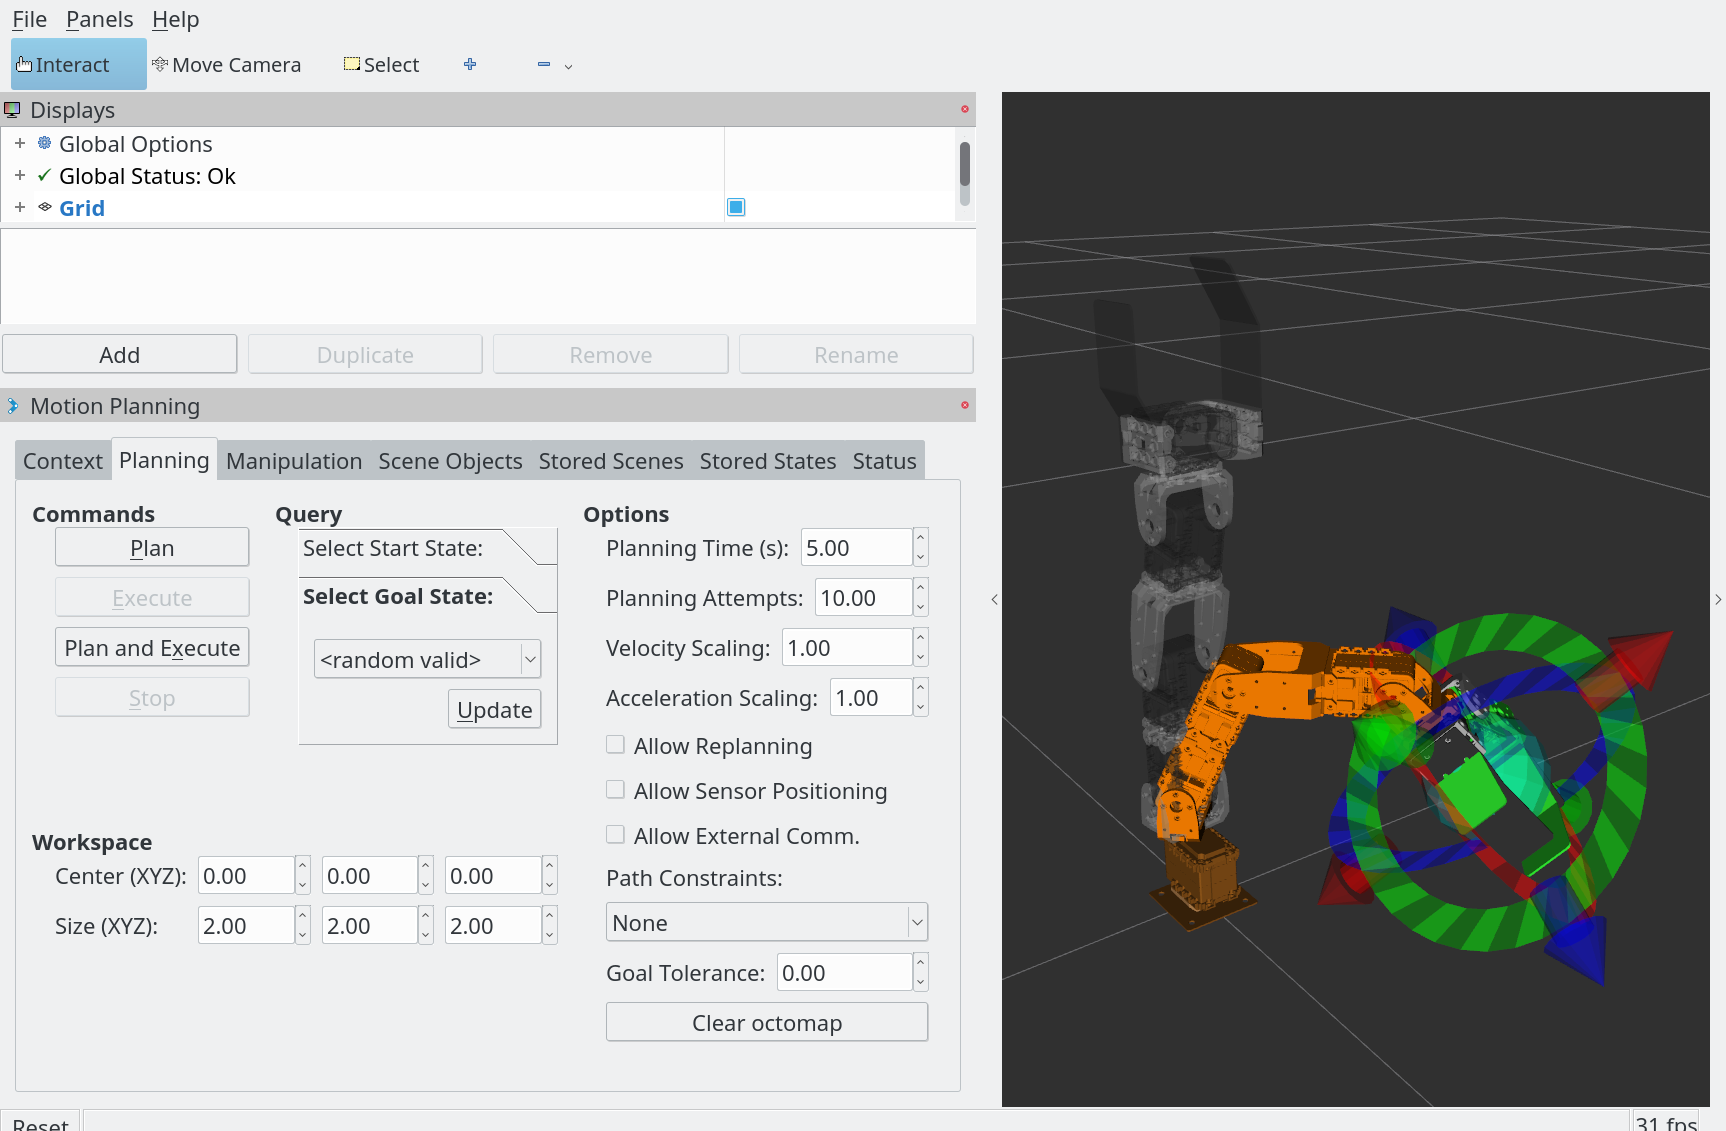
注意:本物のロボットを制御します。ランダムで選択された姿勢は机等に当たらないようになるまでに、「Update」をクリックしましょう。
安全な姿勢になったら、「Plan」をクリックします。MoveIt!が移動プランを計算します。RVizでロボットが追う経路は表示されます。
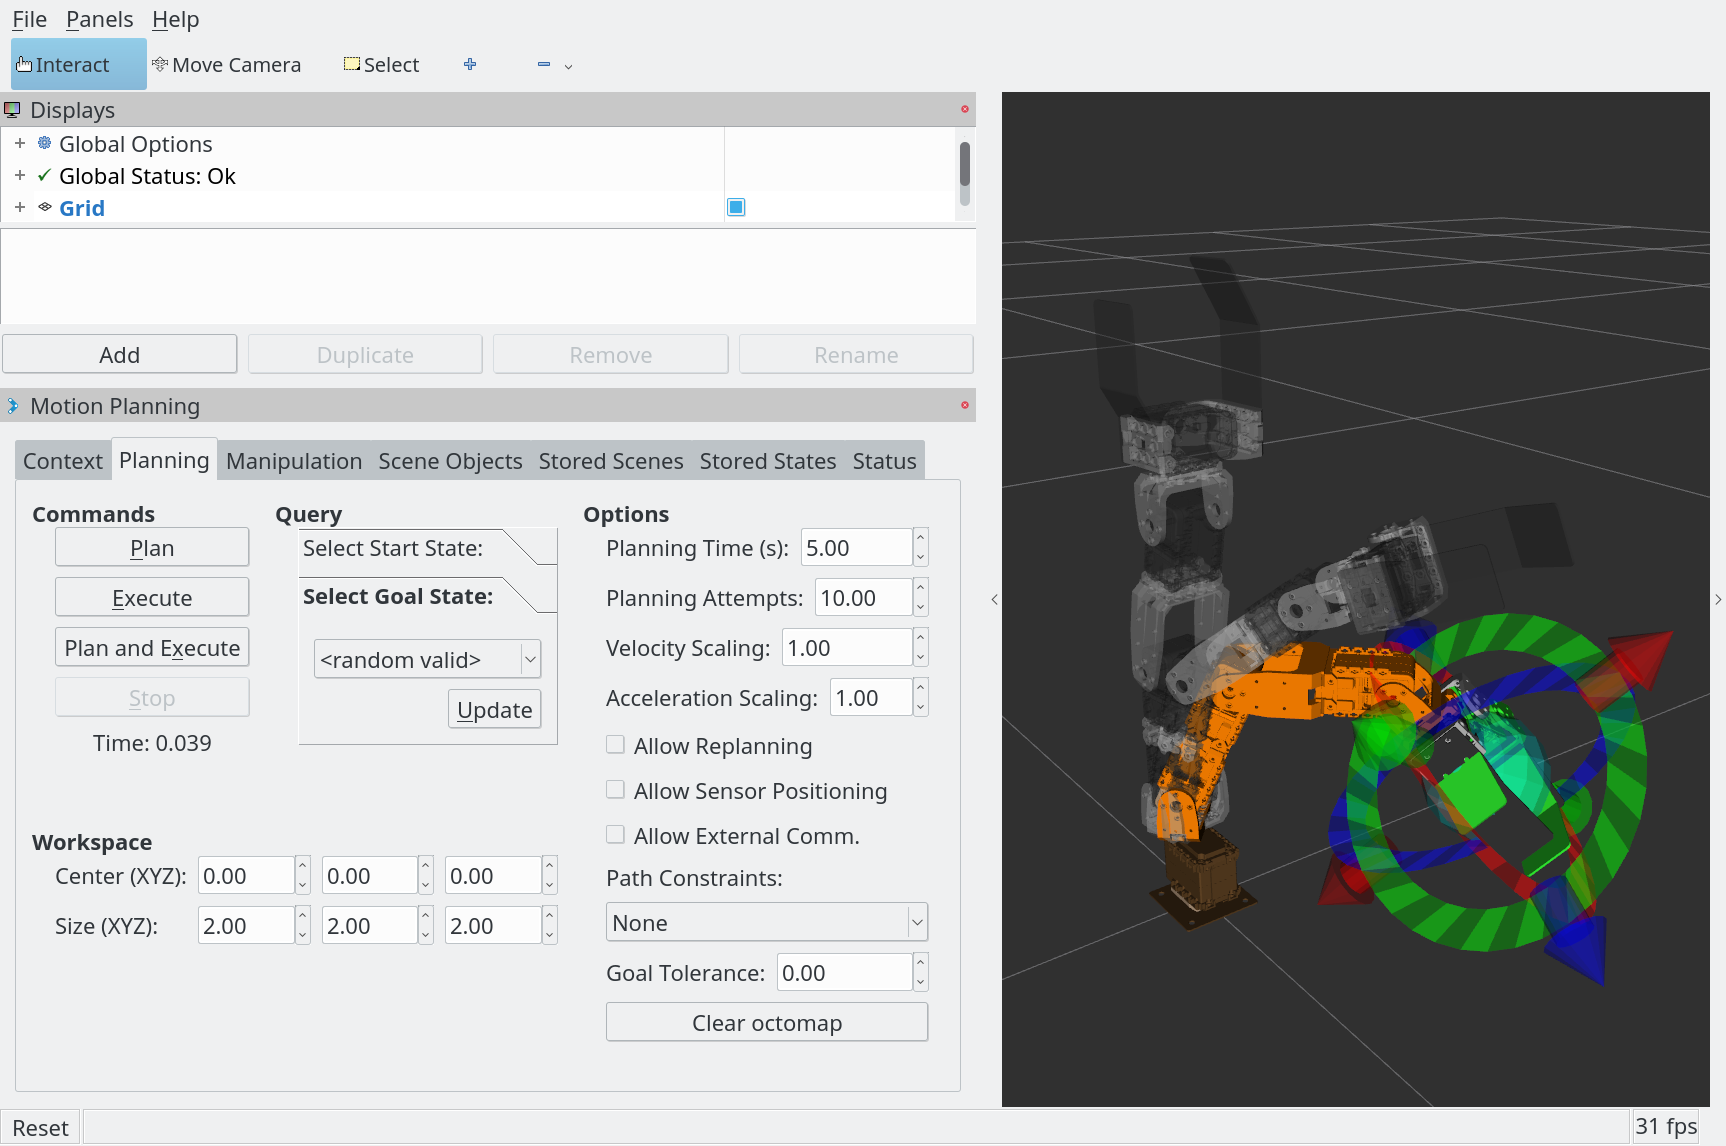
プランを実行します。「Execute」をクリックするとシミュレータ上のマニピュレータが指定した姿勢に移動します。RViz上でロボットの現在の姿勢が表示され、これも指定したポーズ(すなわちシミュレータ上のロボットのポーズ)に移動します。
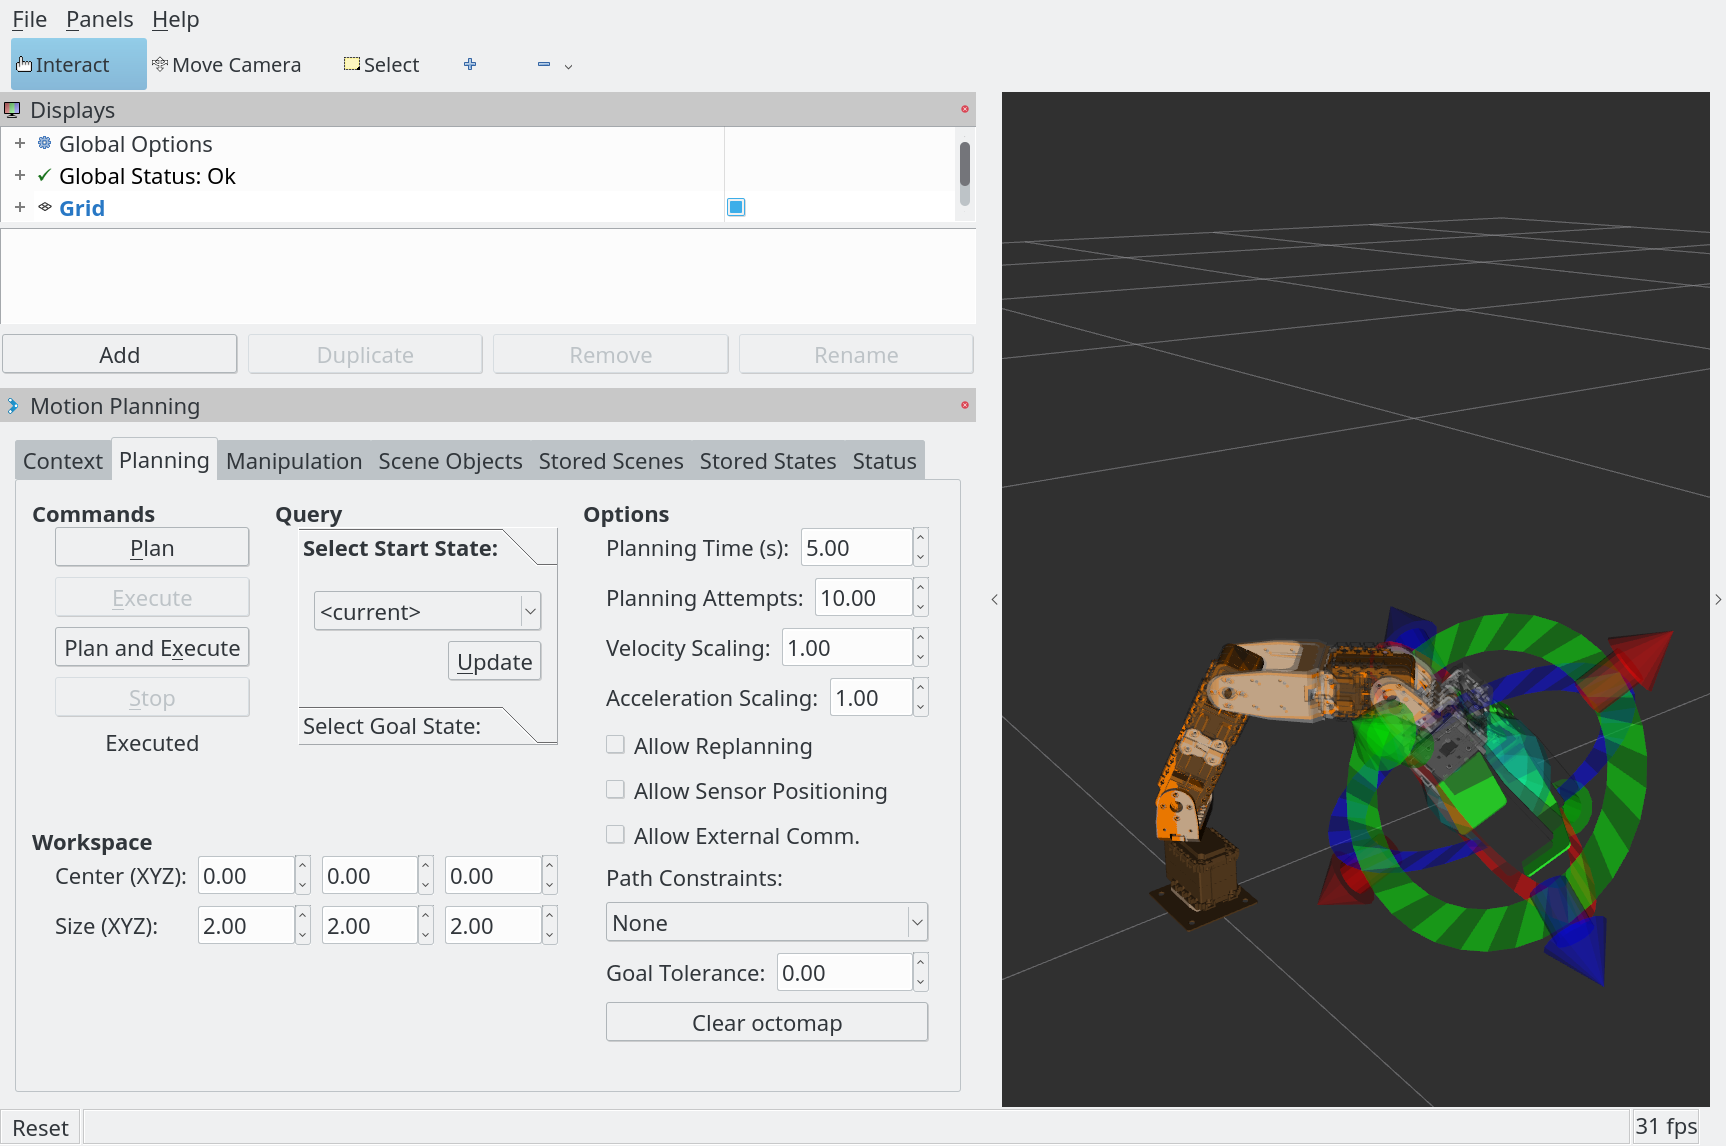
ランダムな姿勢に移動できたら、次に手動制御を行いましょう。RViz内でマニピュレータの先端に球体と丸と矢印があります。以下の方法でこれらを利用してグリッパーの位置と角度が制御できます。
- 球体をドラッグ
- グリッパーの位置を移動する。
- 丸を回す
- グリッパーの角度を変更する。(注意:CRANE+は4DOFのマニピュレータだけなのでグリッパーの角度は上下(緑色の丸)しか変更できない。他の角度変更は無視される。)
- 矢印をドラッグ
- グリッパーの位置を一つの軸だけで移動する。
基本的にMoveIt!のユーザインターフェースは可能か姿勢しか許さないので、時々マニピュレータは移動してくれないことや飛ぶことがあります。
お好みの姿勢にグリッパーを移動して、「Plan」と「Execute」ボタンでマニピュレータを移動しましょう。シミュレータ上のロボットはグリッパーが指定した位置と角度になるように動きます。
シミュレータで試す
シミュレータの利用により上記の手続きはハードウェアなしで行うことができます。ハードウェアの起動するステップの代わりにシミュレータ上のマニピュレータを起動し、残りの手続きはは変わりません。詳しい説明は「ROSの便利機能」の「シミュレータ」セクションに参照してください。
ノードからマニピュレータを制御
MoveIt!を利用するために、主にノードからアプリケーションやタスクに沿ったようにマニピュレータを制御したいでしょう。ここで簡単なノードの作成によりグリッパーの位置と角度を制御します。
ノードを作成
最初にワークスペースにノード用の新しいパッケージを作成します。
1
2
3
4
5
6
7
8
9
$ cd ~/crane_plus_ws/src/
$ catkin_create_pkg rsj_2017_pick_and_placer roscpp moveit_core moveit_ros_planning_interface moveit_visual_tools \
    moveit_msgs moveit_commander tf actionlib control_msgs geometry_msgs shape_msgs trajectory_msgs
Created file rsj_2017_pick_and_placer/CMakeLists.txt
Created file rsj_2017_pick_and_placer/package.xml
Created folder rsj_2017_pick_and_placer/include/rsj_2017_pick_and_placer
Created folder rsj_2017_pick_and_placer/src
Successfully created files in /home/username/crane_plus_ws/src/rsj_2017_pick_and_placer.
    Please adjust the values in package.xml.
パッケージ内のCMakeLists.txtにあるfind_packageコマンドを見つけて(10行目ぐらいにあります。)、そのしたに下記を追加します。
1
2
3
4
5
6
find_package(Boost REQUIRED
  system
  filesystem
  date_time
  thread
)
CMakeLists.txtのcatkin_packageコマンド(120行目ぐらいにあります。)にあるCATKIN_DEPENDS行をアンコメントします。編集後は下記のようになります。
1
2
3
4
5
6
7
8
9
10
11
12
13
14
15
16
17
18
catkin_package(
#  INCLUDE_DIRS include
#  LIBRARIES rsj_2017_pick_and_placer
  CATKIN_DEPENDS
    actionlib
    control_msgs
    geometry_msgs
    moveit_commander
    moveit_core
    moveit_msgs
    moveit_ros_planning_interface
    moveit_visual_tools
    roscpp
    shape_msgs
    tf
    trajectory_msgs
#  DEPENDS system_lib
)
CMakeLists.txtでinclude_directoriesにBoostのディレクトリを追加します。
1
2
3
4
include_directories(
  ${catkin_INCLUDE_DIRS}
  ${Boost_INCLUDE_DIR}
)
パッケージ内のCMakeLists.txtにノード用のコンパイル情報を追加します。ここにもBoostの情報を利用します。
1
2
3
4
5
6
7
8
9
10
11
12
13
14
15
16
17
18
19
20
21
22
23
## Declare a C++ executable
## With catkin_make all packages are built within a single CMake context
## The recommended prefix ensures that target names across packages don't collide
# add_executable(${PROJECT_NAME}_node src/servo_control_node.cpp)
add_executable(${PROJECT_NAME}_pick_and_placer src/pick_and_placer.cpp)

## Rename C++ executable without prefix
## The above recommended prefix causes long target names, the following renames the
## target back to the shorter version for ease of user use
## e.g. "rosrun someones_pkg node" instead of "rosrun someones_pkg someones_pkg_node"
set_target_properties(${PROJECT_NAME}_pick_and_placer
  PROPERTIES OUTPUT_NAME pick_and_placer PREFIX "")

## Add cmake target dependencies of the executable
## same as for the library above
add_dependencies(${PROJECT_NAME}_pick_and_placer
  ${${PROJECT_NAME}_EXPORTED_TARGETS} ${catkin_EXPORTED_TARGETS})

## Specify libraries to link a library or executable target against
target_link_libraries(${PROJECT_NAME}_pick_and_placer
  ${catkin_LIBRARIES}
  ${Boost_LIBRARIES}
)
なお、必ず ファイルトップにadd_compile_options(-std=c++11)の行をアンコメントしてください。
rsj_2017_pick_and_placerパッケージ内のsrc/ディレクトリにpick_and_placer.cppというファイルを作成します。そしてエディターで開き、以下のソースを入力します。
1
2
3
4
5
6
7
8
9
#include <ros/ros.h>

int main(int argc, char **argv) {
  ros::init(argc, argv, "pickandplacer");
  ros::NodeHandle nh;

  ros::shutdown();
  return 0;
}
このソースは空のノードです。これから少しづつMoveIt!のAPIを利用するコードを追加してマニピュレータを制御します。
マニピュレータを保存された姿勢に移動
最初は、ファイルの上に以下のヘッダーをインクルードします。(「ここから追加」と「ここまで追加」の行の間のソースを自分のソースファイルに追加してください。)
1
2
3
4
5
6
#include <ros/ros.h>
/***** ここから追加 *****/
#include <moveit/move_group_interface/move_group_interface.h>
/***** ここまで追加 *****/

int main(int argc, char **argv) {
7行目(ros::NodeHandle nh;)の後に以下を追加します。MoveIt!はアシンクロナスな計算をしないといけないので、このコードによりROSのアシンクロナスな機能を初期化します。
1
2
3
4
5
6
7
8
9
10
  ros::init(argc, argv, "pickandplacer");
  ros::NodeHandle nh;

  /***** ここから追加 *****/
  ros::AsyncSpinner spinner(2);
  spinner.start();
  /***** ここまで追加 *****/

  ros::shutdown();
  return 0;
次はMoveIt!のAPIの初期化です。そしてmain関数に以下の変数を追加します。
1
2
3
4
5
6
7
8
  ros::AsyncSpinner spinner(2);
  spinner.start();

  /***** ここから追加 *****/
  moveit::planning_interface::MoveGroupInterface arm("arm");
  /***** ここまで追加 *****/

  ros::shutdown();
MoveIt!は「MoveGroup」という存在を制御します。「MoveGroup」とは、ロボット内の複数のジョイントのグループです。CRANE+には2つのMoveGroupがあります。「arm」は手首の部分までのジョイントを制御し、「gripper」は指のジョイントのみを制御します。以下は「arm」のMoveGroupです。
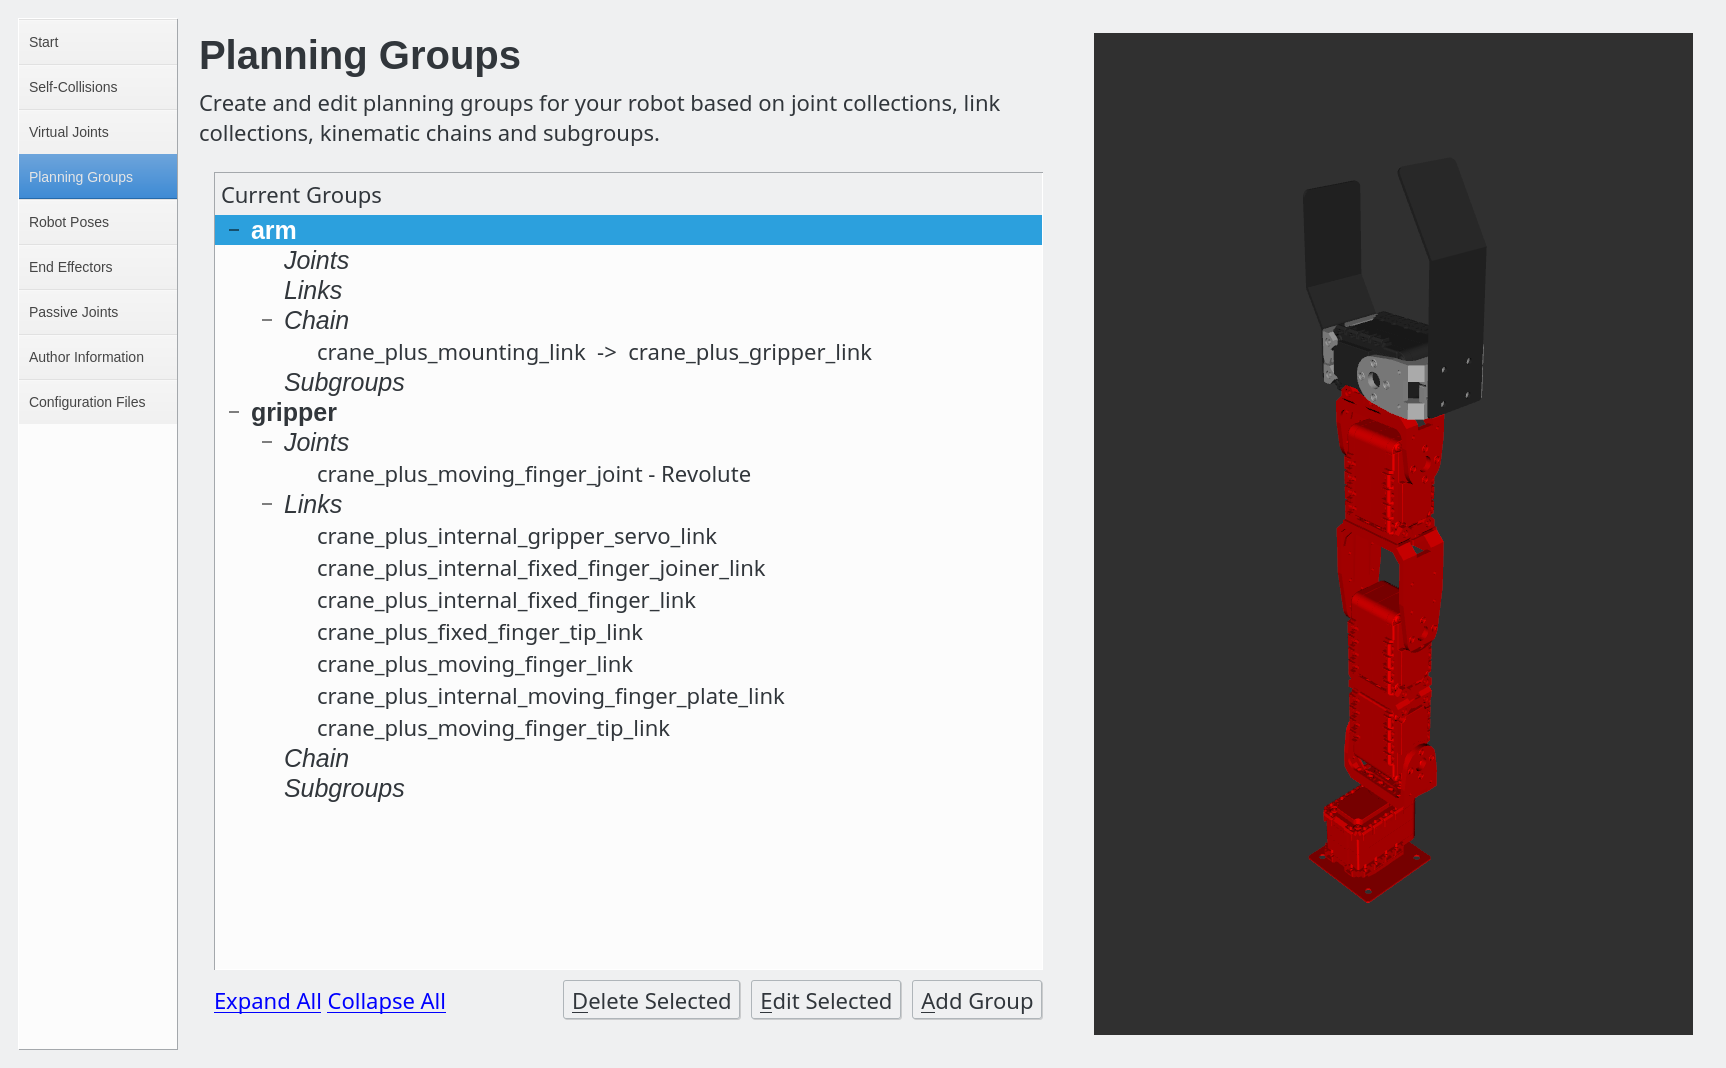
armのMoveGroupの先端はグリッパーの真ん中ぐらいに設定されています。これでarmの位置を指定すると、グリッパーはその位置の周りに行きます。
MoveIt!はどの座標系で制御するかを指定することが必要です。今回ロボットのベースに基づいた「base_link」座標系を利用します。位置制御の座標等はロボットのベースから図るという意味です。
1
2
3
4
5
6
  moveit::planning_interface::MoveGroupInterface arm("arm");
  /***** ここから追加 *****/
  arm.setPoseReferenceFrame("base_link");
  /***** ここまで追加 *****/

  ros::shutdown();
これでマニピュレータは制御できるようになりました。
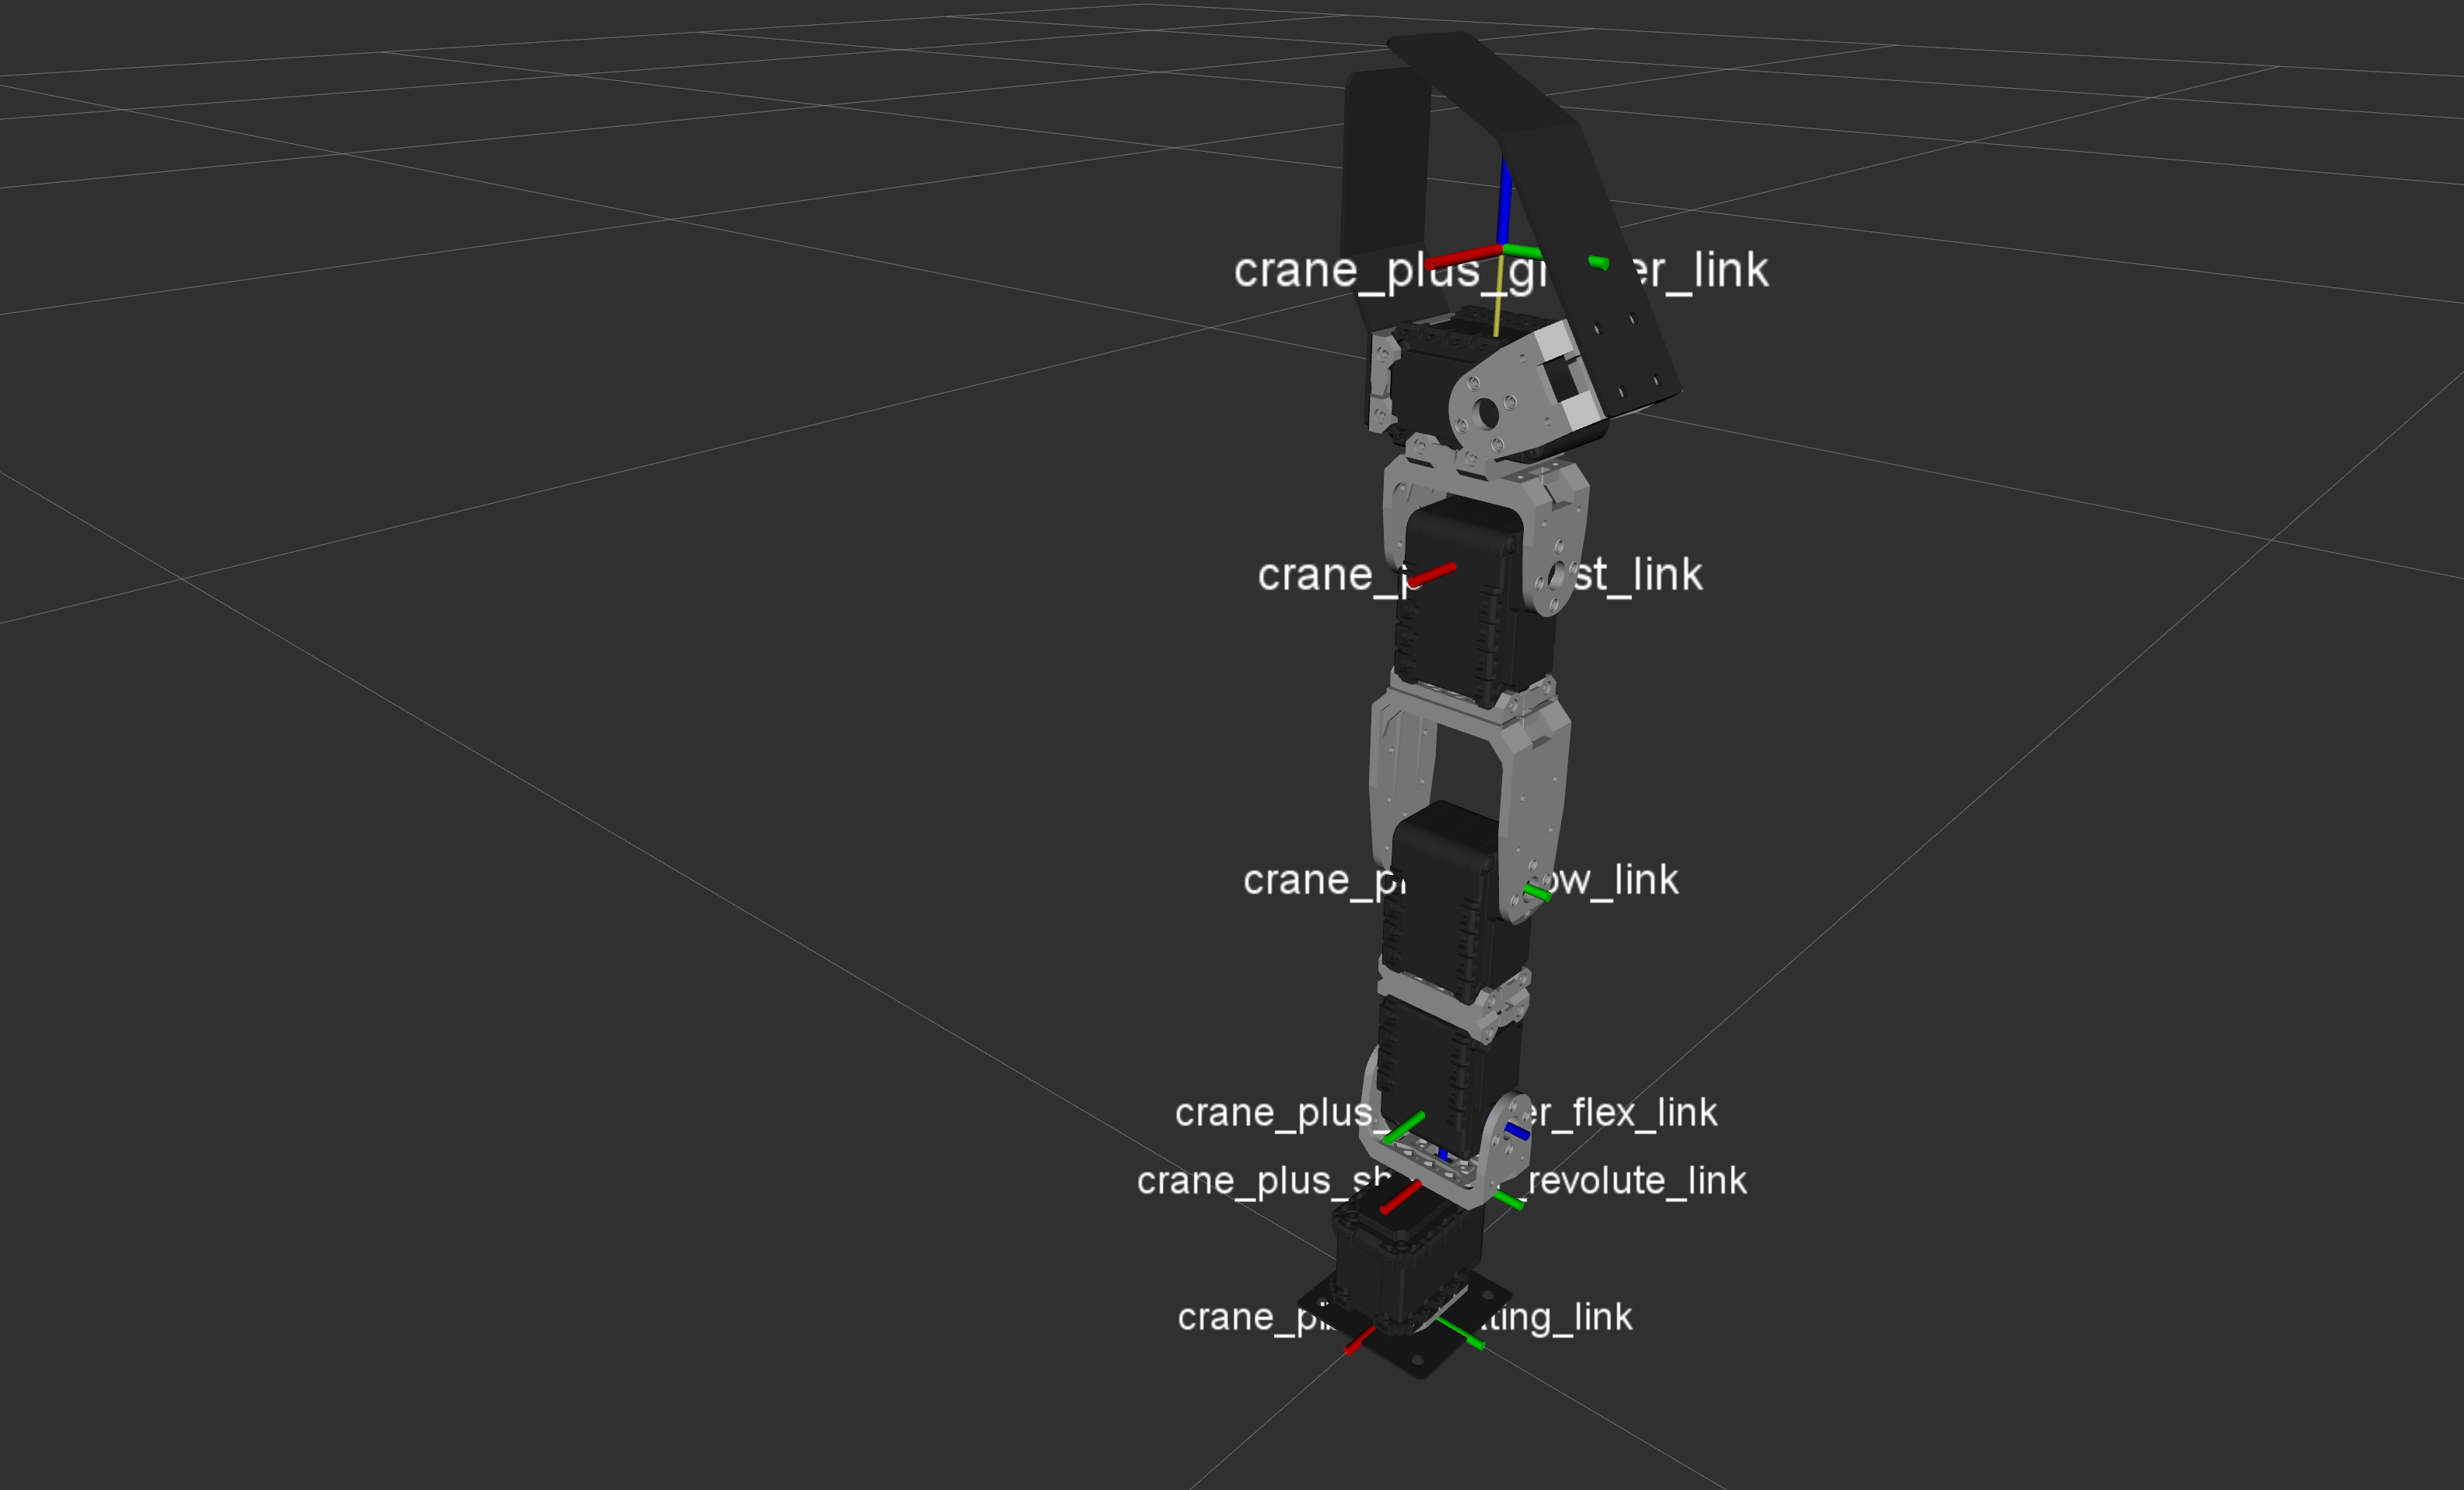
最初の動きとして、マニピュレータを立てましょう。MoveIt!は「Named pose」(名付きポーズ)というコンセプトを持ちます。CRANE+のMoveIt!コンフィグレーション(crane_plus_moveit_configパッケージにある)は2つの名付きポーズを指定します。
vertical- マニピュレータが真上を指す
resting- マニピュレータは休んでいるような姿勢になる
verticalポーズを利用してマニピュレータを立ちます。
1
2
3
4
5
6
7
  arm.setPoseReferenceFrame("base_link");

  /***** ここから追加 *****/
  arm.setNamedTarget("vertical");
  /***** ここまで追加 *****/

  ros::shutdown();
移動先を設定した後、MoveIt!にプラン作成を移動命令を出します。
1
2
3
4
5
6
  arm.setNamedTarget("vertical");
  /***** ここから追加 *****/
  arm.move();
  /***** ここまで追加 *****/

  ros::shutdown();
ノードをコンパイルします。端末で以下を実行します。
1
2
3
4
5
6
7
8
9
10
11
12
13
$ cd ~/crane_plus_ws/
$ catkin_make
Base path: /home/username/crane_plus_ws
Source space: /home/username/crane_plus_ws/src
Build space: /home/username/crane_plus_ws/build
Devel space: /home/username/crane_plus_ws/devel
Install space: /home/username/crane_plus_ws/install
(省略)
[ 85%] Linking CXX executable /home/username/crane_plus_ws/devel/lib/rsj_2017_pick_and_placer/pick_and_placer
[ 85%] Built target pick_and_placer_pick_and_placer
[100%] Linking CXX executable /home/username/crane_plus_ws/devel/lib/
         crane_plus_camera_calibration/calibrate_camera_checkerboard
[100%] Built target calibrate_camera_checkerboard
次にマニピュレータを起動します。
1
2
3
4
5
6
7
8
9
10
11
$ source devel/setup.bash
$ roslaunch crane_plus_hardware start_arm_standalone.launch
... logging to /home/username/.ros/log/4de82534-3e85-11e7-a03f-d8cb8ae35bff/roslaunch-alnilam-27138.log
Checking log directory for disk usage. This may take awhile.
Press Ctrl-C to interrupt
Done checking log file disk usage. Usage is <1GB.

started roslaunch server http://alnilam:37805/
(省略)
[joint_trajectory_controller_spawner-4] process has finished cleanly
[servo_controller_spawner-3] process has finished cleanly
そして、MoveIt!を起動します。別の端末で以下のコマンドを実行します。
1
2
3
4
5
6
7
8
9
10
11
12
13
14
$ cd ~/crane_plus_ws/
$ source devel/setup.bash
$ roslaunch crane_plus_moveit_config move_group.launch
... logging to /home/username/.ros/log/4de82534-3e85-11e7-a03f-d8cb8ae35bff/roslaunch-alnilam-28429.log
Checking log directory for disk usage. This may take awhile.
Press Ctrl-C to interrupt
Done checking log file disk usage. Usage is <1GB.

started roslaunch server http://alnilam:33774/
(省略)
[ INFO] [1495412987.240640847]: MoveGroup context using planning plugin ompl_interface/OMPLPlanner
[ INFO] [1495412987.240652629]: MoveGroup context initialization complete

You can start planning now!
最後に、作成したノードを起動します。別の端末で以下を実行します。
1
2
3
4
5
6
$ cd ~/crane_plus_ws/
$ source devel/setup.bash
$ rosrun rsj_2017_pick_and_placer pick_and_placer
[ INFO] [1495413039.031396268]: Loading robot model 'crane_plus'...
[ INFO] [1495413039.031446316]: No root/virtual joint specified in SRDF. Assuming fixed joint
[ INFO] [1495413040.033491742]: Ready to take commands for planning group arm.
成功であれば、マニピュレータは立ちます。
下記は今回のソース変更です。2箇所を編集しました。
1
2
3
4
5
6
7
8
9
10
11
12
13
14
15
16
17
18
19
20
21
22
#include <ros/ros.h>
/***** ここから追加 *****/
#include <moveit/move_group_interface/move_group_interface.h>
/***** ここまで追加 *****/

int main(int argc, char **argv) {
  ros::init(argc, argv, "pickandplacer");
  ros::NodeHandle nh;

  /***** ここから追加 *****/
  ros::AsyncSpinner spinner(2);
  spinner.start();

  moveit::planning_interface::MoveGroupInterface arm("arm");
  arm.setPoseReferenceFrame("base_link");
  arm.setNamedTarget("vertical");
  arm.move();
  /***** ここまで追加 *****/

  ros::shutdown();
  return 0;
}
このソースは以下のURLでダウンロード可能です。
https://github.com/gbiggs/rsj_2017_pick_and_placer/tree/named_pose
下記のように自分のワークスペースに入れて利用できます。
1
2
3
4
5
6
$ cd ~/crane_plus_ws/src
$ git clone https://github.com/gbiggs/rsj_2017_pick_and_placer
$ git checkout named_pose
$ cd ~/crane_plus_ws
$ catkin_make
$ rosrun rsj_2017_pick_and_placer pick_and_placer
編集されたC++ファイルは以下です。
https://github.com/gbiggs/rsj_2017_pick_and_placer/blob/named_pose/src/pick_and_placer.cpp
マニピュレータを任意の姿勢に移動
MoveIt!によってマニピュレータのグリッパーを任意の姿勢に移動します。
グリッパーの姿勢を指定するために、位置と角度を指定することが必要です。作成したソースからarm.setNamedTarget("vertical");とarm.move();の2行を削除し、以下を追加します。
1
2
3
4
5
6
7
8
9
10
11
12
13
14
15
16
17
18
19
20
21
22
23
24
25
26
27
28
29
  moveit::planning_interface::MoveGroupInterface arm("arm");
  arm.setPoseReferenceFrame("base_link");
  /***** ここから削除 *****/
  arm.setNamedTarget("vertical");
  arm.move();
  /***** ここまで削除 *****/

  /***** ここから追加 *****/
  // Prepare
  ROS_INFO("Moving to prepare pose");
  geometry_msgs::PoseStamped pose;
  pose.header.frame_id = "base_link";
  pose.pose.position.x = 0.2;
  pose.pose.position.y = 0.0;
  pose.pose.position.z = 0.1;
  pose.pose.orientation.x = 0.0;
  pose.pose.orientation.y = 0.707106;
  pose.pose.orientation.z = 0.0;
  pose.pose.orientation.w = 0.707106;

  arm.setPoseTarget(pose);
  if (!arm.move()) {
    ROS_WARN("Could not move to prepare pose");
    return 1;
  }
  /***** ここまで追加 *****/

  ros::shutdown();
  return 0;
上記のソースの前半はグリッパーの姿勢を設定します。geometry_msgs/PoseStampedメッセージを利用します:
1
2
3
4
5
6
7
8
9
10
11
12
13
14
std_msgs/Header header
  uint32 seq
  time stamp
  string frame_id
geometry_msgs/Pose pose
  geometry_msgs/Point position
    float64 x
    float64 y
    float64 z
  geometry_msgs/Quaternion orientation
    float64 x
    float64 y
    float64 z
    float64 w
headerの下のframe_idに、このポーズのタスクフレーム(座標系)を指定します。先に指定した制御座標系base_linkを指定します。
poseの下のpositionはグリッパーの位置です。マニピュレータから真っ直ぐ前の20 cm、机から10 cm離れた所にします。
poseの下のorientationはグリッパーの角度です。ROSでは角度をオイラー角ではなくて、四元数(quaternion)として指定します。人に分かりにくくなりますが、計算としてより楽で早いです。指定している角度は、グリッパーがX軸を指します(机に対して水平になります。)。
もう一度コンパイルして実行します。
1
2
3
4
5
6
7
8
9
10
11
12
13
14
15
16
17
$ cd ~/crane_plus_ws/
$ catkin_make
Base path: /home/username/crane_plus_ws
Source space: /home/username/crane_plus_ws/src
Build space: /home/username/crane_plus_ws/build
Devel space: /home/username/crane_plus_ws/devel
Install space: /home/username/crane_plus_ws/install
(省略)
[ 85%] Linking CXX executable /home/username/crane_plus_ws/devel/lib/rsj_2017_pick_and_placer/pick_and_placer
[ 85%] Built target pick_and_placer_pick_and_placer
[100%] Linking CXX executable /home/username/crane_plus_ws/devel/lib/
         crane_plus_camera_calibration/calibrate_camera_checkerboard
[100%] Built target calibrate_camera_checkerboard
$ rosrun rsj_2017_pick_and_placer pick_and_placer
[ INFO] [1495423076.668768146]: Loading robot model 'crane_plus'...
[ INFO] [1495423076.668847786]: No root/virtual joint specified in SRDF. Assuming fixed joint
[ INFO] [1495423077.846839325]: Ready to take commands for planning group arm.
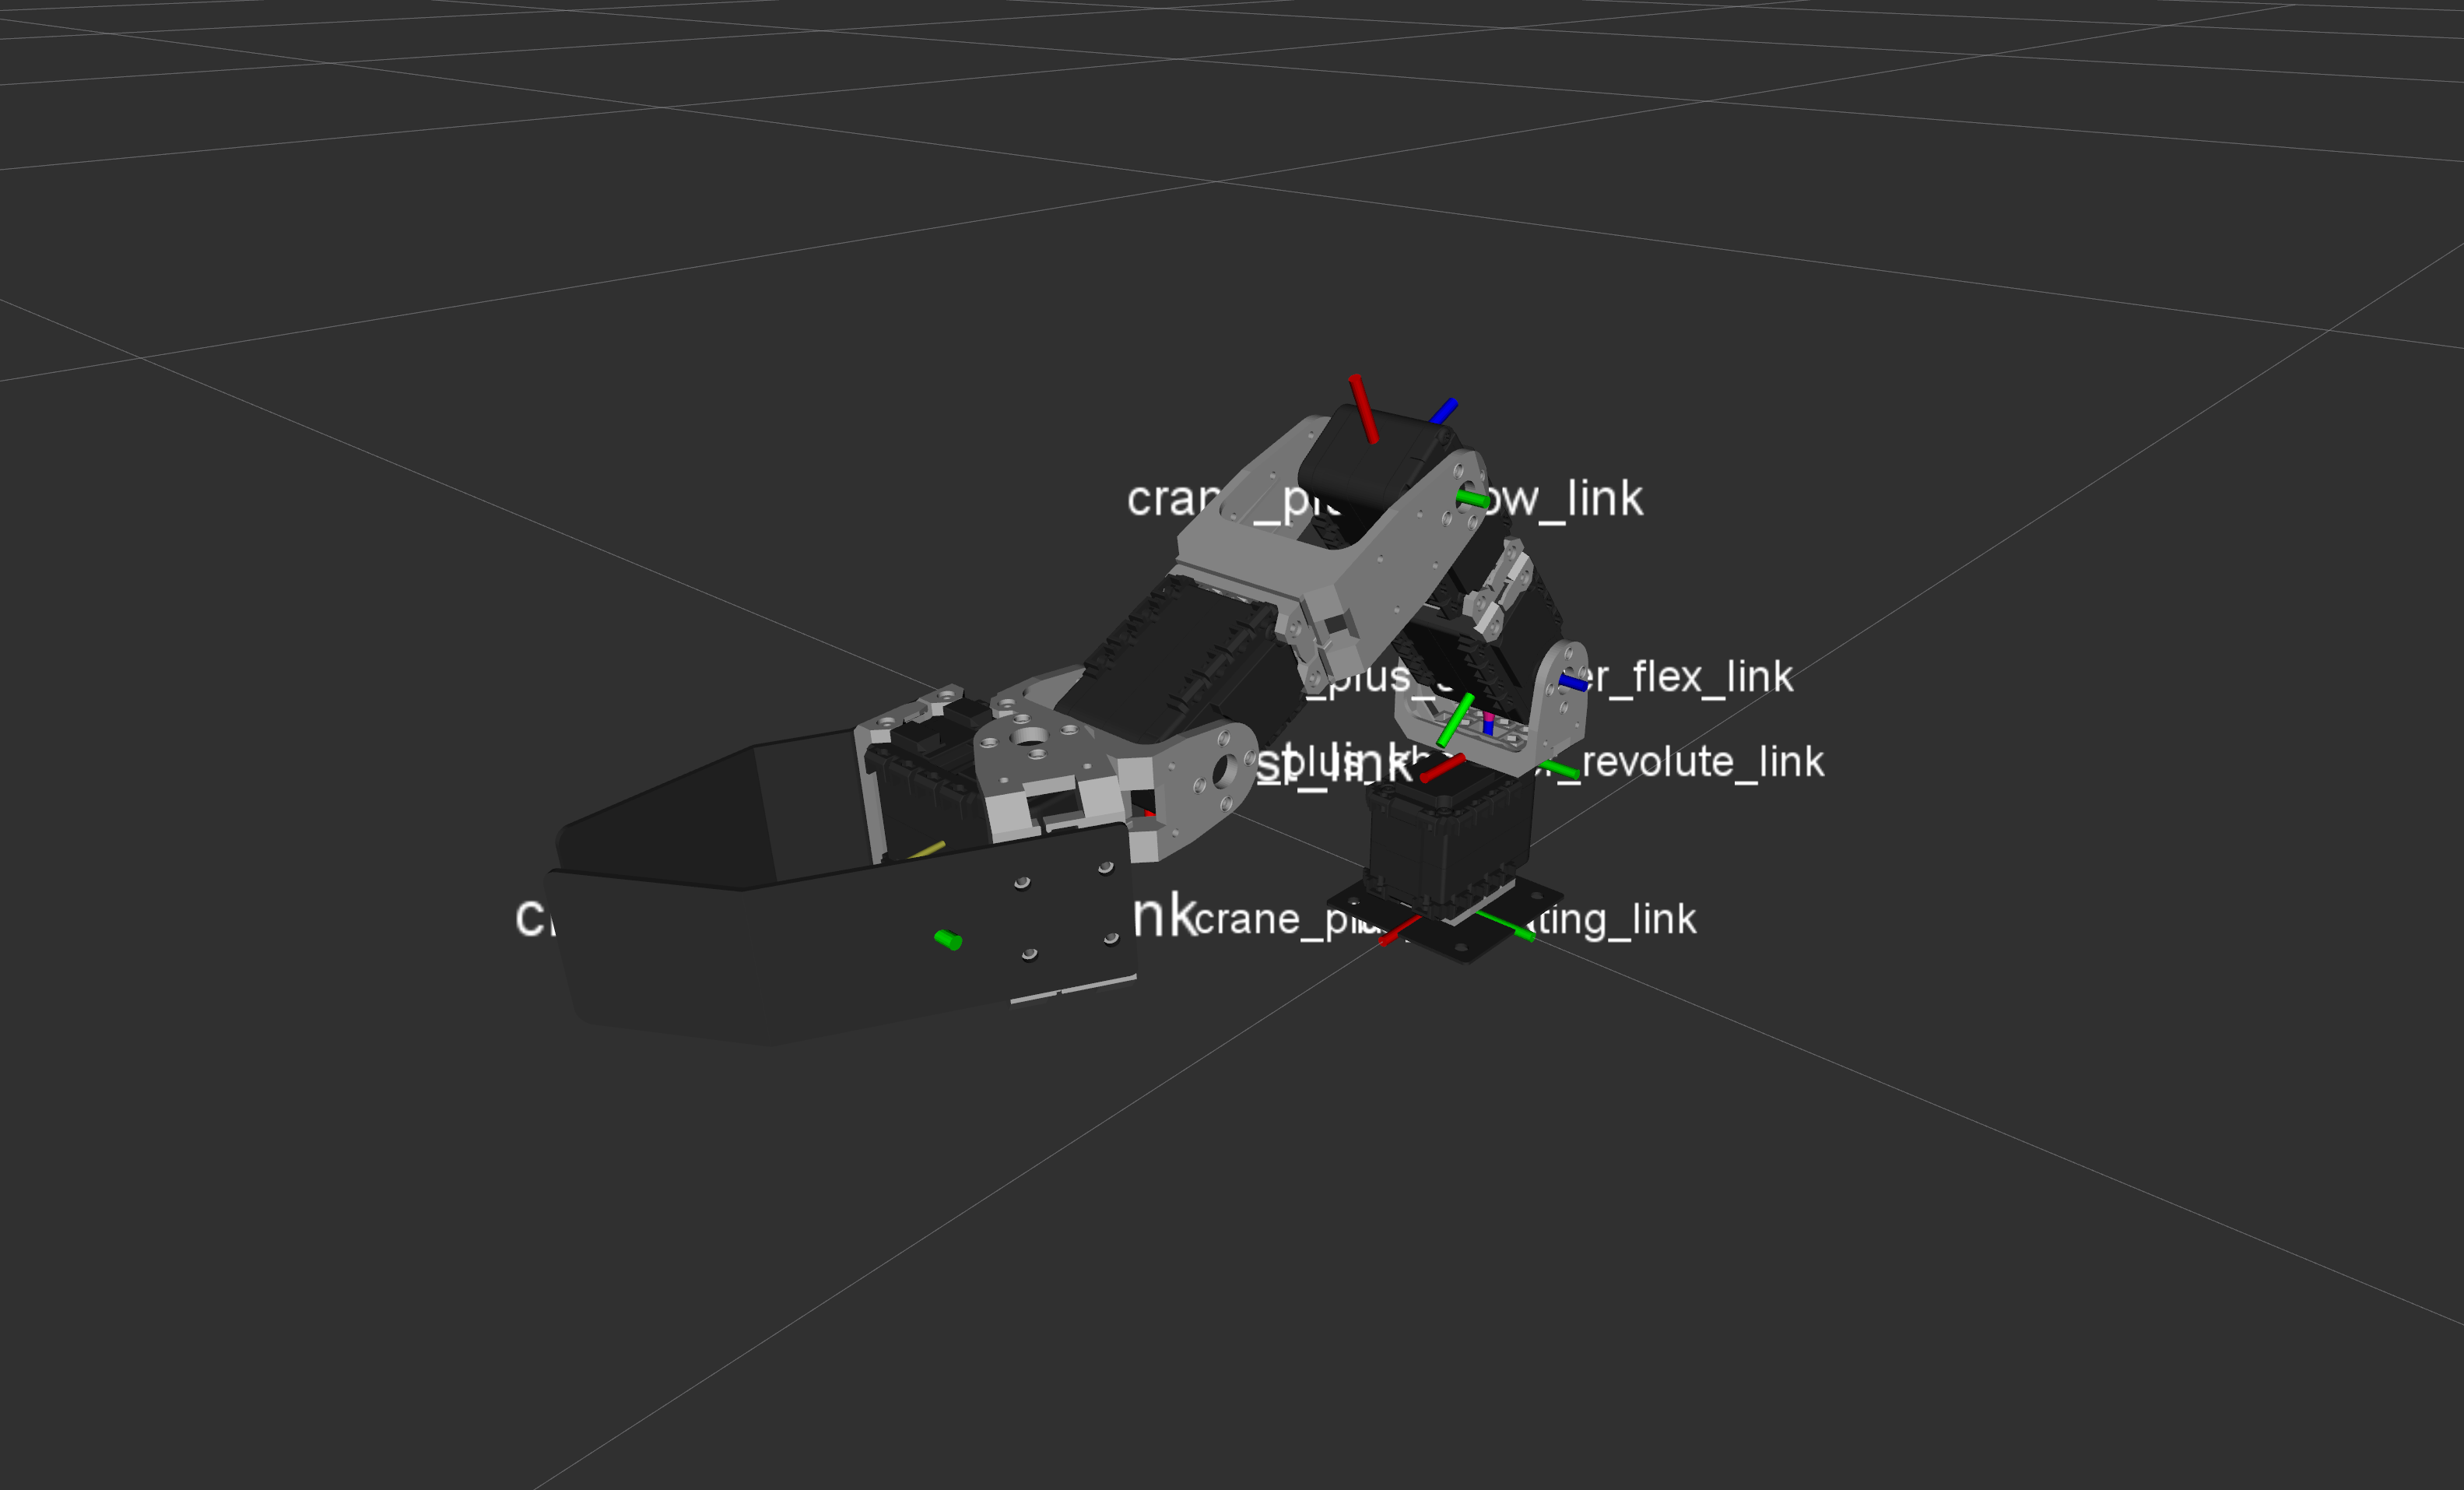
下記は今回のソース変更です。1箇所を編集しました。
1
2
3
4
5
6
7
8
9
10
11
12
13
14
15
16
17
18
19
20
21
22
23
24
25
26
27
28
29
30
31
32
33
34
35
36
#include <ros/ros.h>
#include <moveit/move_group_interface/move_group_interface.h>

int main(int argc, char **argv) {
  ros::init(argc, argv, "pickandplacer");
  ros::NodeHandle nh;

  ros::AsyncSpinner spinner(2);
  spinner.start();

  moveit::planning_interface::MoveGroupInterface arm("arm");
  arm.setPoseReferenceFrame("base_link");

  /***** ここから追加 *****/
  // Prepare
  ROS_INFO("Moving to prepare pose");
  geometry_msgs::PoseStamped pose;
  pose.header.frame_id = "base_link";
  pose.pose.position.x = 0.2;
  pose.pose.position.y = 0.0;
  pose.pose.position.z = 0.1;
  pose.pose.orientation.x = 0.0;
  pose.pose.orientation.y = 0.707106;
  pose.pose.orientation.z = 0.0;
  pose.pose.orientation.w = 0.707106;

  arm.setPoseTarget(pose);
  if (!arm.move()) {
    ROS_WARN("Could not move to prepare pose");
    return 1;
  }
  /***** ここまで追加 *****/

  ros::shutdown();
  return 0;
}
このソースは以下のURLでダウンロード可能です。
https://github.com/gbiggs/rsj_2017_pick_and_placer/tree/specified_pose
下記のように自分のワークスペースに入れて利用できます。
1
2
3
4
5
6
$ cd ~/crane_plus_ws/src
$ git clone https://github.com/gbiggs/rsj_2017_pick_and_placer
$ git checkout specified_pose
$ cd ~/crane_plus_ws
$ catkin_make
$ rosrun rsj_2017_pick_and_placer pick_and_placer
編集されたC++ファイルは以下です。
https://github.com/gbiggs/rsj_2017_pick_and_placer/blob/specified_pose/src/pick_and_placer.cpp
グリッパーを開く
MoveIt!はグリッパーの制御もできるが、直接グリッパーコントローラにコマンドを出すこともよくあります。こちらでは後方の方法でグリッパーの開けく・閉めることを行います。
グリッパーコントローラはROSのactionlib(アシンクロナスRPCのような構造)を利用し、control_msgs/GripperCommandActionアクションを利用します。このアクションのリクエストはcontrol_msgs/GripperCommandGoalで、内容は以下です。
1
2
3
control_msgs/GripperCommand command
  float64 position
  float64 max_effort
上記のメッセージの中にあるpositionはグリッパーの指の幅を示します。ゼロにするとグリッパーは完全に閉じられます。開いた状態の幅はもちろんグリッパーによって変わります。CRANE+の場合は、10 cm 程度です。すなわち、グリッパーが開けたい時にpositionを0.1に設定し、閉じたい時にpositionを0に設定します。正しい、何かを持ちたい場合はゼロに設定すると グリッパーサーボがストールしエラーになる可能性や持つものを壊す可能性がある ので、普段は持つ物の大きさに合わせます。
アクションの利用はサーバーとクライアントが必要です。CRANE+のグリッパーの場合には、サーバーはcrane_plus_gripperノードで、クライントはここで作成するノードです。
ノードのソースを編集してグリッパーを開けましょう。
まずはヘッダーファイルに下記を追加します。
1
2
3
4
5
6
#include <ros/ros.h>
#include <moveit/move_group_interface/move_group_interface.h>
/***** ここから追加 *****/
#include <actionlib/client/simple_action_client.h>
#include <control_msgs/GripperCommandAction.h>
/***** ここまで追加 *****/
つぎにノードの初期化あたりに下記でグリッパーのアクションクリアンとを初期化します。
1
2
3
4
5
6
7
8
9
10
11
12
  arm.setPoseReferenceFrame("base_link");

  /***** ここから追加 *****/
  actionlib::SimpleActionClient<control_msgs::GripperCommandAction> gripper(
      "/crane_plus_gripper/gripper_command",
      "true");
  gripper.waitForServer();
  /***** ここまで追加 *****/

  // Prepare
  ROS_INFO("Moving to prepare pose");
  geometry_msgs::PoseStamped pose;
最後に、マニピュレータを移動したあとに下記を追加してグリッパーを開けます。
1
2
3
4
5
6
7
8
9
10
11
12
13
14
15
16
17
18
19
20
  if (!arm.move()) {
    ROS_WARN("Could not move to prepare pose");
    return 1;
  }

  /***** ここから追加 *****/
  // Open gripper
  ROS_INFO("Opening gripper");
  control_msgs::GripperCommandGoal goal;
  goal.command.position = 0.1;
  gripper.sendGoal(goal);
  bool finishedBeforeTimeout = gripper.waitForResult(ros::Duration(30));
  if (!finishedBeforeTimeout) {
    ROS_WARN("Gripper open action did not complete");
    return 1;
  }
  /***** ここまで追加 *****/

  ros::shutdown();
  return 0;
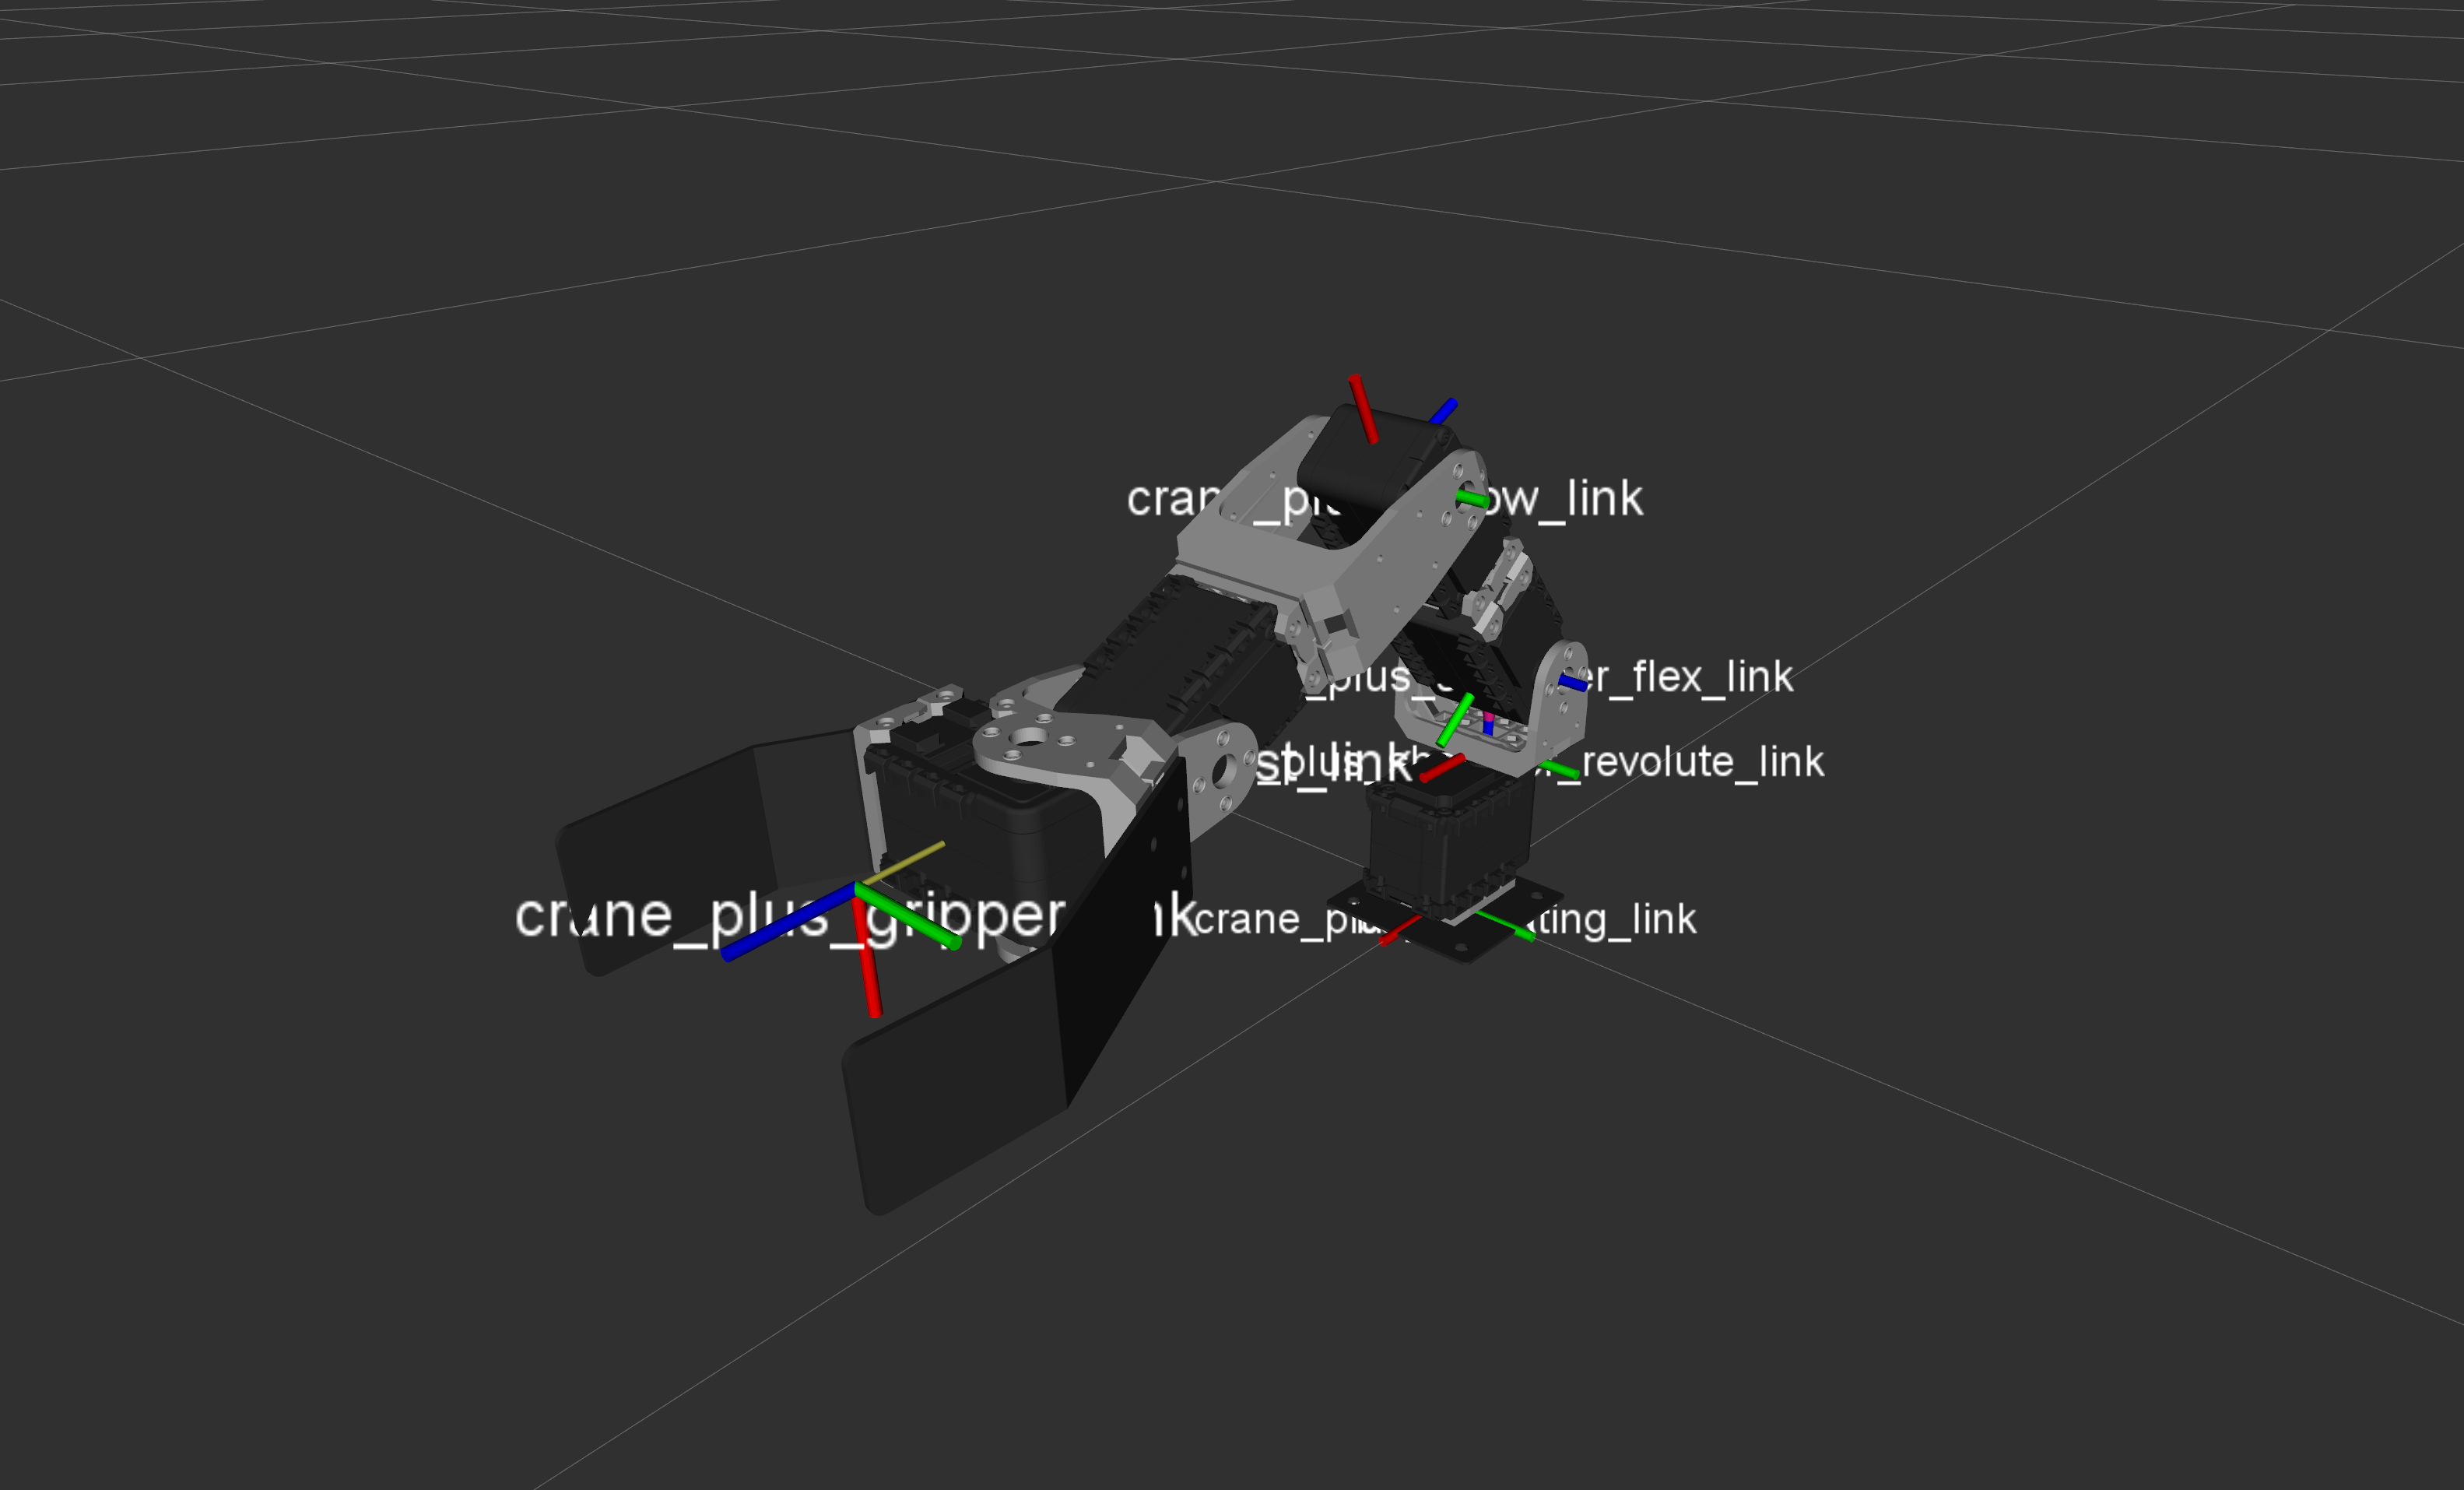
ノードをコンパイルし実行すると以下のようにグリッパーが開きます。
下記は今回のソース変更です。3箇所を編集しました。
1
2
3
4
5
6
7
8
9
10
11
12
13
14
15
16
17
18
19
20
21
22
23
24
25
26
27
28
29
30
31
32
33
34
35
36
37
38
39
40
41
42
43
44
45
46
47
48
49
50
51
52
53
54
55
56
57
#include <ros/ros.h>
#include <moveit/move_group_interface/move_group_interface.h>
/***** ここから追加 *****/
#include <actionlib/client/simple_action_client.h>
#include <control_msgs/GripperCommandAction.h>
/***** ここまで追加 *****/

int main(int argc, char **argv) {
  ros::init(argc, argv, "pickandplacer");
  ros::NodeHandle nh;

  ros::AsyncSpinner spinner(2);
  spinner.start();

  moveit::planning_interface::MoveGroupInterface arm("arm");
  arm.setPoseReferenceFrame("base_link");

  /***** ここから追加 *****/
  actionlib::SimpleActionClient<control_msgs::GripperCommandAction> gripper(
      "/crane_plus_gripper/gripper_command",
      "true");
  gripper.waitForServer();
  /***** ここまで追加 *****/

  // Prepare
  ROS_INFO("Moving to prepare pose");
  geometry_msgs::PoseStamped pose;
  pose.header.frame_id = "base_link";
  pose.pose.position.x = 0.2;
  pose.pose.position.y = 0.0;
  pose.pose.position.z = 0.1;
  pose.pose.orientation.x = 0.0;
  pose.pose.orientation.y = 0.707106;
  pose.pose.orientation.z = 0.0;
  pose.pose.orientation.w = 0.707106;

  arm.setPoseTarget(pose);
  if (!arm.move()) {
    ROS_WARN("Could not move to prepare pose");
    return 1;
  }

  /***** ここから追加 *****/
  ROS_INFO("Opening gripper");
  control_msgs::GripperCommandGoal goal;
  goal.command.position = 0.1;
  gripper.sendGoal(goal);
  bool finishedBeforeTimeout = gripper.waitForResult(ros::Duration(30));
  if (!finishedBeforeTimeout) {
    ROS_WARN("Gripper open action did not complete");
    return 1;
  }
  /***** ここまで追加 *****/

  ros::shutdown();
  return 0;
}
このソースは以下のURLでダウンロード可能です。
https://github.com/gbiggs/rsj_2017_pick_and_placer/tree/open_gripper
下記のように自分のワークスペースに入れて利用できます。
1
2
3
4
5
6
$ cd ~/crane_plus_ws/src
$ git clone https://github.com/gbiggs/rsj_2017_pick_and_placer
$ git checkout open_gripper
$ cd ~/crane_plus_ws
$ catkin_make
$ rosrun rsj_2017_pick_and_placer pick_and_placer
編集されたC++ファイルは以下です。
https://github.com/gbiggs/rsj_2017_pick_and_placer/blob/open_gripper/src/pick_and_placer.cpp
ピッキングタスクを行う
本セクションではマニピュレータを利用して机の上の物を運びます。
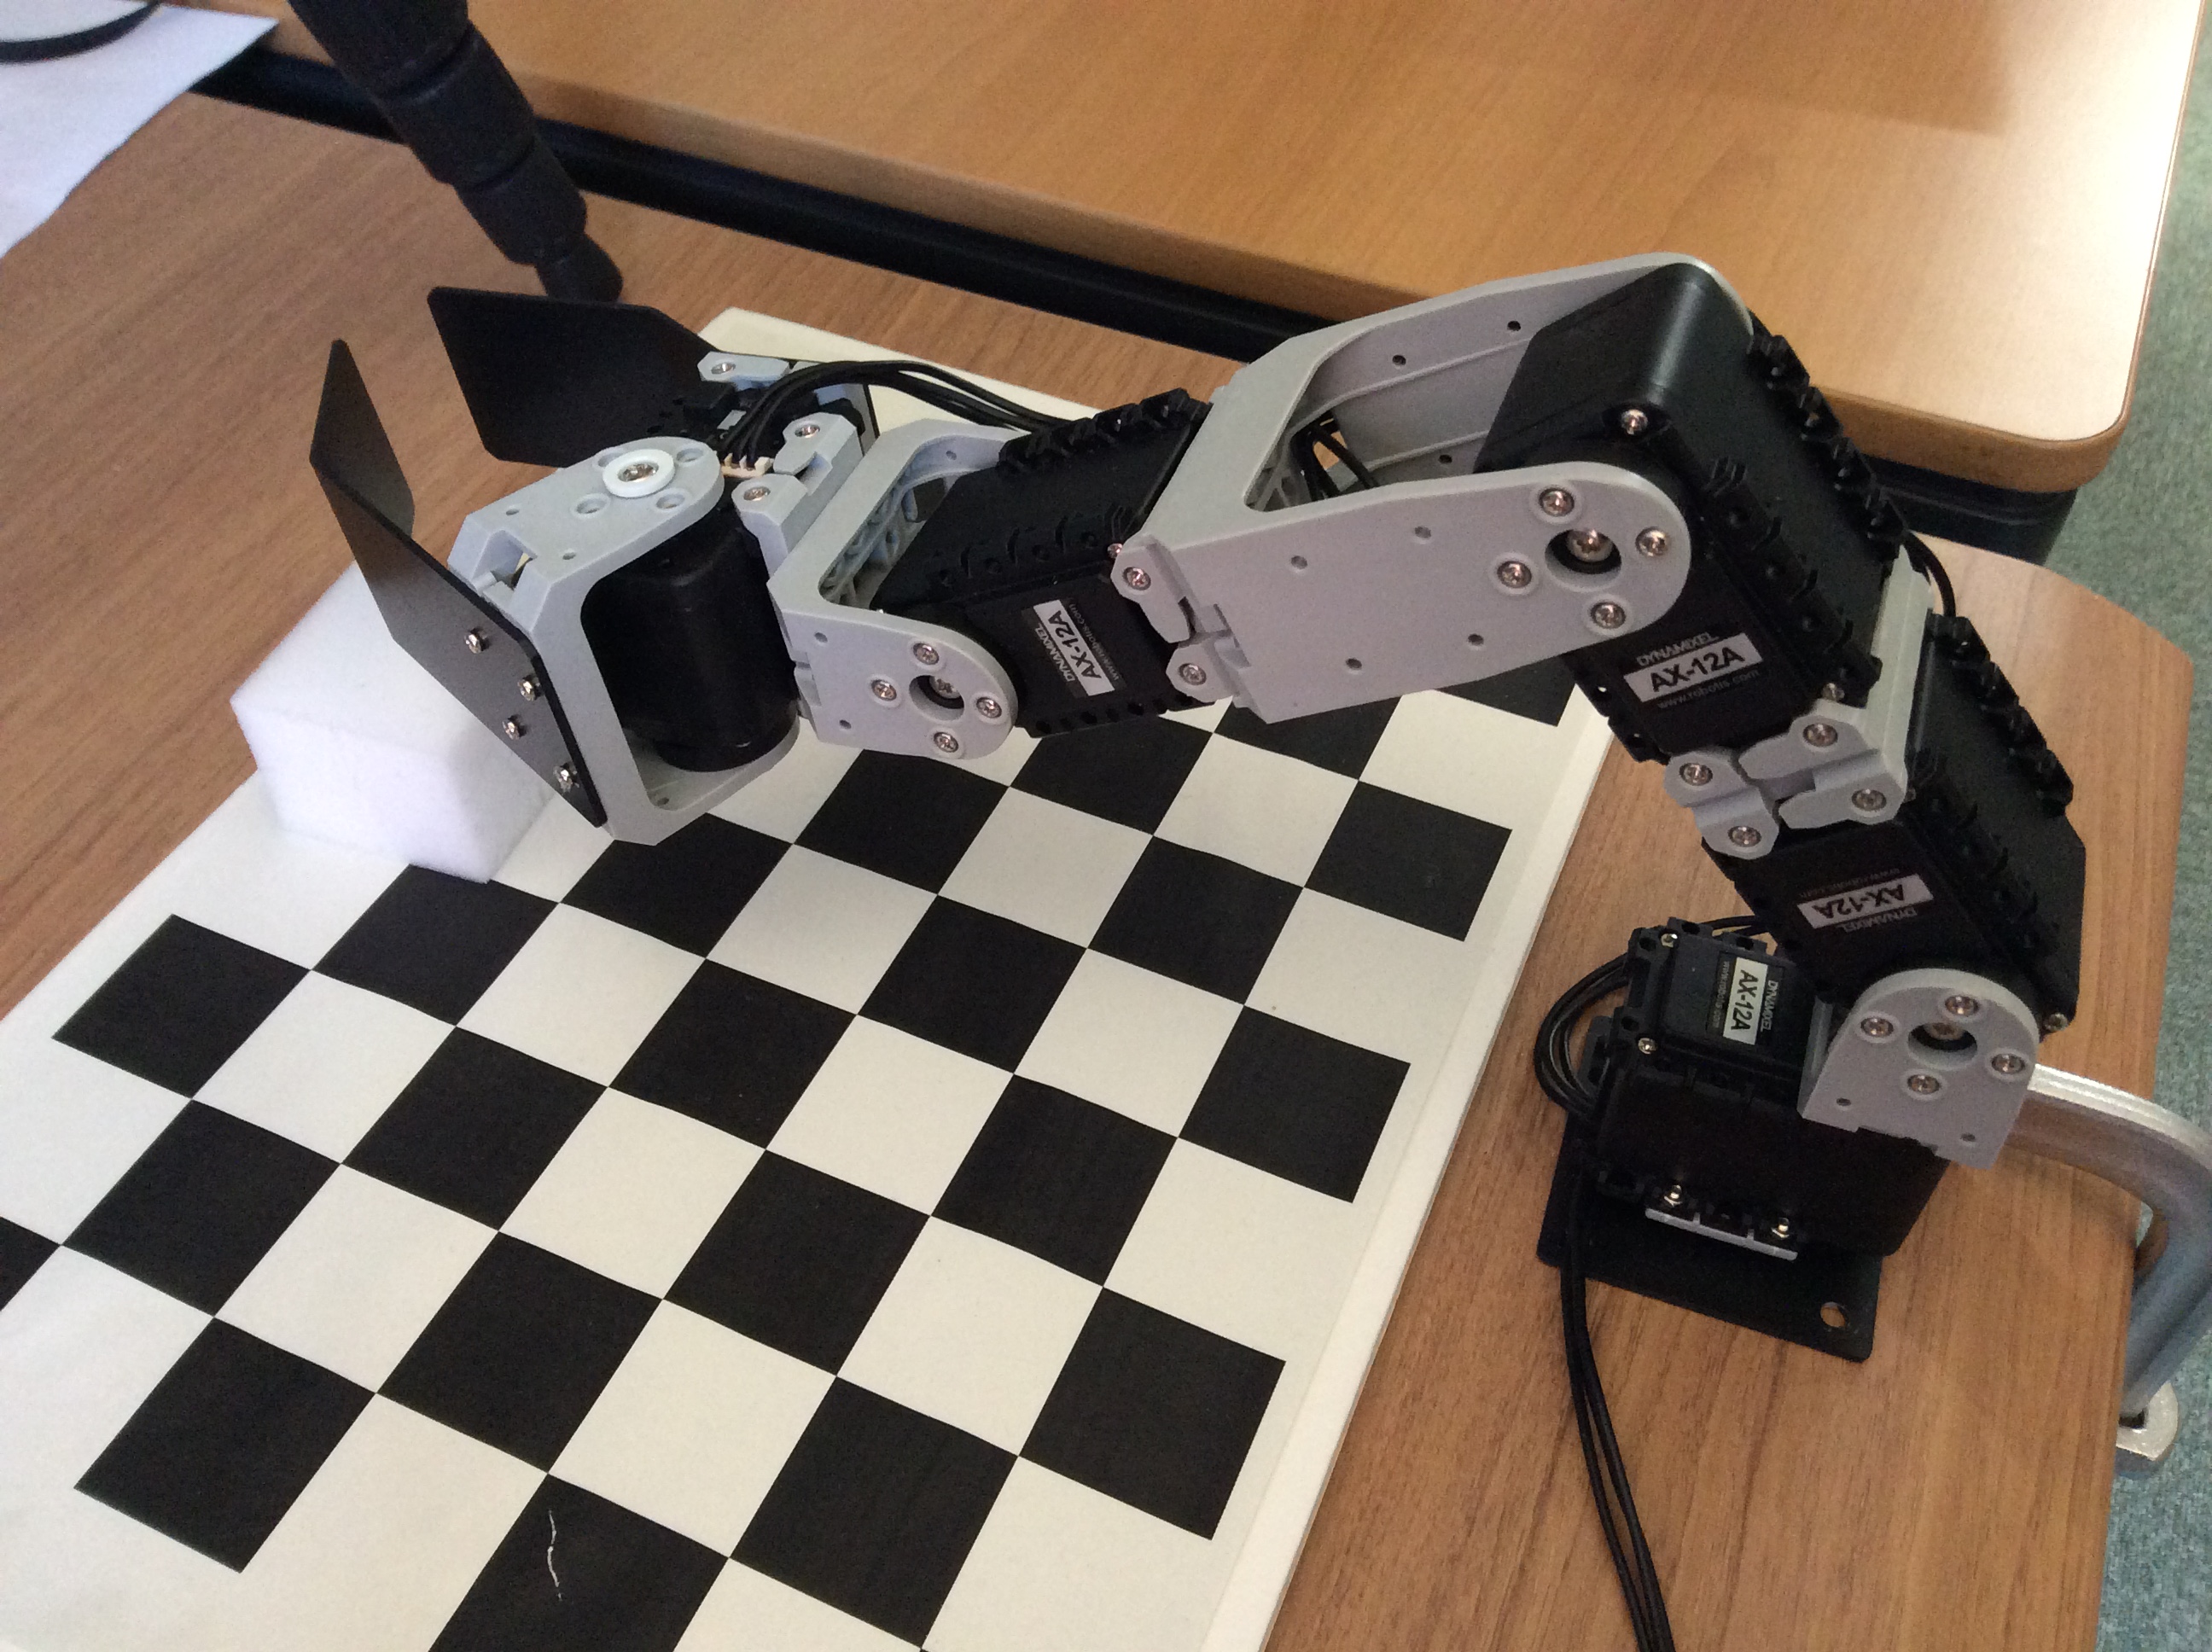
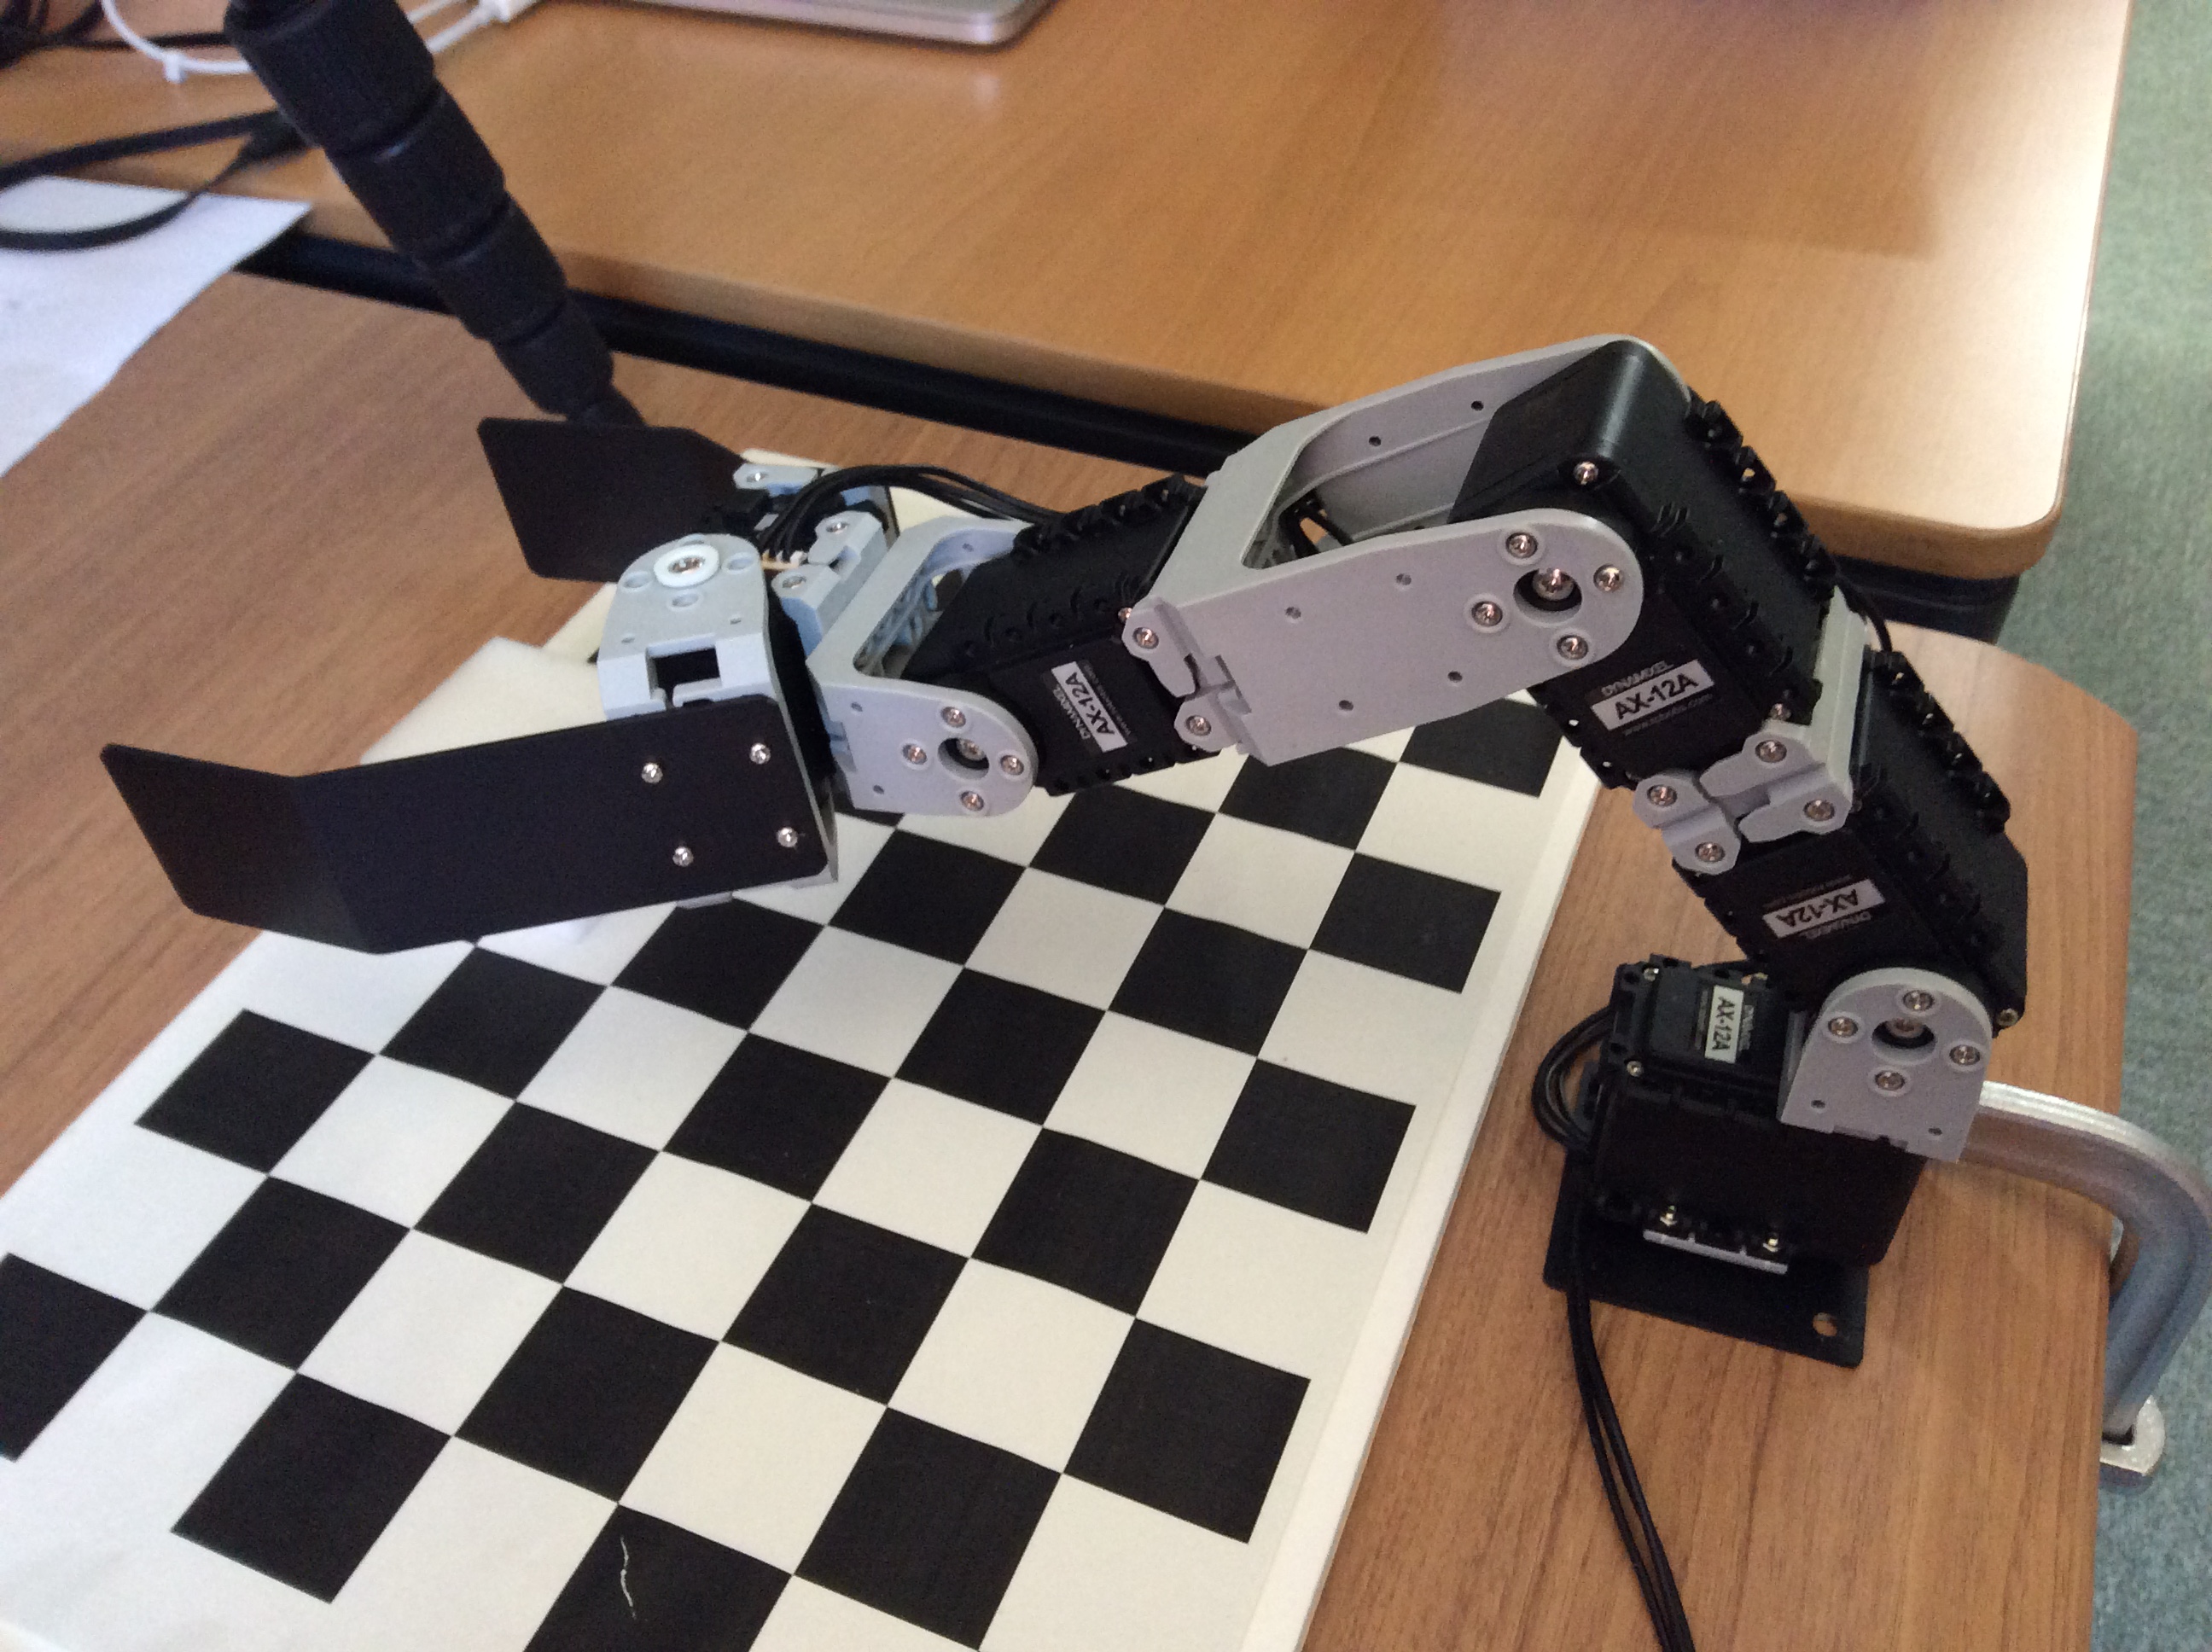
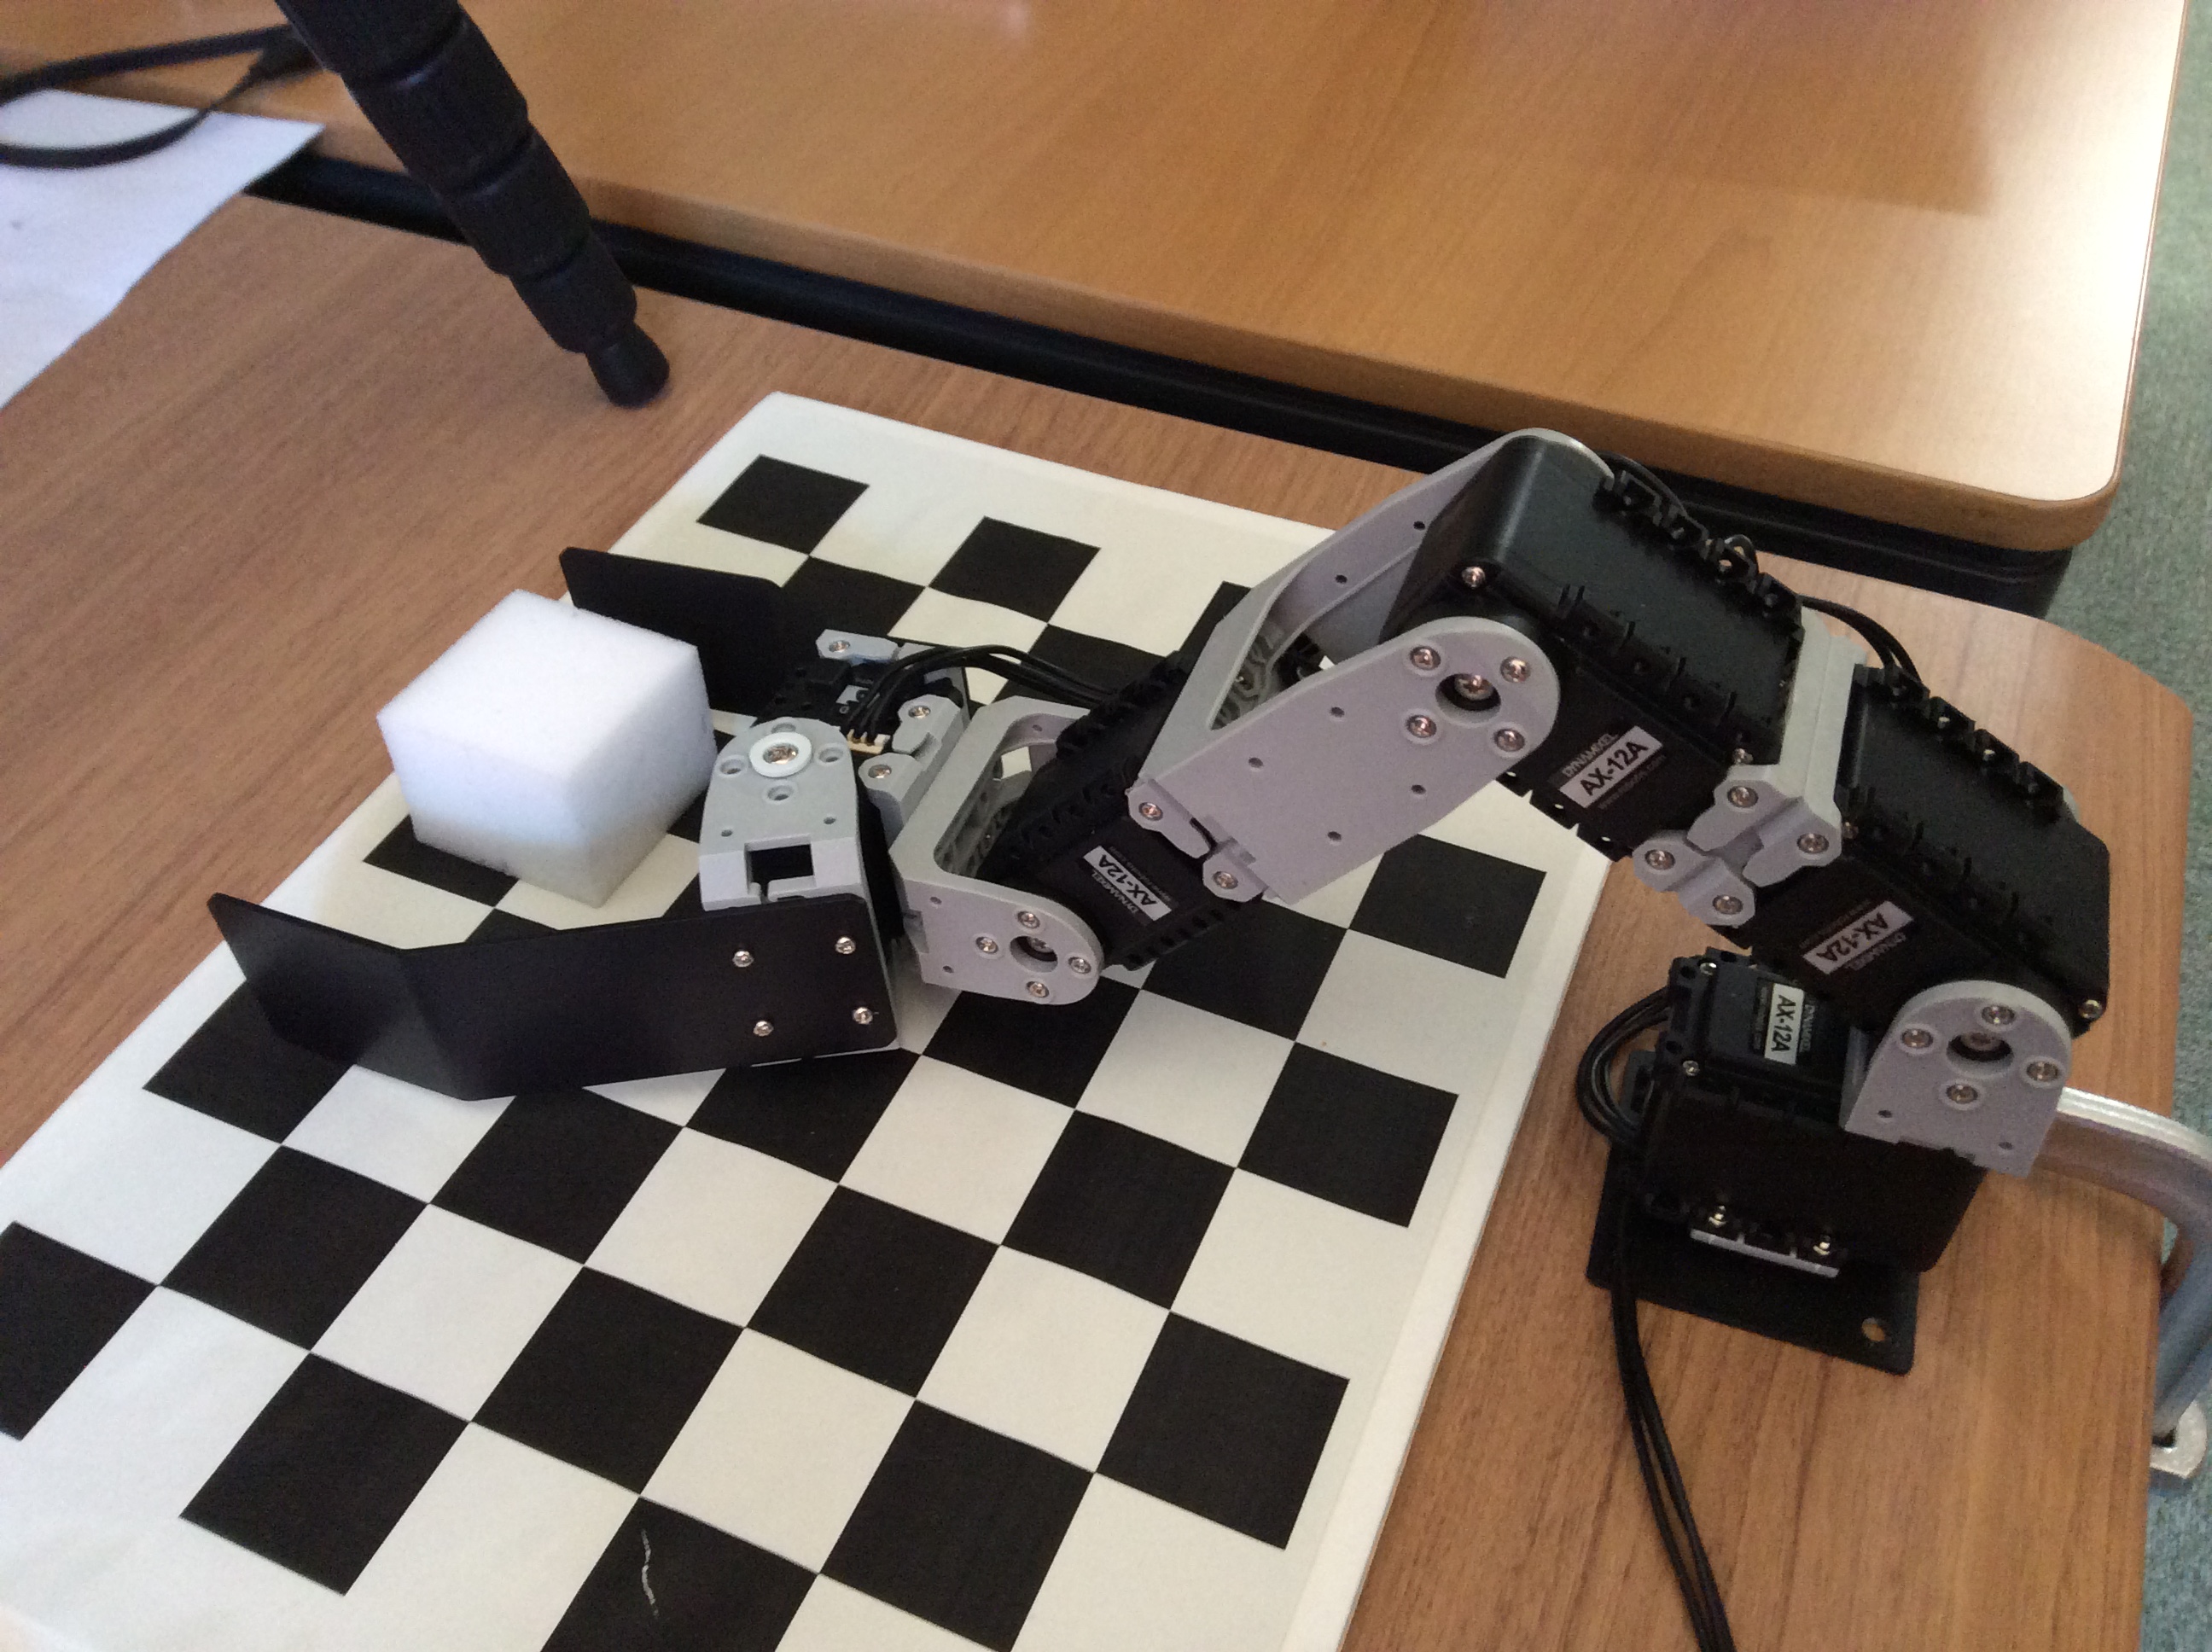
上記のマニピュレータを机の上に移動することとグリッパーを開けることは「ピッキング」というタスクの1番目と2番目のステップです。ピッキングタスクの全部を見ると、以下のようになります。
-
アプローチのスタート点に移動
的の物体の近くに移動して、持つための角度に合わせる [pre-grasp pose]
-
グリッパーを準備する
物体を持つためにグリッパーを開ける
-
アプローチを実行する
グリッパーが物体の周りになるようにアプローチベクターに沿って、グラスプポーズに移動する [approach、grasp pose]
-
グリッパーを閉じて物体を持つ
グリッパーが物体に充分力を与えるまでに閉じる [grasp]
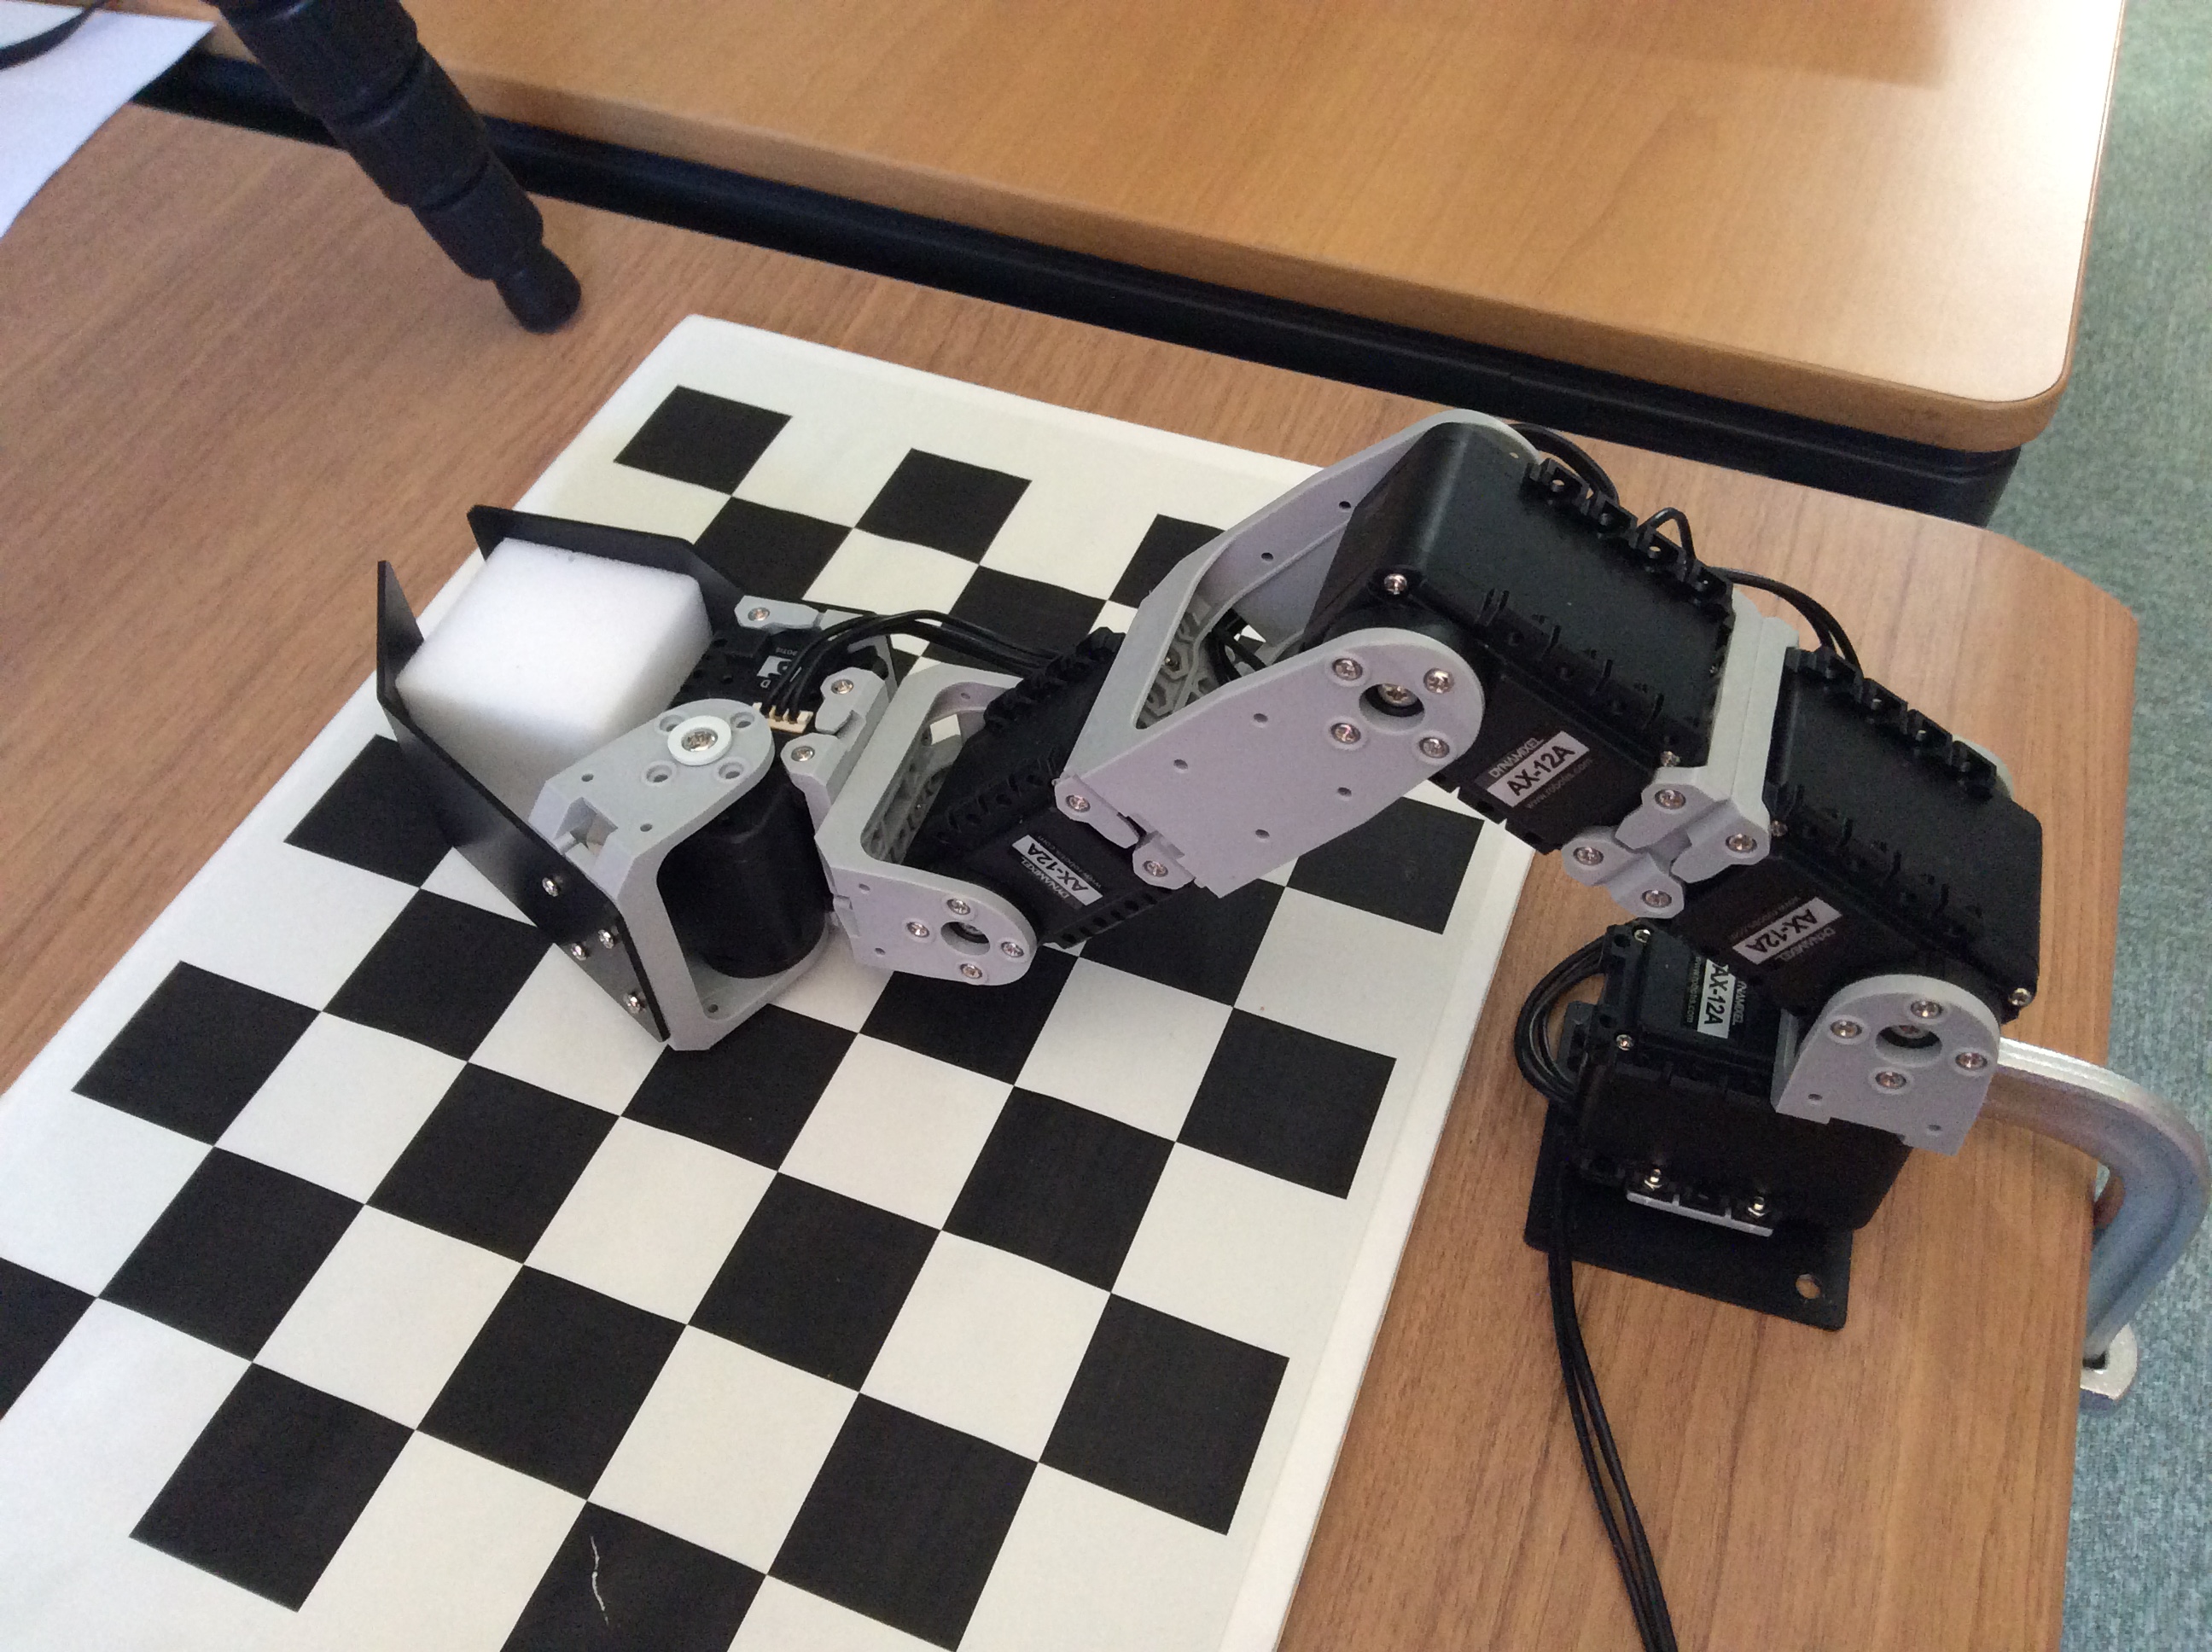
-
リトリートを実行する
物体を持ちながらテーブル等から離れる(アプローチの反対方向ではない場合もある) [retreat, post-grasp post]
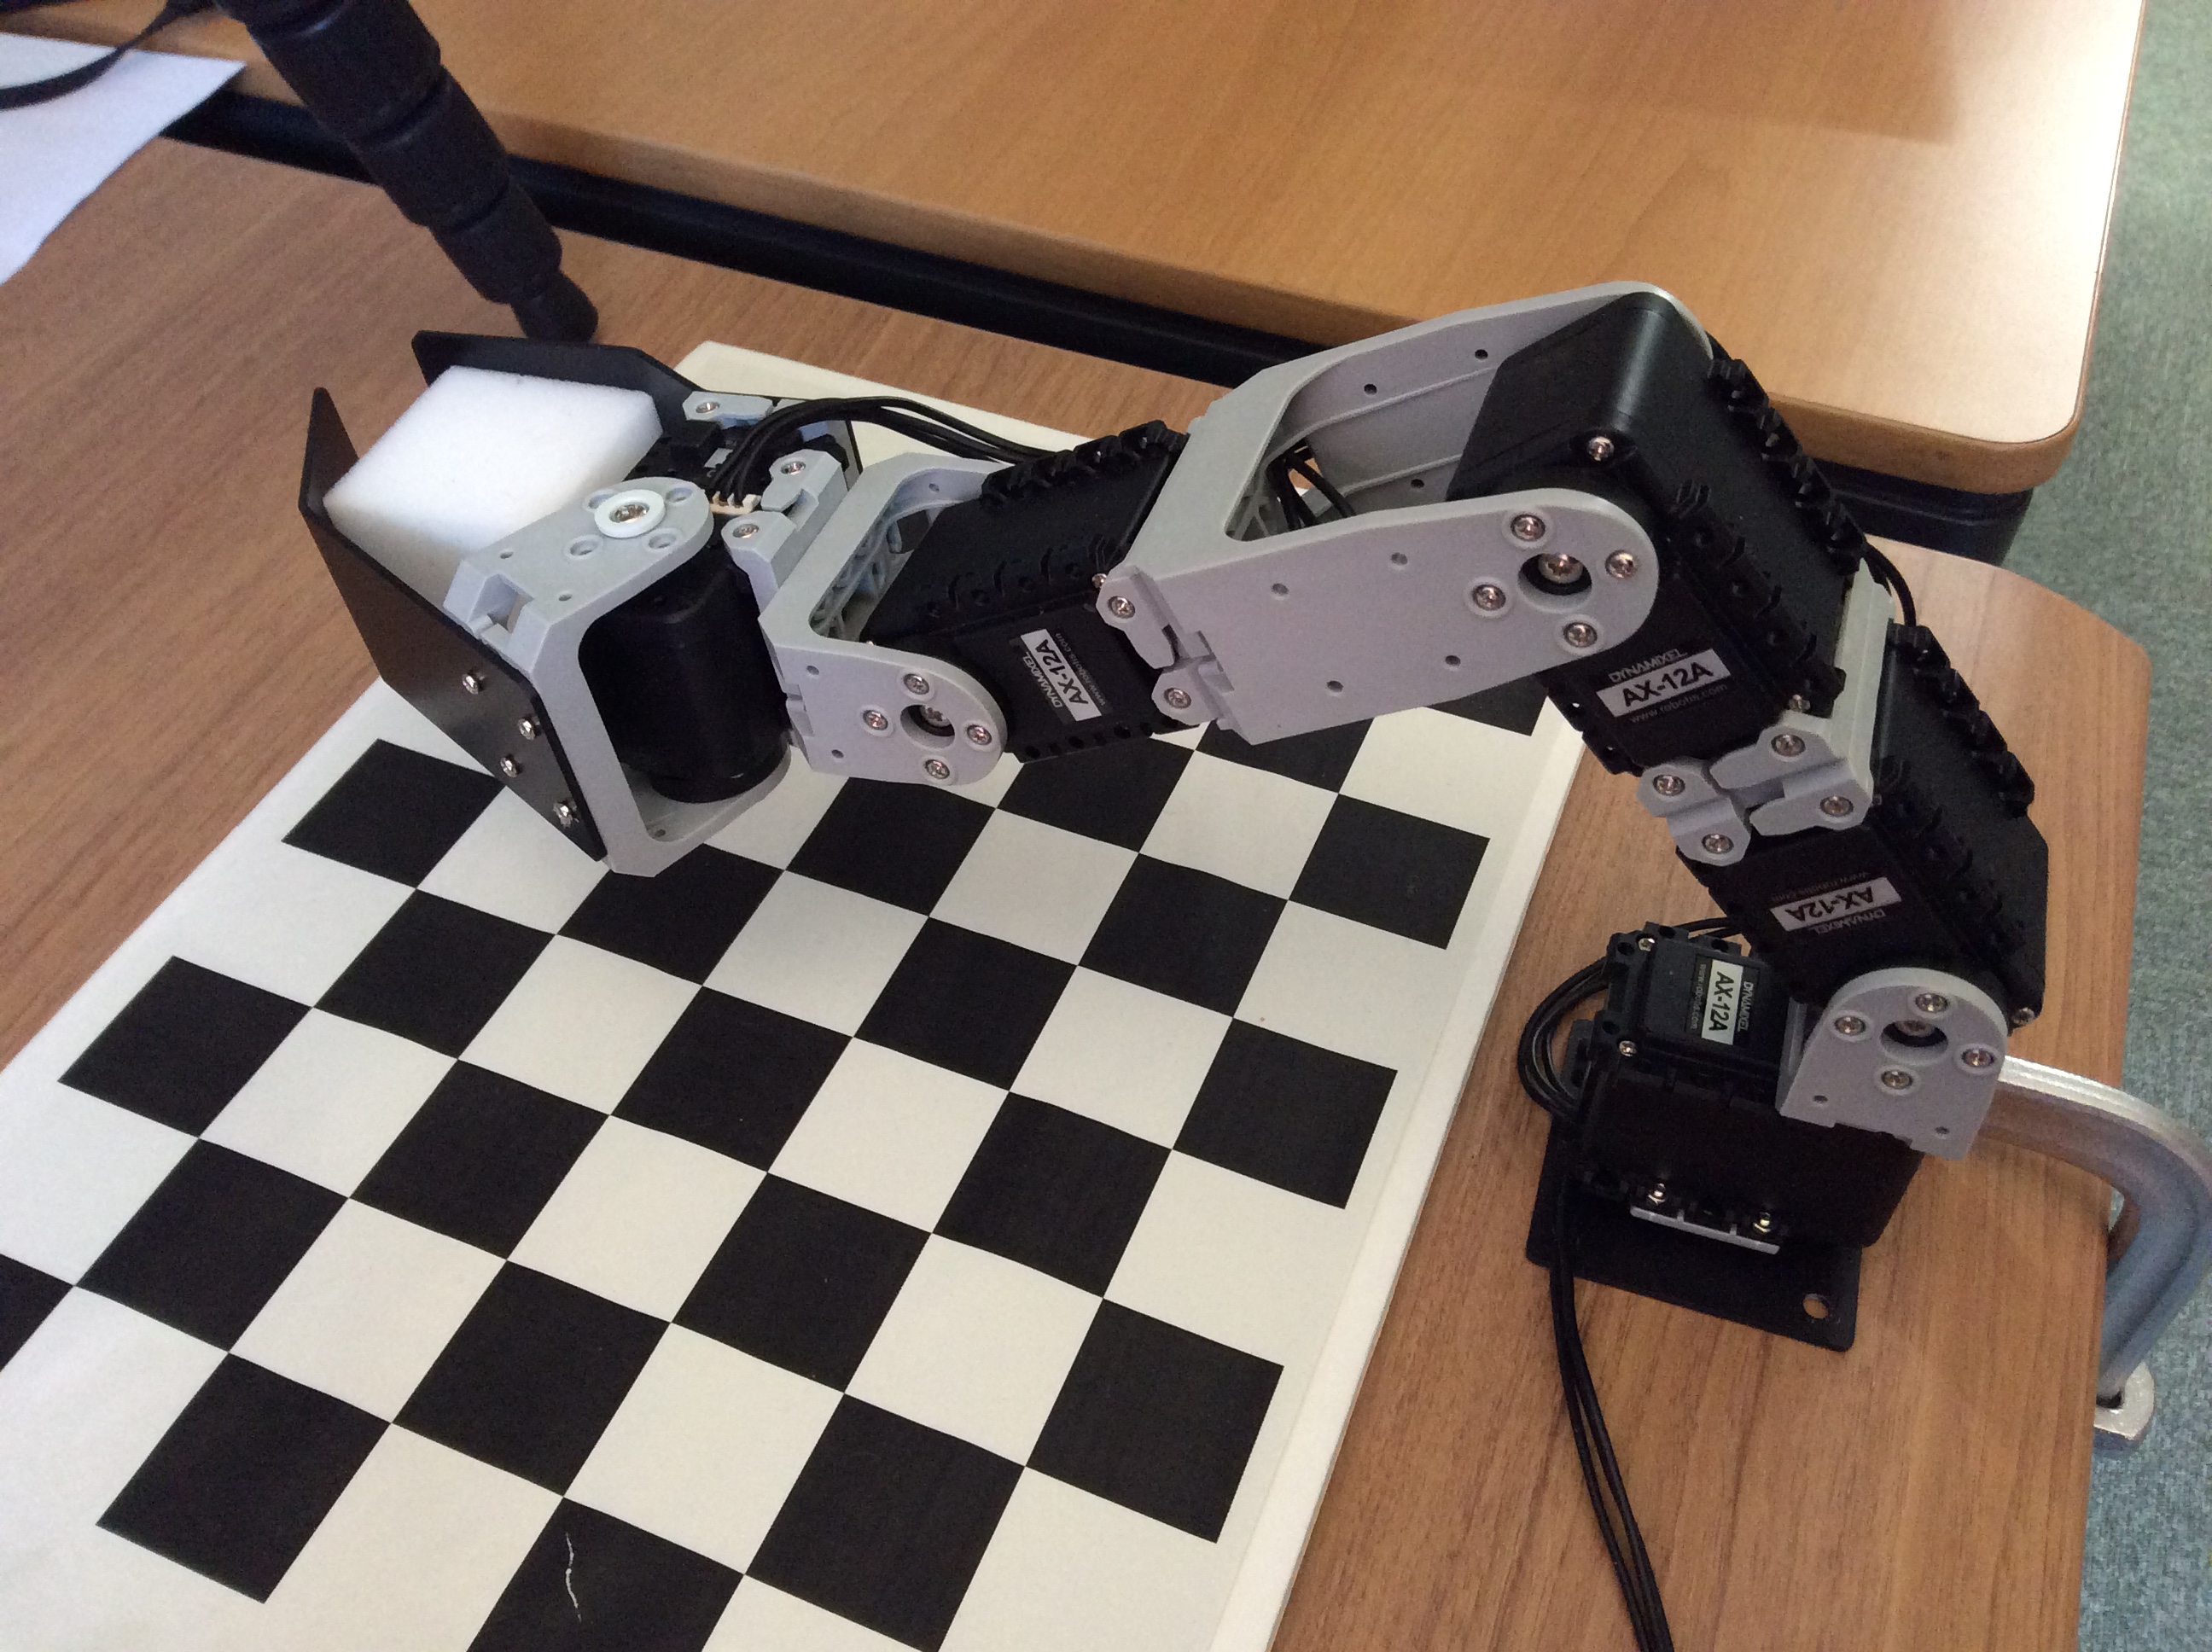
前セクションでステップ1と2を実装しました。次に下記のソースをノードに追加してステップ3から5を実装します。
1
2
3
4
5
6
7
8
9
10
11
12
13
14
15
16
17
18
19
20
21
22
23
24
25
26
27
28
29
30
31
32
33
34
35
36
37
38
  bool finishedBeforeTimeout = gripper.waitForResult(ros::Duration(30));
  if (!finishedBeforeTimeout) {
    ROS_WARN("Gripper open action did not complete");
    return 1;
  }

  /***** ここから追加 *****/
  // Approach
  ROS_INFO("Executing approach");
  pose.pose.position.z = 0.05;
  arm.setPoseTarget(pose);
  if (!arm.move()) {
    ROS_WARN("Could not move to grasp pose");
    return 1;
  }

  // Grasp
  ROS_INFO("Grasping object");
  goal.command.position = 0.015;
  gripper.sendGoal(goal);
  finishedBeforeTimeout = gripper.waitForResult(ros::Duration(30));
  if (!finishedBeforeTimeout) {
    ROS_WARN("Gripper close action did not complete");
    return 1;
  }

  // Retreat
  ROS_INFO("Retreating");
  pose.pose.position.z = 0.1;
  arm.setPoseTarget(pose);
  if (!arm.move()) {
    ROS_WARN("Could not move to retreat pose");
    return 1;
  }
  /***** ここまで追加 *****/

  ros::shutdown();
  return 0;
ノードをコンパイルして実行してみましょう。成功であればマニピュレータはピッキングタスクを行います。
これでROS上でMoveIt!とマニピュレータを利用して、ピック・アンド・プレースの前半が実装できました。
下記は今回のソース変更です。1箇所を編集しました。
1
2
3
4
5
6
7
8
9
10
11
12
13
14
15
16
17
18
19
20
21
22
23
24
25
26
27
28
29
30
31
32
33
34
35
36
37
38
39
40
41
42
43
44
45
46
47
48
49
50
51
52
53
54
55
56
57
58
59
60
61
62
63
64
65
66
67
68
69
70
71
72
73
74
75
76
77
78
79
80
#include <ros/ros.h>
#include <moveit/move_group_interface/move_group_interface.h>
#include <actionlib/client/simple_action_client.h>
#include <control_msgs/GripperCommandAction.h>

int main(int argc, char **argv) {
  ros::init(argc, argv, "pickandplacer");
  ros::NodeHandle nh;

  ros::AsyncSpinner spinner(2);
  spinner.start();

  moveit::planning_interface::MoveGroupInterface arm("arm");
  arm.setPoseReferenceFrame("base_link");

  actionlib::SimpleActionClient<control_msgs::GripperCommandAction> gripper(
      "/crane_plus_gripper/gripper_command",
      "true");
  gripper.waitForServer();

  // Prepare
  ROS_INFO("Moving to prepare pose");
  geometry_msgs::PoseStamped pose;
  pose.header.frame_id = "base_link";
  pose.pose.position.x = 0.2;
  pose.pose.position.y = 0.0;
  pose.pose.position.z = 0.1;
  pose.pose.orientation.x = 0.0;
  pose.pose.orientation.y = 0.707106;
  pose.pose.orientation.z = 0.0;
  pose.pose.orientation.w = 0.707106;
  arm.setPoseTarget(pose);
  if (!arm.move()) {
    ROS_WARN("Could not move to prepare pose");
    return 1;
  }

  ROS_INFO("Opening gripper");
  control_msgs::GripperCommandGoal goal;
  goal.command.position = 0.1;
  gripper.sendGoal(goal);
  bool finishedBeforeTimeout = gripper.waitForResult(ros::Duration(30));
  if (!finishedBeforeTimeout) {
    ROS_WARN("Gripper open action did not complete");
    return 1;
  }

  /***** ここから追加 *****/
  // Approach
  ROS_INFO("Executing approach");
  pose.pose.position.z = 0.05;
  arm.setPoseTarget(pose);
  if (!arm.move()) {
    ROS_WARN("Could not move to grasp pose");
    return 1;
  }

  // Grasp
  ROS_INFO("Grasping object");
  goal.command.position = 0.015;
  gripper.sendGoal(goal);
  finishedBeforeTimeout = gripper.waitForResult(ros::Duration(30));
  if (!finishedBeforeTimeout) {
    ROS_WARN("Gripper close action did not complete");
    return 1;
  }

  // Retreat
  ROS_INFO("Retreating");
  pose.pose.position.z = 0.1;
  arm.setPoseTarget(pose);
  if (!arm.move()) {
    ROS_WARN("Could not move to retreat pose");
    return 1;
  }
  /***** ここまで追加 *****/

  ros::shutdown();
  return 0;
}
上述のソースは以下のURLでダウンロード可能です。
https://github.com/gbiggs/rsj_2017_pick_and_placer/tree/picking
下記のように自分のワークスペースに入れて利用できます。
1
2
3
4
5
6
$ cd ~/crane_plus_ws/src
$ git clone https://github.com/gbiggs/rsj_2017_pick_and_placer
$ git checkout picking
$ cd ~/crane_plus_ws
$ catkin_make
$ rosrun rsj_2017_pick_and_placer pick_and_placer
編集されたC++ファイルは以下です。
https://github.com/gbiggs/rsj_2017_pick_and_placer/blob/picking/src/pick_and_placer.cpp
追加の課題
以上はMoveIt!の基本操作です。下記は、MoveIt!とROSをより効率的に利用するための説明です。
トピックでピックの場所を受信
実装したノードは決まっている所((x: 0.2, y: 0.0))にしかピッキングできません。従来のロボットワークセルでは、決まっている所にタスクを行うことが普通です。しかし、将来の産業ロボットには、そしてサービスロボットにも、センサーデータによって物体の場所を判断して、そしてピッキングします。
上記で実装したノードを、ROSのトピックから受信した場所にあるブロックをピッキングするように変更しましょう。ROSトピックでデータを受信することはROSの基本操作の「サーボの状態を確認」セクションで学んだように、コールバックを利用します。
ノードは、arm等の変数を利用しています。トピックコールバックでマニピュレータを操作したいので、arm等をコールバックで利用することが必要です。しかし、コールバックは違う関数のでmain関数にあるarmやgripperの変数にアクセスできません。
何かのデータを持って、トピックにサブスクライブして、そしてトピックコールバックでそのデータを利用するノードは基本的に暮らすとして実装します。(グローバル変数の利用も可能ですが、将来のメンテナンスの観点から考えるとグローバル変数は利用しない方がいいです。)
本セミナーでC++のクラス作成方法を説明しません。C++の参照文書(教科書等)に参照してください。
ということで、ピッキングタスクを行うノードの実装をクラスに変更し、トピックからブロックの位置を受信するようにします。
トピックのメッセージタイプにgeometry_msgs/Pose2Dは利用できます。
1
2
3
float64 x
float64 y
float64 theta
thetaを無視して、xとyだけでブロックの位置を示す。geometry_msgs/Pose2Dのヘッダーはgeometry_msgs/Pose2D.hです。下記のように追加します。
1
2
3
4
5
6
7
8
9
#include <ros/ros.h>
#include <moveit/move_group_interface/move_group_interface.h>
#include <actionlib/client/simple_action_client.h>
#include <control_msgs/GripperCommandAction.h>
/***** ここから追加 *****/
#include <geometry_msgs/Pose2D.h>
/***** ここまで追加 *****/

int main(int argc, char **argv) {
次にクラスのスケルトンを追加します。main関数の前に下記を追加します。
1
2
3
4
5
6
7
8
9
10
11
12
13
14
15
16
17
18
19
#include <geometry_msgs/Pose2D.h>

/***** ここから追加 *****/
class PickNPlacer {
 public:
  // コンストラクタ
  // クラスを初期化するための関数
  // クラスのインスタンスを作成すると自動的に呼ばれる
  explicit PickNPlacer(ros::NodeHandle& node_handle)
  {
    // クラスの初期化
  }

 private:
  // クラスのメンバー変数(クラスの中に存在し、クラスのメソッドでアクセスできる)
};
/***** ここまで追加 *****/

int main(int argc, char **argv) {
クラスとして実装するとarmやgripperはクラスのメンバー変数して、クラスメソッドをコールバックとして利用して、そしてコールバックからクラスのメンバー変数であるarmとgripperへアクセスすることが可能になります。
クラスのメンバー変数にarmとgripperを追加します。そして、トピックにサブスクライブするのでros::Subscriberのインスタンツもクラスのメンバー変数に入れます。
1
2
3
4
5
6
7
8
9
10
 private:
  // クラスのメンバー変数(クラスの中に存在し、クラスのメソッドでアクセスできる)
  /***** ここから追加 *****/
  moveit::planning_interface::MoveGroupInterface arm_;
  actionlib::SimpleActionClient<control_msgs::GripperCommandAction> gripper_;
  ros::Subscriber sub_;
  /***** ここまで追加 *****/
};

int main(int argc, char **argv) {
クラスのメンバー変数の初期化はコンストラクタで行います。2つの方法があり、メンバー変数のデータ型により選択します。
- 変数を作成する段階で初期化が必要の場合
- コンストラクタの頭に追加します。
arm_とgripper_はこのタイプです。 - 変数に初期化を作成する関数の結果を保存する場合
- コンストラクタのボディー内で初期化します。
sub_はnode_handle.subscribeを呼ぶまでに初期化できないのでこのタイプです。
コンストラクタに追加する初期化は下記の通りです。コンストラクタのボディ内に他のセットアップも追加しました。
1
2
3
4
5
6
7
8
9
10
11
12
13
14
class PickNPlacer {
 public:
  explicit PickNPlacer(ros::NodeHandle& node_handle)
  /***** ここから追加 *****/
      : arm_("arm"),
        gripper_("/crane_plus_gripper/gripper_command", "true") {
    arm_.setPoseReferenceFrame("base_link");
    arm_.setNamedTarget("vertical");
    arm_.move();
    gripper_.waitForServer();

    sub_ = node_handle.subscribe("/block", 1, &PickNPlacer::DoPick, this);
  /***** ここまで追加 *****/
  }
最後の行はトピックにサブスクライブします。ROSの基本操作の「サーボの状態を確認」セクションで学んだ方法から少し変わりました。
- `&PickNPlace::DoPick’
- クラスのメンバー関数をコールバックとして利用するのでコールバックになるメンバー関数をクラス名(
PickNPlace)から指定します。 this- コールバックに渡す
msg以外の引数を指定します。thisは、クラスへのポインターです。クラスのメンバー関数の最初の引数は実はクラスポインターですが、普段コンパイラーが隠すので見えません。ここでは指定しないとクラスのデータにアクセスできません。
コールバック自体をクラスに追加します。前回のmain()関数のソースを、ピッキングタスクの始まりからそのままコピーしました。(ros::shutdown()はコピーしません。)
コールバックは、メッセージをmsgという引数としてもらいます。msgの中のXとYデータをピッキングタスクのために利用します。
1
2
3
4
5
6
7
8
9
10
11
12
13
14
15
16
17
18
19
20
21
22
23
24
25
26
27
28
29
30
31
32
33
34
35
36
37
38
39
40
41
42
43
44
45
46
47
48
49
50
51
52
53
54
55
56
57
58
59
60
61
62
63
64
65
    sub_ = node_handle.subscribe("/block", 1, &PickNPlacer::DoPick, this);
  }

  /***** ここから追加 *****/
  void DoPick(geometry_msgs::Pose2D::ConstPtr const& msg) {
    // Prepare
    ROS_INFO("Moving to prepare pose");
    // 受信したポースに移動する
    geometry_msgs::PoseStamped pose;
    pose.header.frame_id = "base_link";
    pose.pose.position.x = msg->x;
    pose.pose.position.y = msg->y;
    pose.pose.position.z = 0.1;
    pose.pose.orientation.x = 0.0;
    pose.pose.orientation.y = 0.707106;
    pose.pose.orientation.z = 0.0;
    pose.pose.orientation.w = 0.707106;
    arm_.setPoseTarget(pose);
    if (!arm_.move()) {
      ROS_WARN("Could not move to prepare pose");
      return;
    }

    ROS_INFO("Opening gripper");
    control_msgs::GripperCommandGoal goal;
    goal.command.position = 0.1;
    gripper_.sendGoal(goal);
    bool finishedBeforeTimeout = gripper_.waitForResult(ros::Duration(30));
    if (!finishedBeforeTimeout) {
      ROS_WARN("Gripper open action did not complete");
      return;
    }

    // Approach
    ROS_INFO("Executing approach");
    pose.pose.position.z = 0.05;
    arm_.setPoseTarget(pose);
    if (!arm_.move()) {
      ROS_WARN("Could not move to grasp pose");
      return;
    }

    // Grasp
    ROS_INFO("Grasping object");
    goal.command.position = 0.015;
    gripper_.sendGoal(goal);
    finishedBeforeTimeout = gripper_.waitForResult(ros::Duration(30));
    if (!finishedBeforeTimeout) {
      ROS_WARN("Gripper close action did not complete");
      return;
    }

    // Retreat
    ROS_INFO("Retreating");
    pose.pose.position.z = 0.1;
    arm_.setPoseTarget(pose);
    if (!arm_.move()) {
      ROS_WARN("Could not move to retreat pose");
      return;
    }
  }
  /***** ここまで追加 *****/

 private:
  moveit::planning_interface::MoveGroupInterface arm_;
最後にmain()関数を編集します。
ノードをクラスとして実装するとき、ROSとノードハンドルの初期化はどこにするかを決めないとなりません。クラスのコンストラクタにするか、main()関数でクラスインスタンスを作成する前にするかという2つの選択があります。基本的にどちらでもいいですが、ノードを複数のクラスとして実装するときはmain()関数ですることが必要になることがあります。今回はmain()関数で行います。
main()関数の中身を削除し、以下のように変更します。
1
2
3
4
5
6
7
8
9
10
11
12
13
14
15
16
17
int main(int argc, char **argv) {
  /***** ここから追加 *****/
  ros::init(argc, argv, "pickandplacer");

  ros::AsyncSpinner spinner(2);
  spinner.start();

  ros::NodeHandle nh;
  PickNPlacer pnp(nh);

  // Wait until the node is shut down
  ros::waitForShutdown();

  ros::shutdown();
  return 0;
  /***** ここまで追加 *****/
}
9行目でノードの振る舞えを実装するクラスのインスタンスを作成し、ノードハンドルを渡します。12行めでmain()関数がすぐに終わらないように、シャットダウン信号を待ちます。ここで待っている間に、トピックコールバックがデータの到着次第呼ばれます。
ノードはトピックにサブスクライブすること以外の振る舞えがあれば、ros::waitForShutdown()を呼ぶことの代わりにクラスでメーンロープのような関数を追加し、12行目でそれを呼べばいいです。
これでクラースでノードを実装し、トピックから受信した座標でピッキングタスクを行うようにしました。コンパイルしてノードを起動してみましょう。
ノードをテストするために、ブロックの位置を送信します。このためにrostopicは利用できます。例えば上記のソースのようにトピックの名はblockであれば、端末で以下を実行するとノードに位置情報が送信できます。
1
$ rostopic pub -1 /block geometry_msgs/Pose2D "{x: 0.2, y: 0.0}"
注意:変更し始める前に、ソースのバックアップを作りましょう。
このソースは以下のURLでダウンロード可能です。
https://github.com/gbiggs/rsj_2017_pick_and_placer/tree/topic_picker
下記のように自分のワークスペースに入れて利用できます。
1
2
3
4
5
6
$ cd ~/crane_plus_ws/src
$ git clone https://github.com/gbiggs/rsj_2017_pick_and_placer
$ git checkout topic_picker
$ cd ~/crane_plus_ws
$ catkin_make
$ rosrun rsj_2017_pick_and_placer pick_and_placer
編集されたC++ファイルは以下です。
https://github.com/gbiggs/rsj_2017_pick_and_placer/blob/topic_picker/src/pick_and_placer.cpp
プレースタスクも行う
ピッキングタスクの逆は「place」(プレース、置くこと)です。
プレースの動きは基本的にピッイングの逆ですが、物体の置き方により動きは代わることもあります。CRANE+と本セミナーの物体(スポンジのブロック)の場合は、プレースはピッキングの逆で問題ありません。(落とすことでも問題ありませんが、少し無粋でしょう。)
ノードにピッキング後にプレースを行うソースを実装してみましょう。
まずはプレースを行うメンバー関数、DoPlace()、をノードのクラスに追加します。
1
2
3
4
5
6
7
8
9
10
11
12
13
14
15
16
17
18
19
20
21
22
23
24
25
26
27
28
29
30
31
32
33
34
35
36
37
38
39
40
41
42
43
44
45
46
47
48
49
50
51
52
53
54
55
56
57
58
59
60
61
62
63
64
65
    ROS_INFO("Pick complete");
    return true;
  }

  /***** ここから追加 *****/
  bool DoPlace() {
    // Prepare
    ROS_INFO("Moving to prepare pose");
    geometry_msgs::PoseStamped pose;
    pose.header.frame_id = "base_link";
    pose.pose.position.x = 0.1;
    pose.pose.position.y = -0.2;
    pose.pose.position.z = 0.1;
    pose.pose.orientation.x = 0.0;
    pose.pose.orientation.y = 0.707106;
    pose.pose.orientation.z = 0.0;
    pose.pose.orientation.w = 0.707106;
    arm_.setPoseTarget(pose);
    if (!arm_.move()) {
      ROS_WARN("Could not move to prepare pose");
      return false;
    }

    // Approach
    ROS_INFO("Executing approach");
    pose.pose.position.z = 0.05;
    arm_.setPoseTarget(pose);
    if (!arm_.move()) {
      ROS_WARN("Could not move to place pose");
      return false;
    }

    // Release
    ROS_INFO("Opening gripper");
    control_msgs::GripperCommandGoal goal;
    goal.command.position = 0.1;
    gripper_.sendGoal(goal);
    bool finishedBeforeTimeout = gripper_.waitForResult(ros::Duration(30));
    if (!finishedBeforeTimeout) {
      ROS_WARN("Gripper open action did not complete");
      return false;
    }

    // Retreat
    ROS_INFO("Retreating");
    pose.pose.position.z = 0.1;
    arm_.setPoseTarget(pose);
    if (!arm_.move()) {
      ROS_WARN("Could not move to retreat pose");
      return false;
    }

    // Rest
    goal.command.position = 0.015;
    gripper_.sendGoal(goal);
    arm_.setNamedTarget("vertical");
    arm_.move();

    ROS_INFO("Place complete");
    return true;
  }
  /***** ここまで追加 *****/

 private:
  moveit::planning_interface::MoveGroupInterface arm_;
次にピックとプレースを連続に行うメンバー関数を追加します。この関数はトピックのコールバックになるので、msgという引数をもらうようにします。
1
2
3
4
5
6
7
8
9
10
11
12
13
14
15
    sub_ = node_handle.subscribe("/block", 1, &PickNPlacer::DoPickAndPlace, this);
  }

  /***** ここから追加 *****/
  void DoPickAndPlace(geometry_msgs::Pose2D::ConstPtr const& msg) {
    if (DoPick(msg)) {
      DoPlace();
    }
  }
  /***** ここまで追加 *****/

  bool DoPick(geometry_msgs::Pose2D::ConstPtr const& msg) {
    // Prepare
    ROS_INFO("Moving to prepare pose");
    geometry_msgs::PoseStamped pose;
最後に、コンストラクタでトピックにサブスクライブするところで指定しているコールバックを変更します。DoPickAndPlace()メンバー関数にします。
1
2
3
4
5
6
7
8
9
    arm_.move();
    gripper_.waitForServer();

  /***** ここから変更 *****/
    sub_ = node_handle.subscribe("/block", 1, &PickNPlacer::DoPickAndPlace, this);
  /***** ここまで変更 *****/
  }

  void DoPickAndPlace(geometry_msgs::Pose2D::ConstPtr const& msg) {
ノードをコンパイルし実行し、別の端末で下記を実行するとマニピュレータはブロックを取って、違う所で置きます。
1
$ rostopic pub -1 /block geometry_msgs/Pose2D "{x: 0.1, y: 0.0}"
このソースは以下のURLでダウンロード可能です。
https://github.com/gbiggs/rsj_2017_pick_and_placer/tree/pickandplace
下記のように自分のワークスペースに入れて利用できます。
1
2
3
4
5
6
$ cd ~/crane_plus_ws/src
$ git clone https://github.com/gbiggs/rsj_2017_pick_and_placer
$ git checkout pickandplace
$ cd ~/crane_plus_ws
$ catkin_make
$ rosrun rsj_2017_pick_and_placer pick_and_placer
編集されたC++ファイルは以下です。
https://github.com/gbiggs/rsj_2017_pick_and_placer/blob/pickandplace/src/pick_and_placer.cpp
パラメータで振る舞えを変更
ピックの場所をトピックから受信するようにしたらノードは様々なアプリケーションで再利用できるようになりました。しかし、プレースの場所はまだソースでハードコードしたのでノードの再利用性が低いです。
プレースの場所を簡単に変更してアプリケーションに合わせるノードを作りましょう。プレースの場所をパラメータで設定できるようにします。
パラメータの値を保存する変数が必要です。クラスの他のメンバー変数と同じ所に追加します。パラメータサーバから読み込んだ値はここで保存し、実行中にここから利用します。
1
2
3
4
5
6
7
8
9
10
11
 private:
  moveit::planning_interface::MoveGroupInterface arm_;
  actionlib::SimpleActionClient<control_msgs::GripperCommandAction> gripper_;
  ros::Subscriber sub_;
  /***** ここから追加 *****/
  float place_x_;
  float place_y_;
  /***** ここまで追加 *****/
};

int main(int argc, char **argv) {
パラメータのロードをクラスのコンストラクタで行います。ros::param::param()関数を利用して、パラメータサーバから読み込みます。
1
2
3
4
5
6
7
8
9
10
11
12
13
14
class PickNPlacer {
 public:
  explicit PickNPlacer(ros::NodeHandle& node_handle)
      : arm_("arm"),
        gripper_("/crane_plus_gripper/gripper_command", "true") {
    /***** ここから追加 *****/
    ros::param::param<float>(
      "~place_x",
      place_x_,
      0.1);
    ros::param::param<float>("~place_y", place_y_, -0.2);
    /***** ここまで追加 *****/
    arm_.setPoseReferenceFrame(scene_task_frame_);
    arm_.setNamedTarget("vertical");
7行目から10行目は一つのパラメータの読み込みです。
ros::param::param<float>(- 関数を呼びます。テンプレート関数のでパラメータのデータ型(
float)を指定します。 "~place_x"- パラメータサーバ上のパラメータ名を指定します。
~で始まるので、ノードのネームスペース内のパラメータだと指定します。基本的に一つのノードだけで利用するパラメータはノードのネームスペース内に置くべきです。~を指定しないことはグローバルパラメータを利用するということです。 place_x_- 保存先を指定します。メンバー変数
place_x_に保存します。 0.1- ディフォルト値です。パラメータサーバに指定したパラメータがなかったら、この値は
place_x_に入れられます。
11行目はY座標のパラメータを同様に読み込みます。
パラメータの利用として、DoPlace()内のpose変数を初期化するところにpose.pose.position.xとpose.pose.position.yの値をパラメータからとるように変更します。
1
2
3
4
5
6
7
8
9
10
11
    pose.header.frame_id = "base_link";
    /***** ここから変更 *****/
    pose.pose.position.x = place_x_;
    pose.pose.position.y = place_y_;
    /***** ここまで変更 *****/
    pose.pose.position.z = 0.1;
    pose.pose.orientation.x = 0.0;
    pose.pose.orientation.y = 0.707106;
    pose.pose.orientation.z = 0.0;
    pose.pose.orientation.w = 0.707106;
    arm_.setPoseTarget(pose);
パラメータの設定は「ROSの基本操作」で学んだようにノードの起動時に行います。
1
2
3
$ cd ~/crane_plus_ws/src/
$ source devel/setup.bash
$ rosrun rsj_2017_pick_and_placer pick_and_placer _place_x:='0.1' _place_y:='-0.2'
パラメータ名の頭にアンダーバーを付けている理由は、パラメータはノードのネームスペース内であるからです。
下記のように、パラメータをlaunchファイルに指定することも可能です。<node>タグ内のでノードのネームスペース内になります。
1
2
3
4
  <node name="pickandplace" pkg="rsj_2017_pick_and_placer" type="pick_and_placer" output="screen">
    <param name="place_x" value="0.1"/>
    <param name="place_y" value="-0.2"/>
  </node>
ノードの他の値もパラメータで設定できるようにすると、さらに再利用しやすくなります。例えば、以下をパラメータにする価値があります。
- プランニングを行うタスクフレーム(
setPoseReferenceFrame()とframe_idに利用) - ピック前ポーズのZ値(机の上の高さ)
- ピックポーズのZ値
- プレース前ポーズのZ値
- プレースポーズのZ値
- グリッパーの開ける値
- グリッパーの閉める値
このソースは以下のURLでダウンロード可能です。
https://github.com/gbiggs/rsj_2017_pick_and_placer/tree/parameterised
下記のように自分のワークスペースに入れて利用できます。
1
2
3
4
5
6
$ cd ~/crane_plus_ws/src
$ git clone https://github.com/gbiggs/rsj_2017_pick_and_placer
$ git checkout parameterised
$ cd ~/crane_plus_ws
$ catkin_make
$ rosrun rsj_2017_pick_and_placer pick_and_placer
編集されたC++ファイルは以下です。
https://github.com/gbiggs/rsj_2017_pick_and_placer/blob/parameterised/src/pick_and_placer.cpp
MoveIt!のピックアンドプレース機能を利用
MoveIt!はピック・アンド・プレースを行うソースが含まれています。動きを自分で指定するより、この機能を利用するとMoveIt!の様々な機能(コリジョン・チェッカー等)が自動的に利用されます。
ノードのソースを編集して、MoveIt!の「pick」と「place」アクションを利用しましょう。
注意:下記のソースは、ROSの便利機能の「プラニングシーンの可視化」のソースから編集します。プラニングシーンの初期化を行わないとMoveIt!のピックアンドプレース機能は利用できません。
下記のヘッダーファイルを追加します。
1
2
3
4
5
6
7
8
#include <moveit_msgs/CollisionObject.h>
#include <shape_msgs/SolidPrimitive.h>
/***** ここから追加 *****/
#include <moveit_msgs/Grasp.h>
/***** ここまで追加 *****/

#include <string>
#include <vector>
DoPick関数の中身は下記の通りに変更します。
1
2
3
4
5
6
7
8
9
10
11
12
13
14
15
16
17
18
19
20
21
22
23
24
25
26
27
28
29
30
31
32
33
34
35
36
37
38
39
40
  bool DoPick(geometry_msgs::Pose2D::ConstPtr const& msg) {
    std::vector<moveit_msgs::Grasp> grasps;
    moveit_msgs::Grasp g;
    g.grasp_pose.header.frame_id = arm_.getPlanningFrame();
    g.grasp_pose.pose.position.x = msg->x;
    g.grasp_pose.pose.position.y = msg->y;
    g.grasp_pose.pose.position.z = 0.05;
    g.grasp_pose.pose.orientation.y = 0.707106;
    g.grasp_pose.pose.orientation.w = 0.707106;

    g.pre_grasp_approach.direction.header.frame_id = arm_.getPlanningFrame();
    g.pre_grasp_approach.direction.vector.z = -1;
    g.pre_grasp_approach.min_distance = 0.05;
    g.pre_grasp_approach.desired_distance = 0.07;

    g.post_grasp_retreat.direction.header.frame_id = arm_.getPlanningFrame();
    g.post_grasp_retreat.direction.vector.z = 1;
    g.post_grasp_retreat.min_distance = 0.05;
    g.post_grasp_retreat.desired_distance = 0.07;

    g.pre_grasp_posture.joint_names.resize(1, "crane_plus_moving_finger_joint");
    g.pre_grasp_posture.points.resize(1);
    g.pre_grasp_posture.points[0].positions.resize(1);
    g.pre_grasp_posture.points[0].positions[0] = 0.1;

    g.grasp_posture.joint_names.resize(1, "crane_plus_moving_finger_joint");
    g.grasp_posture.points.resize(1);
    g.grasp_posture.points[0].positions.resize(1);
    g.grasp_posture.points[0].positions[0] = 0.01;

    grasps.push_back(g);
    arm_.setSupportSurfaceName("table");
    ROS_INFO("Beginning pick");
    if (!arm_.pick("sponge", grasps)) {
      ROS_WARN("Pick failed");
      return false;
    }
    ROS_INFO("Pick complete");
    return true;
  }
上記はGraspを作成します。物体を持つための位置と角度、アプローチベクター、リトリートベクター及びグリッパーの開けると閉じる方法(直接ジョイント制御で)を指定します。
本方法の特に便利なことは、周りの物体で当たってもいい物が指定できます。このシナリオの場合には、テーブルとブロックが接触してもいいと指定しています。
DoPlace関数の中身は下記の通りに変更します。
1
2
3
4
5
6
7
8
9
10
11
12
13
14
15
16
17
18
19
20
21
22
23
24
25
26
27
28
29
30
31
32
  bool DoPlace() {
    std::vector<moveit_msgs::PlaceLocation> location;
    moveit_msgs::PlaceLocation p;
    p.place_pose.header.frame_id = arm_.getPlanningFrame();
    p.place_pose.pose.position.x = 0.2;
    p.place_pose.pose.position.y = 0;
    p.place_pose.pose.position.z = 0.1;
    p.place_pose.pose.orientation.y = 0.707106;
    p.place_pose.pose.orientation.w = 0.707106;

    p.pre_place_approach.direction.header.frame_id = arm_.getPlanningFrame();
    p.pre_place_approach.direction.vector.z = -1;
    p.pre_place_approach.min_distance = 0.05;
    p.pre_place_approach.desired_distance = 0.07;

    p.post_place_retreat.direction.header.frame_id = arm_.getPlanningFrame();
    p.post_place_retreat.direction.vector.z = 1;
    p.post_place_retreat.min_distance = 0.05;
    p.post_place_retreat.desired_distance = 0.07;

    p.post_place_posture.joint_names.resize(1, "crane_plus_moving_finger_joint");
    p.post_place_posture.points.resize(1);
    p.post_place_posture.points[0].positions.resize(1);
    p.post_place_posture.points[0].positions[0] = 0.1;

    location.push_back(p);
    arm_.setSupportSurfaceName("table");
    ROS_INFO("Beginning place");
    arm_.place("sponge", location);
    ROS_INFO("Place done");
    return true;
  }
DoPickと同様に、どこに物体をどうやって置くか指定します。
コンパイルして実行するとマニピュレータはよりスムーズな動きでピック・アンド・プレースを行います。
注意:MoveIt!は基本的に6DOF以上を持つマニピュレータ向きです。CRANE+のような4DOFマニピュレータのリチャブル・スペース(マニピュレータが届ける姿勢)はかなり限られていて、プラニングが難しいです。MoveIt!はプラニングで失敗することが多くなります。
このソースは以下のURLでダウンロード可能です。
https://github.com/gbiggs/rsj_2017_pick_and_placer/tree/moveit_pick_place_plugin
下記のように自分のワークスペースに入れて利用できます。
1
2
3
4
5
6
$ cd ~/crane_plus_ws/src
$ git clone https://github.com/gbiggs/rsj_2017_pick_and_placer
$ git checkout moveit_pick_place_plugin
$ cd ~/crane_plus_ws
$ catkin_make
$ rosrun rsj_2017_pick_and_placer pick_and_placer